Thursday, March 31, 2011

Wonderful memories with friends and shaving cream...

The other day I seen a post by my SBC (sister by choice) from Lusk, WY about her and friends making shaving cream paper.  I commented back that I remember teaching them how to do this and proceeded to dig up the photos!  What a hoot!!!  These were taken by my old camera and I didn't get the date taken off on 2 of them so bear with me.


This was the great group of gals I taught.  They are from left to right, top row...  Judy H. (thanks, Sandi!), Kelli, and Cindi.  Bottom row: Judy T., Sandi (SBC), Nona (SBC), and Tammi.


Here's Sandi poking at her paper and Nona giggling...   Your turn is coming, Nona!!


And here's Cindi and Nona getting into the cream...   I sure miss all these gals.  Such great memories!


Tuesday, March 29, 2011

Tune In Tuesday, It's Masculine!

I had another post planned for today then I realized it was Tune In Tuesday over on the TAC Savvy Projects blog and I like to play along when I can.  So, here's what's happening!  Today Debra Miller is the featured designer.  And you know I like to make masculine cards....


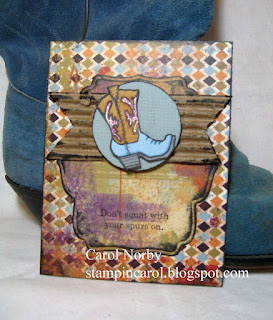
I still have my blue suede cowboy boots and one makes a great "easel" for my card featuring the set, Cowboy Boots!  Now, who woulda thought of that...   Wait...  I've done it before! LOL!  Anyway, I'm using Winchester SWIC and matching cardstock, Noir ink, Nesties Labels 4, the Super Jumbo Circle punch (2"), and Copic markers (B91, B95,E35, E55, V06, and N4).


This sketch layout is by Heather over on Oz-some Stamps.  How do you like the "banner"?  It's a piece of corrugated cardboard that I stripped the top layer of paper off before adding some more Noir ink for emphasis. And, of course, I added some bling on the boot using the Stardust Clear Gel pen.

After leaving a comment and/or rating my post please check out these other great projects (and the list will grow as the day and week goes on so check back!).....


Sunday, March 27, 2011

Ink Spots meeting & challenges

The Ink Spots met last Friday night at our LSS in Green Valley, AZ and boy, did we have fun!  Our ATC swap was really cool (I've already posted my Wild Thing card) and some of us finished our challenge boxes.  Susanne got these boxes at IKEA in Phoenix and we were to decorate them.


Here is the box, closed.  It has an elastic cord that holds down the top flap.  Kind of a pain...


Here it is, open. Holds a TAC catalog, Fall & Spring supplements, and a few invoices with ease!


Kathy got hers done!  She sprayed Walnut Inks on it with a flourish stencil resist, added a "key hole" and a gorgeous handmade flower (which we all got and I'll do something with it soon).

Ann's is a work in progress (and she doesn't like camera flashes...)


Sharon missed the last meeting so had no idea what we were doing so she made a photo explosion box.  It was really cool but she did get the box we used and hopefully will have it done by the next meeting in April.  I didn't get a picture of Susanne's (she uses it to hold her ATCs) as we got very busy then she had to leave. So, are you ready for mine? 


I also used Walnut Inks, Cherry Blossom,  Eucalyptus, and Cornflower.  I should have used Lilac instead of the Cornflower as it was more suited to the colors in the danglies.


These danglies were hooked to an ugly purple chain necklace...  Now thrown away.  I embossed the 2 geckos and horse from the retired Kokopelli set using gold and turquoise powders.  This was a hoot! I do plan on removing the elastic cord and adding some velcro to hold the flap down.  I may still do more stamping, especially on the top flap, when I get the velcro added.  What have you done lately??

Friday, March 25, 2011

A Pot of Gold challenge...


 Mischelle, CEO and owner of TAC, is having a challenge over on TAC Savvy Projects blog.  She specified certain items that must be on the card to take part in this challenge.  They are:

1. Stitching ~ can be stamped or stitched.
2. A punched item ~ punched with a clever lever or other punching tool.
3. Ribbon!
4. A button AND/OR a bow AND/OR a brad!
5. The color GREEN! (a little or a lot)
6. LAYERS! You must use more than 1 layer of cardstock!

I believe I have met this challenge in this card...


I used Mimi SWIC (still have a little left then I'll start playing with More Mimi!), Running Stitches and Sunflowers stamp sets, Nesties Labels 9 and 5More Mimi Ribbon, a green button, a small flower punch (can you find it??), Momento Tuxedo Black and Burnt Umber PH inks, white scrappers floss (I got a LOT of this but use Bone Scrappers Spool!), and various Copic markers.   Have you found the punched flower yet?


I also sponged a bit of Pink Petunia VM ink on the label while the paper was still in the die.  Kinda frames it a bit more, don't you think?   Have you found the punched flower yet?  Well, here it is!


It's under the button!! I really struggled to add a punched item to this card and I don't think the Labels counted.  This was a fun challenge and please check out other projects in this challenge!


Thursday, March 24, 2011

Wild thing... I only have eyes for you!

Tomorrow night is our monthly meeting of the Ink Spots stamp club.  I just finished my ATCs for the swap and the theme is Wild Things.  As I thought on this I remembered the retired Tiger stamp and the hypnotizing eyes that it has and away I went!


I used Terra Cotta Walnut Ink on the cards before stamping the tiger in Noir PH ink.  The text is computer generated.  I edged both pieces with Burnt Umber PH ink as I didn't want the white edges to show.


Don't you just love the eyes!!!  I colored them with a Copic marker then added a drop of Glossy Accents to them.  I'm sure the gals will like my cards.  What do you think?

Tuesday, March 22, 2011

Opal pendants

Last Saturday, Kathy, Susanne, and I attended the "Rubber Stamp and Scrapbook Expo" in Tucson, AZ.  The number of vendors was down from last year but After Midnight Art Stamps was there!!!  They headquarter in Sonoita, AZ and I have been to their store/home and visited with Linda and Tom - wonderful people!

After buying some Copic markers (to fill out some blank spots in my collection) I watched the make 'n take.  Janice was playing with Opal powders and making pins/pendants.  I made a blue one 2 years ago and posted it then.  Well, Linda was the teacher then and Janice this time and she did things different. So I had to take the "class"...   Here's what we did...  (And the photos do NOT do justice to the pendants...)


The top 2 are Janice's, the bottom left is Kathy's and the bottom right is mine.  It was so hard to get a good photo and get the sheen, details, colors, etc.


These 2 are Janice's. Aren't they just lovely?


This one definitely fit Kathy.  The stripes are strips of Fantasy Film and she added some "glass" and iridescent powders.  She's planning on putting a pen back on it as she doesn't do necklaces.


This is mine after I added the bail and chain.  This photo absolutely does NOT do justice to the pendant.  It's just gorjus!!  I deliberately offset the bail for fun. Susanne left us too quickly so I didn't get a photo of hers....

I'll get a photo of another make 'n take soon.  It was great fun but the cost to attend really jumped! I did see a few of my customers having a great time as did we!

Sunday, March 20, 2011

It's Spring and it's time to hop.... blogs, that is!

Well, Paper Wings is at it again!  We're hoppin' and poppin' (well, hoppin' anyway) for spring!  We already have a Chinese Elm tree in front of our house leafed out and GREEN!!  Beautiful! I love spring and having the windows open (and they have been LOTS) and hearing the birds - the quail are very vocal!

My card uses a hostess set called Spring Life (appropriate for the hop) and I used Lilly Anna SWIC paper and matching cardstock.  I love the brightness of the papers.  I also used a corner scissors and small flower punch, and, of course, the Stardust Clear gel pen


I used an old ink pad, Calypso K-pad....  I don't even know if it's available but I love the variety of colors in it.


As you can see, the Stardust gel pen picks up the ink colors while it glitters.  You KNOW it's my favorite bling maker!


I got these rhinestones somewhere so decided to use them as the flower centers.  And the flowers are popped up on foam mounting tape.

There are a few "angels" participating so after leaving a comment on my post (or a rating) please visit these other blogs for more spring projects!

Rita W
Shirley
Laura
Seleise

Kim
Laurie
Teresa


Friday, March 18, 2011

Geckos and the hot sand...

One thing there is a lot of here in southern Arizona is geckos!  Lots of them! Our cat even brings them into the house and plays catch and release! Beats me where they go as they're very fast and hard to catch. The other day I was at a meeting at our LSS in Green Valley, AZ and found a cool gecko punch by the Punch Bunch.  It's about double the size of the punch I have by Paper Shapers.  I looked at the punch and got to thinking it'd be fun to play with and work on one of my May classes at the store.  I also found some cool sand-pattern paper by Sugar Tree. Here's what I came up with...


The gold cardstock is not a glossy but more of a shimmer.  I also used a black Stardust gel pen to embellish the geckos.


I used foam mounting tape under the geckos to raise them off the sand like they're actually walking on it.  And how do you like my trails?  I've done something like this many years ago with my smaller punch and it turned out so cool!  I did use a stamp on the inside of the card made by Copper Leaf Creations about the hot desert and blazin' sun. 

So, what do you think? 
And come back Sunday evening for a blog hop through Paper Wings!  We'll be celebrating Spring!!

Wednesday, March 16, 2011

Going green?

Over on the TAC Savvy Projects blog Mischelle is showcasing "green" projects.  Now, you can take this 3 ways....  the color green or recycling or even both, if you're so inclined.  I decided to play with recycling and the color green is nowhere to be found in my project.  We are quite the coffee drinkers and I've been saving all those round "seals" between the plastic covers and the coffee.  Here's what become of one of those...


I've included a "seal" along with my card.  I ran the seal through a Cuttlebug embossing folder then cut it out with the Spellbinder Label 5 on my Wizard (now discontinued by Spellbinders).  I colored the raised diamond-plate pattern with a black copic marker for a bit more pop then lightly sanded.


 I stamped the car on white with Noir PH ink, cut it out, and adhered it with some foam mounting tape.  It is quite a bit darker than it shows here. Oh, see the black piece under it?  That's a piece of the black glossy like the main card front.  And the screw brads are perfect for embellishment! How cool!  My hubby really likes this card.  What do you think?

Here are some more "green" projects! Leave some love when you visit!


Monday, March 14, 2011

And I'm done flocking for now...

This is the last of the 3 cards.  It's considerably more complicated the the previous 2.  And it's my favorite!


Can you tell me which came first...  The chicken or the egg?  Well, according to the Bible God created the animals therefore they came first before reproducing.  Now that I'm got a bit off subject we'll get back to the card.  I used the same stamp set and papers (the pattern paper is double-sided) from the first 2 cards.  But I added the egg and little flowers!  The egg was made using my C.M. template and blades.  I've had these forever!!


I edged the egg after "cracking" it with Seascape PH ink to make it pop more. And I used foam mounting tape under the egg so that the chickie looks like he's coming out of it.   This card is my favorite of the 3.  The papers I got from the LSS works well with my design and stamps.  I like to use just 3 - 4 papers for all three cards for my class to show my students how a sketch change can make a real difference in the card.

What do you think?


Saturday, March 12, 2011

More flocking....

Are you ready to see up close and personal my other 2 flocked cards?  I really like how they turned out.


I used Brown Fun Flock on the little bunny.  And ribbon for embellishments along with inchies!  I stamped the bunny and text in Burnt Umber PH ink.  The paper started out with just the yellow dots so I added the text to pull the theme together.


Isn't he just delicious looking??  You can see the velvety softness in this picture. And I used various circle punches and foam mounting tape.

If you chose not to leave a comment I do appreciate you rating my post.  It's easy!  Just click on the rating you want to give.  I sure appreciate it!


Thursday, March 10, 2011

It's been flocked!

I've been working on my samples for one of my April classes at the LSS in Green Valley, AZ and the owner wanted me to use Fun Flock.  Well, I haven't played with the velvety stuff in quite some time but it all came back when I opened the jars.  I will be teaching 3 cards that progressively get harder, at least to my way of thinking.  I used a retired set called Easter - very appropriate for my cards.  So, without further ado...

Here's all three.  As you can see the bottom left is the easiest but I want my students to get a feel for the gluing and flocking.


Here it is by itself.  Very easy.


And doesn't this little chickie-poo just look so soft and cuddly? For glue I prefer using my Zig 2 Way glue pen.  I have pretty good control with it.  And of course I used Yellow Fun Flock!  The solid cardstocks are by Bazzill and the pattern paper is all from the LSS.

I will show the other cards shortly.  Are you getting ready for Easter?  I prefer inspirational cards but these are just great for young children and grandchildren!  Since the store will be keeping them until after Easter I'll probably make some more using TAC paper to send to our kids and grandkids.


Tuesday, March 8, 2011

Tune In Tuesday...

Today over on TAC Savvy Projects blog is Tune In Tuesday with a flower theme!  I wanted to participate but have been so busy getting ready for a class tomorrow at G.V.R. (Green Valley Recreation, AZ) and working on samples for my April classes at the LSS in Green Valley.  So, I did something easy.... And I mean, EASY!!


How's this for a bookmark?  And NO stamping!  I found these flowers at the LSS and this project will be a bonus for my students at my Inspiration Card class on March 21st.  I just used 1/2" glue dots, a 2 1/2" punched circle of orange cardstock, 12" of white ribbon, button, and white scrappers floss.  I was considering adding an orange or yellow rhinestone to the bottom of the ribbon but decided not.  So, what do you think??

And check out what others have done!