

Carol Norby, Affiliate for Spellbinders, Scrapbook .com, The Rabbit Hole Designs, Whimsy Stamps, and Art Impressions!
Wednesday, September 30, 2009
I need help....
in knowing what you, my readers, followers, and subscribers, would like to see here. My visitor numbers are way down this month and I am concerned. Any suggestions are appreciated and will be considered. You can leave comments on this post or in the "chat box" in the left sidebar. Thanks!
With Gratitude
I played with a sketch from Heather's blog and some new Core'dinations paper I just purchased.
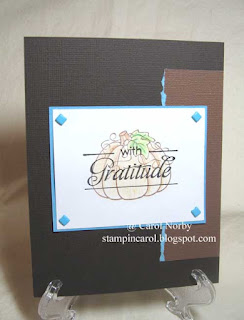
I used 2 stamp sets, Give Thanks and Label Lingo (a hostess set). Can you see the edge of the medium brown cardstock on the right? It's backside has the white stamped piece layered on it. I just love those 2 colors together! The dark brown is from the Bazzil Browns package. I stamped the images using Burnt Umber and Noir PH inks. I like how the Burnt Umber gives a softer look. I colored the pumpkin using my H2O pencils and my Niji Water Brush. I had the little square brads from Creative Impressions that TAC™ used to carry. The blue was a perfect match!!
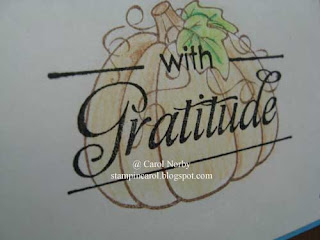 Here is a closeup of the pumpkin so you can see my coloring. You can't quite make out that I added some pale gray around the outside of the pumpkin and as a bit of a shadow at the bottom. I really like how this turned out. What do you think??
Saturday, September 26, 2009
Give Thanks!
I played for a few minutes with a color challenge on Paper Wings (orange, brown, kraft, and green) and a sketch challenge from Paper Crafts Planet and this is the result.
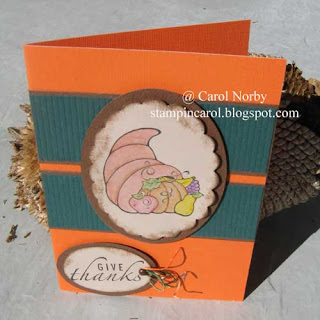
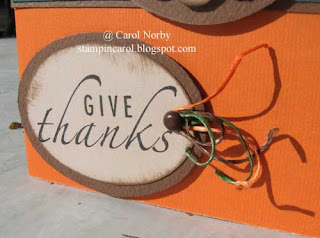 I just got the set called Give Thanks as I have no autumn/Thanksgiving type stamps. I used orange DCWV cardstock, kraft cardstock (temp. unavailable), and some green texture & brown cardstocks from my scrap pile. I stamped the image and text with Noir PH ink. The image is colored with my Watercolor Crayons and the Niji water brush. I used my Mega Scallop Oval punch for the image and swiped Burnt Umber PH ink on the edges. I like this effect. The larger oval was made with my retired Coluzzle oval template (which I also used for the text oval). I colored my white scrappers floss with Jardin Moss, Orangerie, and Burnt Umber inks and attached them with a brown brad. Both ovals are raised up with Pop Dots.
I want to give thanks to my Heavenly Father, Jesus Christ the Son for my salvation, my husband who supports this rubber addiction, and family. What do you want to give thanks for?
Side note: No one guessed what I "tool" I used on my Whitewashed cards so I'll give the answer. It was a Sanding Block!! Now, wasn't that just too easy??? So the first person to comment on this post will receive the card. Please include your email addy as my comment notification doesn't give it to me.
Thursday, September 24, 2009
Stenciled cards and tag
These are the projects we'll be making at my class on October 21st at the AZ Scrapbooking store in Green Valley, AZ.

These are created with a metal stencil from Lasting Impressions, paper from Bazzil, Lasting Impressions and American Crafts, ribbon, chalks, and a sanding block. Don't be shocked, there's NO stamping (except for my name and email addy on the back of each)! I think they turned out pretty good. Since I don't have a light box and not all the embossing could be done on my Wizard machine I had to use my living room window! Hey, it works real good! Just tape the stencil to the window just like you would on your light box, position your paper face down and tape in place (after rubbing with wax paper), then emboss with your stylus! Viola! Cut out, sand and create!

These are created with a metal stencil from Lasting Impressions, paper from Bazzil, Lasting Impressions and American Crafts, ribbon, chalks, and a sanding block. Don't be shocked, there's NO stamping (except for my name and email addy on the back of each)! I think they turned out pretty good. Since I don't have a light box and not all the embossing could be done on my Wizard machine I had to use my living room window! Hey, it works real good! Just tape the stencil to the window just like you would on your light box, position your paper face down and tape in place (after rubbing with wax paper), then emboss with your stylus! Viola! Cut out, sand and create!
Tuesday, September 22, 2009
Can you believe this??
I was searching for some paper by Lasting Impressions to make samples for a dry emboss class next month and this is what my desk looked like!

It is now pretty clean but I was dumping drawers looking for that paper! I did find it and got my samples made and you'll see them in my next post. And don't faint, there's NO stamping!! I don't yet know what date in October my class will be at the AZ Scrapbooking store in Green Valley, AZ but I will post it and email my local gals to remind them.

It is now pretty clean but I was dumping drawers looking for that paper! I did find it and got my samples made and you'll see them in my next post. And don't faint, there's NO stamping!! I don't yet know what date in October my class will be at the AZ Scrapbooking store in Green Valley, AZ but I will post it and email my local gals to remind them.
Sunday, September 20, 2009
I'm still whitewashing!!
I told you I had another card but this is a Christmas card!

Again I used gesso and a Cuttlebug folder. Also used Christmas Circles, and the 2 snowflake punches shown.

Here you can see where I used the Stardust Clear Gel pen on the snowflake and on the curly ques. And I used the Souffle Gel pens on the hearts and leaves in the image. The papers are Bazzil Blues and white cardstocks. The only ink is Starry Night PH. I used foam mounting tape to raise up the snowflakes, circle, and scalloped circle. I used some sheer white ribbon for added embellishment. There is one item (no, I'm not counting the paintbrush) that I did not list in this or my last post that is necessary for this technique. Please leave a comment with what you think it is and the first with the correct answer will receive this Christmas card! Good luck!!
Friday, September 18, 2009
Whitewashed and loving it!
I get the Technique Junkies newsletters (been a subscriber for about 4 years) and this is a technique in the latest edition.
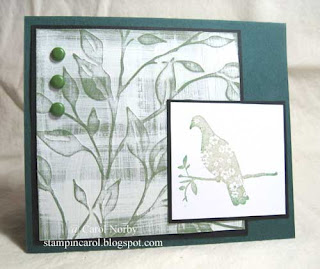 I used a Cuttlebug folder and our Beyond Measure Level A hostess set. Also used 2 green cardstocks, black cs, and white cs. Ink is a coordinating color by Versamagic.
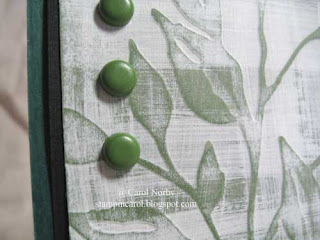 I used gesso to do the whitewashing. How cool!! I won't give away any more info but I bet you can figure it out! You get to see another in my next post! Stay tuned!!
Wednesday, September 16, 2009
Cool necklace!
I went to a small rubber stamp/scrapbook convention in Tucson, AZ last Saturday and did 1 make 'n take by After Midnight Art Stamps. They sell Spellbinder dies, Opals, stamps, and a whole bunch of cool stuff! This cool necklace was made with a piece of glass that I covered with a blue Opal embossing powder. It was heated by laying it on a piece of parchment paper in a melting pot and heated until the blue powder was liquified. I cut small pieces of Friendly Plastic and laid them on top then covered with a clear Opal powder and heated until the F.P. was melted. Using a skewer I moved the F.P. around to my satisfaction.
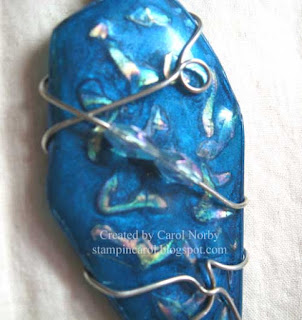 Linda, owner of After Midnight, added the beal (sp??) and chain. When I got home I added the wire and beads. I chose beads that almost blended in so when one looks at it they get a surprise! This is a large necklace, about 3" long and 1 1/2" wide. Love it!! Some day I hope to buy some Opals! I did purchase a cool Spellbinder die called "Create A Flake 1". Hope to play soon but need to get my samples made for my October classes at the AZ Scrapbooking store.
 This cool necklace was made with a piece of glass that I covered with a blue Opal embossing powder. It was heated by laying it on a piece of parchment paper in a melting pot and heated until the blue powder was liquified. I cut small pieces of Friendly Plastic and laid them on top then covered with a clear Opal powder and heated until the F.P. was melted. Using a skewer I moved the F.P. around to my satisfaction.
 Linda, owner of After Midnight, added the beal (sp??) and chain. When I got home I added the wire and beads. I chose beads that almost blended in so when one looks at it they get a surprise! This is a large necklace, about 3" long and 1 1/2" wide. Love it!! Some day I hope to buy some Opals! I did purchase a cool Spellbinder die called "Create A Flake 1". Hope to play soon but need to get my samples made for my October classes at the AZ Scrapbooking store.
Monday, September 14, 2009
Interesting color combination...
I did a color challenge over on Paper Wings which consisted of: orange, hunter/dark green, ivory, brown, and kraft/tan. I really like how this card turned out!!

I used DCWV colored cardstocks and watercolor paper for the Watercolor Plants stamp. They're stamped by misting the stamp with water then coloring with watercolor crayons before applying to the lightly dampened paper. The 2 top images I used my Impress Brights markers applied directly to the stamp before applying to the dried paper. I also used my paper piercer on the brown cardstock then sanded with my sanding block. I had this cool ribbon from a sale at Michaels that was just the right kraft/tan that I wanted and tied 2 small pieces to form the bow. My white scrappers floss was colored with Orangerie PH ink by rubbing it on the ink pad. If you look closely at the green you will see the Script background that I stamped with my Versamark ink. So, what do you think?? And I like my sunflower that the card is standing against. We munch on the seeds when sitting at our patio table.

I used DCWV colored cardstocks and watercolor paper for the Watercolor Plants stamp. They're stamped by misting the stamp with water then coloring with watercolor crayons before applying to the lightly dampened paper. The 2 top images I used my Impress Brights markers applied directly to the stamp before applying to the dried paper. I also used my paper piercer on the brown cardstock then sanded with my sanding block. I had this cool ribbon from a sale at Michaels that was just the right kraft/tan that I wanted and tied 2 small pieces to form the bow. My white scrappers floss was colored with Orangerie PH ink by rubbing it on the ink pad. If you look closely at the green you will see the Script background that I stamped with my Versamark ink. So, what do you think?? And I like my sunflower that the card is standing against. We munch on the seeds when sitting at our patio table.
Saturday, September 12, 2009
Watered down and ....
A friend, Gloria, just purchased a Scor-Pal and wanted to see what the Scor-Bug does before purchasing it. Well, this gave me the opportunity to play with a new set called Watercolor Plants.
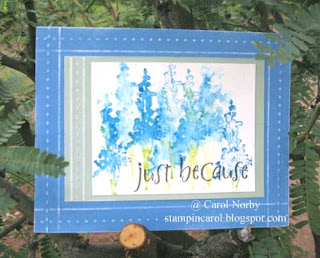
I stamped the flowers on dampened watercolor paper and used my watercolor crayons to color directly on the water-misted stamp. I stamped numerous times on the paper then dried with my heat tool. I then stamped the Just Because with Noir PH ink. I tried to coordinate the paper to the colors of the flowers but the green just wouldn't photo as bright was it actually was. I used DCWV Brights cardstock and "scored" and "bugged" as shown then sanded with my sanding block to expose the white core.

I stamped the flowers on dampened watercolor paper and used my watercolor crayons to color directly on the water-misted stamp. I stamped numerous times on the paper then dried with my heat tool. I then stamped the Just Because with Noir PH ink. I tried to coordinate the paper to the colors of the flowers but the green just wouldn't photo as bright was it actually was. I used DCWV Brights cardstock and "scored" and "bugged" as shown then sanded with my sanding block to expose the white core.
Friday, September 11, 2009
We will remember....
 May we never forget the death and destruction caused by Islamic insurgents on this fateful day 8 years ago. Nor forget how they and the United Nations want to destroy the basic principles this country was created and founded on.
Do you know the 2nd paragraph to the Declaration of Independence (bold text is my addition):
We hold these Truths to be self-evident, that all Men are created equal, that they are endowed by their Creator with certain unalienable Rights, that among these are Life, Liberty, and the Pursuit of Happiness - That to secure these Rights, Governments are instituted among Men, deriving their just Powers from the Consent of the Governed, that whatever any Form of Government becomes destructive to these Ends, it is the Right of the People to alter or to abolish it, and to institute new Government, laying its Foundation on such Principles, and organizing its Powers in such Form, as to them shall seem most likely to effect their Safety and Happiness.
My prayers for the U.S. is that our government will show common sense and respect to it's people, have Godly wisdom with all its dealings, keep fiscal responsibility, turn back to the God of our Founding Fathers, and fight the evil that threatens to destroy our rights as set forth in the Declaration of Independence, the Constitution of the United States, and the Bill of Rights.
May God show Mercy and Grace to US, the United States.
May we never forget the death and destruction caused by Islamic insurgents on this fateful day 8 years ago. Nor forget how they and the United Nations want to destroy the basic principles this country was created and founded on.
Do you know the 2nd paragraph to the Declaration of Independence (bold text is my addition):
We hold these Truths to be self-evident, that all Men are created equal, that they are endowed by their Creator with certain unalienable Rights, that among these are Life, Liberty, and the Pursuit of Happiness - That to secure these Rights, Governments are instituted among Men, deriving their just Powers from the Consent of the Governed, that whatever any Form of Government becomes destructive to these Ends, it is the Right of the People to alter or to abolish it, and to institute new Government, laying its Foundation on such Principles, and organizing its Powers in such Form, as to them shall seem most likely to effect their Safety and Happiness.
My prayers for the U.S. is that our government will show common sense and respect to it's people, have Godly wisdom with all its dealings, keep fiscal responsibility, turn back to the God of our Founding Fathers, and fight the evil that threatens to destroy our rights as set forth in the Declaration of Independence, the Constitution of the United States, and the Bill of Rights.
May God show Mercy and Grace to US, the United States.
Stampin Carol
Thursday, September 10, 2009
Tower of Cupcakes
Is that a catchy title?? Because that is what this card is all about! I have a Christmas sweatshirt that has this same tower made of Santas and we have a granddaughter whose birthday is coming up so this card was born. I think she'll like it. She'll be 5 in December.
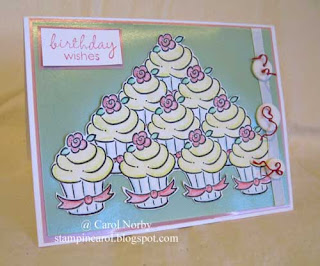
I used our Little Cupcake set and Thinking of You Level C set stamped with Noir PH & L'Amore PH inks. The shiny paper I purchased at the Recycle place in Kansas City, KS or MO when we had our TAC™ annual Seminars in that city. The base card is white cardstock. I had to use 1/4" Wonder Tape as the shiny stuff is quite slick! I colored all these little sweet things with my Prismacolor H2O pencils and my Niji Water brush. The buttons have Red Scrapper's Floss for added punch. The 1/4" white ribbon was purchased at Walmart or someplace like that.

Here you can see that I outlined the frosting and flowers with the Stardust Clear Gel pen. Just too cool! I had to make a couple of cupcake masks to make this tower. I haven't done any masking for quite some time. How about you??
Wednesday, September 9, 2009
Green Eyed Cats
My friend, Barb, has Haunted House Designs blog for all things Halloween. She does amazing work. Her challenge this week was to use a poem or rhyme on the project. I had to search for this but it does make for a cute card.

All my stamps are retired and so is the cool purple paper. I do have Spookalicious on order as I have only retired Halloween sets. The paper is one of our Designer pads called Too Spooky. Was a great paper. And I used my Fiskars Treading Water border punch to do the edging. Anyway...
The cats are stamped in Noir PH ink and white cardstock then colored with Prismacolor H2O pencils. The base card is black cardstock. I had some 1/4" black ribbon and added the black button and black scrappers floss for more umph!
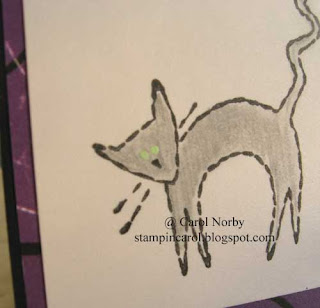
Here you can see the green eyes. I used my green Souffle Gelly pen and just put a dot on each eye. It rather glows! How eerie!
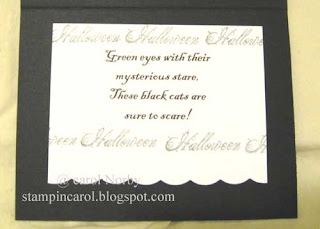
I found this little poem online and printed it out. I used cloud scissors to add the border. I probably should have used the Fiskars border punch but, since it was rather late at night when I finished this, I just was beyond thinking. The Halloween is a retired stamp. So what do you think??
Tuesday, September 8, 2009
Always Remember....
I had a lot of fun Saturday when a friend had a FUNshop. I showed off the great Scor-Pal and one of the guests just loved it! I did chose a simpler card as one lady was a new stamper! She took my Stamping 101 class a couple weeks ago at the local scrapbook store in Green Valley, AZ.
 I used our really cool Amberly Grace SWIC and cardstock to start this card. You can see the score lines on each side of the pattern paper which just gives a little more pop. I stamped the phrase from Always Remember in Burnt Umber PH ink on a small piece of white cardstock and edged all papers by swiping the ink pad on the edges for a bit of a distressed look. I added a matching button with White Scrapper's Floss for a touch of elegance. The gals had fun doing this card and learning more about the Scor-Pal! How cool!
 I used our really cool Amberly Grace SWIC and cardstock to start this card. You can see the score lines on each side of the pattern paper which just gives a little more pop. I stamped the phrase from Always Remember in Burnt Umber PH ink on a small piece of white cardstock and edged all papers by swiping the ink pad on the edges for a bit of a distressed look. I added a matching button with White Scrapper's Floss for a touch of elegance. The gals had fun doing this card and learning more about the Scor-Pal! How cool!
Monday, September 7, 2009
Fabric stamping
I really want our new Gingerbread Fun set in the new Inspiration Avenue but until I get it ordered I used a recently retired set to do this.
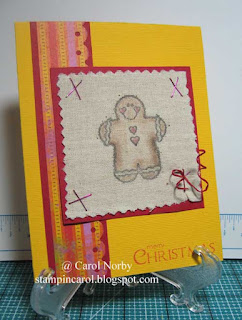
I used Miss Moxie SWIC and Cardstock for all the paper. Love the bright cheery colors. The text is from our Level C set called Thinking of You. You need to have net sales of $500 or more to receive this set FREE! It is stamped in L'Amore PH ink. I used the Fiskars Treading Water border punch for the striped piece. I got the muslin fabric at a local beauty supply store. It comes in a BIG package and you can find it in the wax department. I cut a strip into thirds with my pinking shears. I stamped the gingerbread man in Noir PH ink, heat set, then colored with my Prismacolor H2O pencils. I then used my Blender Pen to blend the colors. Can you see the sparkle on the icing strips of this little guy?? I used the Stardust Clear Gel Pen to fill in those parts. I attached the fabric to my cardstock using colored staples and stapled a piece of red Scrapper's Floss for added embellishment (I wound it around a skewer to get the curl after stapling).

A bit more info on coloring like this. Use very little red - it blends a LOT of area. On the main image start with your lightest color, then using that same pencil add it a little harder/darker on the edges. Then, using a darker coordinating color, add to areas where you want shadow. When using your blender pen make sure you clean the tip between colors or you'll have red where you don't want it.
So, isn't he just adorable! Anyway, hopefully I'll have our new set soon. It'll be great to make gift tags and all kinds of cool stuff!!
Saturday, September 5, 2009
Scored and Flaked
I've lost my mojo! I don't feel creative! Hopefully I'll get my mojo back this weekend.
Anyway, I'm going to demonstrate this card at a FunShop today. I love playing with my Scor-Pal and think it's one of the greatest tools I have. Can you see the diamond grid in the card? I scored every 1/2 inch.

I also used the Black Cardstock Strips, Scarlet cardstock, and the Scallop Square punch. But do you notice the Ornamental Snowflake?? It glimmers as I stamped it with Frost Dazzle VersaMark ink!! How cool is that!! I was debating on adding Merry Christmas over the snowflake but can't make up my mind. What's your opinion??
Thursday, September 3, 2009
Another CD picture frame
I made this picture frame to commemorate my nephew's and brother's 4 hikes in one day to peaks in Colorado of at least 14,000 feet elevation. This pic comes from the top of Torreys Peak. My nephew and brother posted these pictures on Face Book and I "borrowed" them for this "page".

The phrase is from the This Boy set and I made the holes using my Crop-a-Dile. Since this is a masculine frame I used twine to wrap the frame.
 I also used DCWV cardstock to layer to the CD. I also used 1/4" Wonder Tape to adhere to cardstock to the CD since the CD is a slick surface. I did make a loop with the twine on the back to make this easier to hang. Hmmm.... you could even hang this on a Christmas tree. So, this might end up as a Christmas gift so does these mean I've already started my "shopping"? Have you made or purchased any Christmas gifts yet??
Tuesday, September 1, 2009
Halloween CD Frame
I've been working on my 2 classes for Sept. for the local scrapbook store and this is one of the projects we're going to make (minus my photos, of course!). There will be 1 change as I have to use products that they carry. These 2 superhero gals are our 2 youngest granddaughters all dressed up for Halloween last year. Rylie is Wonder Woman and Rowan is Super Girl. Aren't they just darling? They have the greatest expressions!
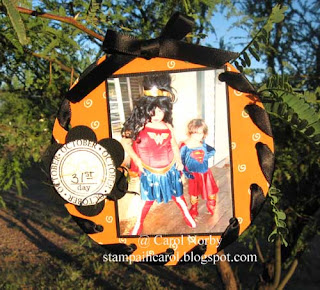
The orange pattern paper is from Daisy De's and the black is by Bazzil. I used my Crop-a-dile to punch the holes then I wove the black satin ribbon. I added the stamped Date Disc in Noir PH ink on a scrap of white cs and stamped a retired Boo! in Orangerie PH ink (stamped off once). You can see it better in the next picture.
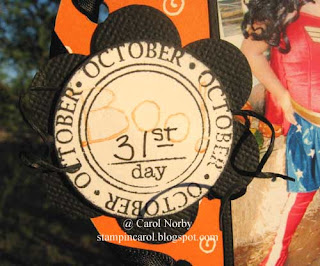
I used my Extra Jumbo Circle punch to create the date circle and my Super Jumbo Flower punch with the black cardstock behind the date. I added some Black scrapper's floss between the date and flower and used Pop Dots to complete this embellishment before attaching to the CD.
Subscribe to:
Posts (Atom)