Friday, July 28, 2023

What is a Bendy Card?

At our local stamp club meeting last Saturday we learned how to make a fun fold "bendie" card. This was all new to me and I used a newly purchased Altenew stamp set to decorate it.

(This post uses affiliate links to some of the products I used. If you shop through these links I may receive a small commission at NO cost to you. Thank you oodles for your support.)


This card folds flat but when you stand it up is has bends out in front and back.  I'll show you how to make it. I used Altenew's Sophisticated Wreath clear stamp set but it's not available on Scrapbook.com at this time. I received all papers precut and ready as a make n take kit. 

You start with 4 each 4 1/4" x 5 1/2" cardstock pieces scored and folded in half lengthwise. You then adhere them together into an X shape. Be sure and burnish your folds good.


Then you cut 2 each of decorative paper 2" x 5 3/8" and adhere to opposite sides.


 Next you cut 2 each of decorative paper 4" x 5". Die cut a "window" out of each. Then score lengthwise at 1/4" on each long side.


Add adhesive to the 1/4" "tabs", lay your card flat and adhere to the center of the 2 remaining sides as shown.

 Cut 2 tabs 1" x 2 1/2", score 1/2" from each side and adhere as shown.

Cut 2 more labels the same shape as your windows but smaller, decorate, and adhere to the tabs. See my first 2 photos.

I hope you try this style of card.  It's pretty cool!

Stampin Carol

I will turn their mourning to joy, will comfort them, and make them rejoice rather than sorrow.  Jeremiah 31:13


Tuesday, July 25, 2023

Winter Scene Ornaments

 Last week some friends and I got together to make some fun winter scene boxes using a retired Sizzix die set called Winter Scene Box. We had a blast!

(This post uses affiliate links to some of the products I used. If you shop through these links I may receive a small commission at NO cost to you. Thank you oodles for your support!)

The purple one is the original I made over a year ago but I updated it into an ornament. I used Spellbinders Mini Christmas Greetings stamp & die set for the sentiments.


This view shows the laces I added to the sides of the boxes and the hanging cords.


And a little closer look at the inside of my recent box. I added itty bitty clear rhinestones to some of the snowflakes and on the ends of the banner. Turned out nicely, don't you think?

I also used my Platinum 6 die cut machine, detail scissors, Bearly Art Glue, and double sided tape.

Stampin Carol

But You, O Lord, are a God full of compassion, and gracious, longsuffering and abundant in mercy and truth.  Psalm 86:15


Friday, July 21, 2023

A Penguin Box

I recently got in a great order from The Rabbit Hole Designs and needed a swap card for tomorrow's stamp club meeting. It had to be a box card so my hand reached for their Penguining TZ clear stamp set.

(This post uses affiliate links to some of the products I used. If you shop through those links I may receive a small commission at NO cost to you. Thank you oodles for your support!)

I used the same size box as I did 2 days ago but rounded the corners with my Corner Chomper. The fun print paper if from Craft Consortium's Polar Playtime. I even used some of the elements from the paper folder such as a tree, a fish, and a whale tale.
 

I colored using my OLO markers and added some "fluff" on the green hat using a snow marker (kinda like the old Liquid Applique pens). I also used the Penguining Die set.


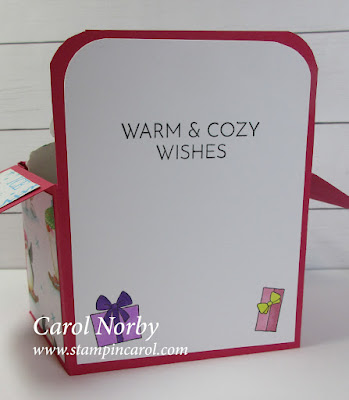
The sentiment and gifts are from TRHD Warm & Cozy AP clear stamp set which has a coordinating Warm & Cozy die set.

Also used was my paper trimmer, ATG adhesive runner, detail scissors, and Bearly Art Glue.

Stampin Carol

A faithful man will abound with blessings.  Proverbs 28:20


Tuesday, July 18, 2023

More Shark Week!

Since I was on a roll with my new Whimsy Stamps' Shark Week clear stamp set I made another card using it!

(I use affiliate links to some of the products I used. If you shop through these links I may receive a small commission at NO cost to you! Thank you oodles for your support!)

I added some Broken China, Chipped Sapphire, and Faded Jeans Distress Oxide inks to my top layer using my Life Changing  Blender Brushes by Picket Fence Studios from Scrapbook.com. I spritzed some water on this then dried before stamping the layer multiple times with the 3 shark image in the set using my Black Soot Distress ink. I die cut it using Whimsy Stamps' Ripples Die set. There are 4 dies off various sizes. Pretty cool!

I added some Broken China Distress Oxide ink to my next layer with my blending brush and spritzed it, also.


Here you can see the spots the water added to my 2 layers. I stamped the sentiment and found a punch that kinda made me think of a shark bite. Again, more Broken China Distress Ink was added to the edges.

After assembling the layers I added some True Blue Stickles for bubbles and barely a touch of Crystal Stickles to the shark's eye.


This is the inside of the card. Don't you love it!!

I also used my ATG adhesive roller, detail scissors, Platinum 6 die cut machine, foam tape, and misti stamping platform.

This card is going to a couple special young men who LOVE Shark Week! 

Stampin Carol

God is my strength and power, and He makes my way perfect.          2 Samuel 22:33


Thursday, July 13, 2023

Happy Shark Week!

Our 2 great grandsons love Shark Week but this card isn't for them.  I recently got in some great products from Whimsy Stamps and just had to play.

(This post contains affiliate links to some of the products I used. If you shop through these links I may receive a small commission at NO cost to you. Thank you for your support!)

Isn't this a hoot! The shark is from Whimsy Stamps' Shark Week clear stamp set and the portal is from their Lookin' Shark Elements clear stamp set and their Lookin' Shark Elements outline die set. This is kinda a birthday card as inside I stamped "A little fishy told me it was your birthday so I ate him."


I added some True Blue Stickles to kinda look like bubbles and lightly colored the shark with a grey PrismaColor pencil. The blue "water" is from a piece of ribbon that is the mystery item for this month's swap card.  I used about half so I can make another card for the boys.

I also used my paper trimmer, atg adhesive gun, foam tape, and detail scissors.

I'll be at my desk soon to make the next Shark Week card!

Stampin Carol

I sought the Lord, and he heard me, and delivered me from all my fears. Psalm 34:4


Monday, July 10, 2023

My First Box Card

A couple posts ago I shared a box card that was a make 'n take from our local stampers club. I found my first ever card recently and, though I shared it in 2015, I wanted to share it again. There are no affiliate links available.


It's made from a 5 1/2" x 8 1/2" piece of card stock, scored at 1/2", 2 1/2", 4 1/2", and 6 1/2" on the long side and at 2 3/4" on the short side. The inserts are 3" and scored at 1/2" and 2 1/2".


I added just a simple flower on the back over the score line to help stabilize it.


Here is the top view. I have 2 inserts.

I love that it lays flat and fits in an A2 envelope!

I recently started purchasing the Distress Inks in the mini cubes and here's the start of my collection...


The plastic containers are from Joann's made by Hildie & Co. I haven't had much for just plain dye inks as most of my inks are hybrids from Fun Stampers Journey.

Stampin Carol

And as it is appointed for men to die once, but after this the judgment. so Christ was offered once to bear the sins of many. To those who eagerly wait for Him He will appear a second time, apart from sin, for salvation.  Hebrews 9:27-28


Friday, July 7, 2023

Penguin Cheer

I signed up for a swap and the theme is non-traditional Christmas card. Well, I just got my new StampWheel and I just had to use it! This card is a hoot! I used Art Impression's Penguin Cheer stamp set.

(This post has affiliate links to products I used. If you shop through these links I may receive a small commission at NO cost to you. Thank you for your support!)


Though this stamp set isn't the best to use with the wheel I still had to try. The sponged pink ink and the pink card stock are coordinating though they don't look it. I also used Stickles Glam Pink and a Marvy Snow Marker (purchased at a big box store a couple years ago).


You can see on the hat band and pom pom the snow marker.


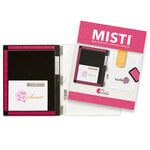
Here's the StampWheel's box and in use. I also purchased it's Center Alignment Guides which is a must! It can be used as a stamp positioner along with the wreath maker!

Other products used: Detail Scissors, 1/4" ATG tape & tape gun, 1/2" foam tape, and a paper trimmer.

Stampin Carol

Be kind and compassionate to one another, forgiving each other, just as Christ God forgave you.  Ephesians 4:32


Tuesday, July 4, 2023

May The 4th Be With You!

Happy Independence Day!

Here's an oldie but goodie! A box card! I have made so many of these over the years. It came as a kit for a make n take from our local stamp club and is the fun fold of the month for the July meeting.  I have no idea where the papers and stamps are from so there are no affiliate links.


This fun card folds flat to 4 3/4" x 5 1/2" so it will fit in a standard A2 envelope. 


You can add a piece of card stock to the back to stabilize it and add any sentiment or greeting you want.  It would work better if you added these prior to adhering this piece to the back.


Here you can see the 2 inserts to adhere my fun decorations to that makes this card 3D. I made sure my card folded flat before adding the decorations.

And now for the template and directions.....

I started with my base cute to 4 1/4" x 11". 

I scored at 2", 5 1/4", 7 1/4" and 10 1/2".

I cut off the top little tab on the far right.


I did NOT score on the longer section on the left but you can if you add the piece to the back.

Fold into a box shape and make sure it folds flat, burnish with your crease tool.  Fold the flaps downward as shown in my photos. Glue the bottom tab inside the box.

Cut 2 pieces of the same card stock to 4 1/4" x 3/4", score both ends at 1/2". Glue into box as shown in my box top photo.

Decorate your box as desired.  Add your focal points to the inserts. If you make them taller than the box you may need a larger envelope.

I hope to share another one of these soon. I'll be using a 5 1/2" x  8 1/2" base.

Let me know if you try this!

Stampin Carol

A generous person will prosper; whoever refreshes others will be refreshed.  Proverbs 11:25