Monday, October 31, 2016

A Birthday Cupcake

Saturday a friend held a Home Make-It Party and this was our child's birthday card.  You've seen the Guy card and we also did a Gal card.


I don't know the name of the technique I used on the "frosting" but I've been doing it for years. How do you like the little girl clip!  The package also has little boys, planes, and cars!


I basically inked the frosting stamp with Pool Play then swiped it with cupcake base stripes stamp.  This removed the ink from the stamp then I stamped and die cut.   Fun way to add dimension!

Stamps: Yummy & Delicious Bundle and Yummy Wishes
Card stocks: Whip Cream, Lemon Drop, and Celebrate You Prints
Inks: Pool Play, Watermelon Fusion, and Black Licorice
Embellies: Fam Bam Elements and Silver Sequins

The party was great fun.  There was 8 ladies including the hostess.

Today I'll be at our church all day as tonight we hold an event called The Blast.  It's a Halloween alternative mini carnival with a Bible theme.  We have games, laser tag, lots of food & candy & prizes, and oodles of Fun.  It's a lot of work but so satisfying seeing the kids having fun in a safe environment.

Friday, October 28, 2016

Birthday Stache

Well, looks like this week will end much better than it started!  Today I have a class with 5 ladies as I haven't heard from the 6th.  But since she was traveling back from Michigan I'm still prepared for her.  And tomorrow I will be having my first Home Make-It Party and I hope the hostess gets LOTS of sales!  Here's another card for the party tomorrow.


She wanted birthday cards for her party as her birthday was yesterday.  So you've seen the child's card, here is the guy's card.  I used Dapper Birthday stamp set which turned out cute.  It's a simple card, no techniques and only 1 die, the Everyday Tags die set from our current Trends mini catalog.  I also embossed the Whip Cream layer with our Beach Towel embossing folder.


Here's a closer look at the tag before I added the Rhinestone to the bow tie.  The hair and tie are stamped directly on the tag but the stache was stamped on a piece of Whip Cream then cut out and pop dotted in it's place.

Card stocks: Whip Cream, Denim Days, and Candy Apple
Inks: Hazelnut, Candy Apple, and Black Licorice
Other: Black Licorice Thread

My gal's card will post Monday.  I used a variety of dies, punches, and embossing folder with just 1 stamp phrase.  So come on back!

Wednesday, October 26, 2016

Desks And Freezes

I've had one of those weeks.  Lots of good but some trying days. But it's Wednesday and that's GOOD! I worked hard yesterday getting pics taken and starting this post for you.  But you get to see my desk!  And the desks of many others, should you decide to accept the mission.  This fun tour d'desks is put together by Julia at the Stamping Ground.  Please head over there when you're done here for the links to desks and projects of other crafters and enjoy the "view".


No projects today but I have a pile of stuff on the left.  I finished a couple cards for a party Saturday and I'm keeping some of the supplies handy to put together my list of supplies, make the direction sheets, then make 10 kits of each card.  That's my goal today.  I have 6 kits of the 3rd card done and need to make 4 more of those.  I think there will be at least 8 at the party.  I'll find out later today.  So, not much going on as I start prepping.


This happened yesterday.  Monday hubby realized our chest freezer was not working properly and that it's not repairable.  So I took a bit of time off work and met him at our local Sears store.  We looked at the upright as I'm tired of the chest style and it was $650.   But wait...  They had the same model at $398 as it was shipped accidentally to the store and it had no freon.  They had it serviced and we got it!  We borrowed my dad's pickup Monday night and brought it home.  Yesterday, Dean and a friend took the door off the new freezer and the door off the room and got it in. I can't quite get everything in it but the main stuff, such as meat, baked goods, and other items are in.  I still need to find room for a few things.  The chest freezer was dismantled today and taken out.

But yesterday, oh my.  It started Saturday.  I went to Tucson, a 30+ mile trip 1 way for our monthly stamp group meeting.  We went to Tucson Sunday as Dad wanted to celebrate our anniversary at Red Lobster.  Monday back to Tucson to take a friend to her dental checkup.  Yesterday, I went to church for Bible study.  After that I went to Walmart to purchase groceries.  Got in car to go home, wouldn't start.  Finally started on the 4th try.  Went straight to my mechanic.  Died completely in their parking lot.  Bad battery, bad starter.  Mechanic asked me how in the world did I get anywhere this past week!  Only by the grace of God!!!  But yesterday afternoon the mechanic called and so far repairs are about $710.  Ouch!!   This has be a VERY expensive week.  $424 for freezer, $700+ for car, our anniversary gift to us (a new stereo/GPS/CD player/blue tooth/back-up camera for our car for $900.  Tomorrow I have a dr. appt. to consult and schedule a colonscopy for next month, my cost about $200 - $300.   Ok. I'm done complaining. Thank you Lord that we have the $$ for all this, great blessings through hubby's work.

So now please head over to the Stamping Ground and check out the links to others in this blog hop.  I'll be in and out as I prep for the party.  At least I'm ready for my Friday morning class.

Monday, October 24, 2016

Mystery Item Card and a Sketch Challenge

This past Saturday Angie S. and I attended the SALSA (Stampers At Large; Stamping Away) meeting in Tucson, AZ.  Last month we were given a mystery item to use on a project if we wanted to "play."  We were given some small burgundy feathers in a glassine bag.  I didn't use the bag but I had fun with the feathers.  I knew within a week what I wanted to do.


I used the stamp set Dream It which was part of our July Bloom Box and should be available next month for purchase.


I colored using my Copic markers.  I haven't used them in quite some time.

Card stock:  Black Licorice and Whip Cream
Punch: Handle and This Way cartridge
Dies: Journey Rectangles
Ink: Black Licorice
Other: Silver Sequins

Another challenge was to use a specific sketch.  I enjoy playing with sketches and this one had LOTS of layers!


I actually added extra layers as I used a solid card stock under each printed and stamped layer.


Card stocks: Pumpkin Bread, Butter Cream, and Autumn Prints PP-0036 (again available until Dec. 31)
Stamps: Artsy Leaves Bundle and Autumn Time
Inks: Black Licorice and Pumpkin Bread
Coloring Medium: Assorted PanPastel collections
Other: Spring Accent Dots
Ribbon: Citrus Cooler Satin


Saturday, October 22, 2016

A Faith Journey Blog Hop


Welcome to the Amazing Journey Blog Hoppers Hop! This month’s theme is XXXXX. I'm so happy you're hoppin' along! If you arrived here from Karen Seifert’s blog, you're on the right track. If not, that's ok too! Just continue the hop and you'll come full circle!


I have 2 projects to show today.  The first has NO stamping but showcases a piece of card stock from our cool Faith Journey Print card stock and a couple of dies.


 I used our Doily Die and the Bloom Cluster die (cut into 3 pieces).


 Card stocks: River Stone, Rock Candy, and Whip Cream.

My 2nd card has a bit of stamping and mixed media.  I used 2 stamp sets, Thread Sketch (the background) and God Is Light.  I used Cocoa Powder ink for the stamping.  I used our Journey Circles die set to cut out the crown of thorns then sponged with more Cocoa Powder ink.


I played a bit with our Modeling Paste but had some issues with it.  It was mostly dry!  I added water to cover and waited a while then started mixing and mixing.  I got it mostly reconstituted but it was still a bit runny and chunky.  To use it I added a bit of Pineapple Smoothie paint.  (A day later after trying to reconstitute it was in pretty good shape.  I added some plastic wrap to the jar before screwing the lid on so hope that helps.)


After sponging some Limeade Splash ink on the Oatmeal Cookie card stock strip I added the modeling paste.  I offest the Bubble Bubble stencil then using the Spatula I added the paste.


This bottom corner shows where I had an issue with the paste still too wet.  But I like the looks overall.
I used Cocoa Powder card stock for the base and layers, and Whip Cream for the stamped pieces.


Thank you for stopping by today, be sure to head to Ruth Cooper's blog next.


Blog List:
Betsye Rose Cimino Erazo
Karen Seifert 
Me!
Ruth Cooper
Kim Lamos
Becky Lemire

Friday, October 21, 2016

Breast Cancer Awareness Cards

I haven't yet shown you the other 2 cards I made to send to Fun Stampers Journey for the Breast Cancer Awareness card drive.


The print paper is retired but I wanted the hearts for these cards.  I added a drop of Journey Glaze to each white spot in the letters.


Stamps: Marquee Type Set Bundle

Paper: Watermelon Fusion, Black Licorice, Whip Cream

Dies: Artistic Butterfly Die Set

Other: Pink World Sequins, Journey Glaze


This card uses our Petal Wall embossing folder but I inked one side of it before adding my card stock and embossing.


Stamps: Be Brave

Card stock: Watermelon Fusion, Whip Cream

Embossing Folder: Petal Wall

Dies: Journey Rectangles, Love from the Snapshot Frames die set

Inks: Watermelon Fusion

Other: Journey Glaze, Pink World Sequins

Tomorrow I'm taking part in a blog hop of FSJ coaches celebrating our Faith Journey line. Please come back and check out our projects!

And we got some great news this week from the company.  They are bringing back select items from the retired Holiday Mini catalog through December 31, 2016. Please go to the FSJ Specials page for more info!


Wednesday, October 19, 2016

Autumn Cards and Desks

It's autumn!  The time of cool nights, a bit warmer days, colorful leaves, oh, and my desk!  Yes, it's Wednesday and the weekly workdesk review.  This is week 385, where does the time go! This fun global, well, Europe and the U.S., tour of desks is put together by Julia at the Stamping Ground.  All these years and she's still doing this!  I think this may be the longest lasting blog hop ever!

My desk is very clean as of yesterday afternoon.  I got the new Amaze die cut machine and had to clean my desk when I removed my Platinum to make room for it.  So much was hidden behind that large machine!


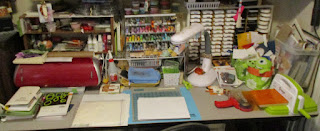
I had filled my trash can with a lot of scraps that just was too small and other misc. "stuff" that needed to be tossed.  So, are you ready for the explanation of my desk?  Far left are my 2 planners in front of my red Cricut (I really need to play with it some!) which is in front of a shelf of small stuff I use regularly. Next is a pile of stamps and dies.  The top set of dies are on a magnetic sheet to keep them together.  Then a package of paper on top of a set of directions for an class Oct. 28.  I've been busy making kits for 8 and I have 6 signed up right now.  Center front my blue mat with my Scor-Pal & mat and a pile of scrap paper to keep the mat clean.  Behind that is my stamp rag, spray water, Copic markers, box of acrylic blocks.  Ok, now to the right, my ATG adhesive runner and Amaze.  Behind that is my Fun Stamper Journey team mascot with friend in their little bag, my OTT light, 2 baskets of misc. paper & scraps, and my shelf of ink pads.

I've shown you one of the cards for my class, here's another:


All supplies are by FSJ.


In case you're wondering about the splatters, they're made by a special product that I just love but I cannot promote my company here.  If you have any questions, please email me through the "Contact Me" in the sidebar.

I tried to keep this relatively short so I'm now at the end of my post.  Please head over to the Stamping Ground and continue the tour of desks.  I'll be visiting while I work on making card kits for my class. Next week there is SO much going on that I'm starting to stress.

Monday, October 17, 2016

Save the TaTas

Join Fun Stampers Journey and support breast cancer awareness month! Richard Garay designed the Be Brave Stamp Set to support awareness and acknowledge the bravery and perseverance of the patients affected by this illness and the family and friends who stand by their side.
We invite you  to create a handmade inspirational card and send it to the Journey Station. The Journey Crew will send them to a breast cancer non-profit organization so that your encouraging messages can be shared with patients in need. You can use any design of your choice- we appreciate your creativity and inspiration! Resources for sharing this outreach opportunity with your customers are located on your Coach dashboard under Resources>Programs and Promotions. Please mail your card(s) to the Journey Station, Be Brave Card Drive, 1125 W. Pinnacle Peak Rd., Building 4, Suite 141, Phoenix, AZ 85027.

I have made a few cards and here's one of them.


I have made cards similar over the years and they almost always have brought a smile.

I used our Heart Felt dies to make the base, inside, and bra.  I started with some retired paper as I wanted to use the pink print but our Bubble Gum card stock would work wonderfully and not have the wild blue print.  I added a bit of "lace" with one of our Border Detail dies and added a little bow made from the Bubble Gum thread.  A few Pearls to make a necklace and the outside is done. The bra and inside are made from our Whip Cream card stock.

I used our Be Brave stamp set and Watermelon Fusion ink to stamp on the inside.


I hope to get my cards in the mail on Monday.  I have 6 done of 3 different styles.


Friday, October 14, 2016

More Fairies

Here's the other 2 cards from our October Bloom Box.  The first 2 are in my 10/10 post.  We did use Stickles on these cards instead of Journey Glaze and Sparkle Dust.  I'm not into fine glitter that much and after making 4 cards there was plenty of Sparkle Dust on us (me and Angie), the table, and floor.  Sometimes it can be hard to control.


This week 15 fellow coaches with their +1 and many of the Journey staff went to Disney Land.  Those coaches earned their trips through sales,recruiting, and leadership.  This set reminds me of the Magic Kingdom, must be the phrase!


Angie had not played much with Stickles so she had some pretty big lines of it on her fairy wings on both of her cards.


We almost didn't make this last card as I did most all of the detail cutting for our cards and the top image was a bear to cut (and I cut 4 of them).  I think it took almost as long to cut as it did to color!


This last card the fairy was easier to cut out but still a pain.

Card Stocks: Whip Cream, Pretty Pansy, Journey Brush Silver, Designer Vellum Prints, Limeade Splash, Lavender Fusion

Inks: Black Licorice

Dies: Journey Circles, Cloud Dreams, Journey Squares

Silk: Silver

Coloring: Color Burst Pencils, Blenders

Embellies: Cut Rhinestones, Silver Sequins, River Stone Satin Ribbon

I still think these cards would be wonderful for a little girl but then, maybe the young at heart would enjoy them, too!

Wednesday, October 12, 2016

Autumn Leaves and Desks, Part 2

Wednesday, Wednesday... seems like it comes faster than every 7 days when I'm taking part in the weekly What's On Your Workdesk Wednesday.  Seems like it was just a couple days ago I took a picture of my desk and joined in this fun global blog hop put together by Julia at the Stamping Ground.  My desk is kinda empty as I just finished up a project for a FSJ Blog Hop this Sunday.  But there is something new and different on my desk today.


Look close...   It's in the upper right on a shelf.  Yep,  it's a little green Monster!  I'm planning on making him my mascot for my team in the company.  But on the lower left you can see my paper trimmer and a pile of stamp sets and dies from the projects I just finished.  Far right... my ATG adhesive gun.  Back left, my red Cricut and a shelf of all kinds of things, then moving right, my Copic markers then my ink pads.  I will be working on a special project today that I need for a challenge.

But I think I've also held you in suspense long enough about the Autumn Leaves.


Someone last week thought she knew what I made from last week's teaser picture.  This card is one of four that I'll be teaching in a class on October 28.  It will be a good distraction for me as that's my mom's birthday and she died just over 2 years ago.  But it's also a very busy week.  Between working that Monday and Thursday, I have a doctor appt. to schedule a colonoscopy (mom had colon cancer twice) and I have a home party Saturday afternoon.  I'll be cutting paper like a crazy woman prepping for the class and party.

I hope you enjoyed seeing my completed card.  I'll be sharing the other 3 soon.  Please head over to the Stamping Ground to get the links to all the others joining in today.

(And since I'm involved in a Blog Hop on Saturday there will be no Friday post.)

Monday, October 10, 2016

Two Fairies

This past Saturday my friend Angie and I got together and worked on our monthly Bloom Box.  She likes to come to my house as I have the Silks, inks, and most every extra that we use on our cards.  We did get all 4 cards completed then I helped her with 1 from last month's Bloom Box before our hubby's called us from work to go to dinner.  Here's 1 of the 4.  The stamp set is called Fairy World.  I have to admit I don't much care for this set as I'm not into fairies and detail cutting them is a pain.  I'll probably give away my set in a drawing or something.  It's pretty rare that I don't like the stamp set from the Bloom Box but it does happen.


Angie is 100% Philippine so her fairies are a bit darker complected.  (She's sending her cards to some nieces.)  We pretty much stuck to the directions, too.


I also don't like playing with loose glitter as it just gets everywhere.  Our Sparkle Dust is very fine and super glittery and I like it but in small doses. The directions called for every card to use our Journey Glaze and Sparkle Dust but I switched over to Stickles on the last 2 cards.  I had enough mess to clean.


I like the effect of this card with using a piece of our Clearview sheet as the card front.


I think these cards would be wonderful for little girls as this one kinda reminds me of Tinker Bell from the Peter Pan movie.

Card Stocks: Pretty Pansy, Lavender Fusion, Designer Vellum Prints, Whip Cream, Limeade Splash, Clear View Sheets

Inks: Black Licorice, Lavender Fusion

Dies: Journey Circles, Border Basics (top of 2nd card)

Silk Silver

Embellies: Lavender Fusion Ribbon, Silver Sequins, Sparkle Dust, Whip Cream Thread

Other: Journey Glaze, Color Burst Pencils, Blenders,


Friday, October 7, 2016

An Old Truck and Plaid

A follow FSJ coach challenges many of us each week to make a card or project according to her specifications.  This week was to make or use a plaid background.  A friend, June, made an amazing plaid design using the paddle from the Adventure Awaits stamp set which inspired me.  So, I searched through my stamps and ended up with this:


I wonder if you can figure out what stamp I used for the plaid....  It's not from a set you'd think of using.  Hmmm......  Give up?  It's the pole from the Silent Night stamp set.  Yep, a Christmas set of the manger scene! I'm not sure if I made a good plaid design as I think I should have stamped the pole in the Butter Cream (very light) ink going the other direction, too.  Oh well.   


I colored the truck with Pan Pastels. I've got a lot of practicing to do.  I did use my Silver Wink of Stella to add to the Silver Pan Pastel on the hub caps, light lights, and grill, it's darker silver.  This cool stamp set was a have to have as my hubby has an old 1949 International truck he is planning on restoring.  Right now it's in 3 pieces, the cab, the hood. and the body with the box.  He has rebuilt the engine.  Plus this set has a lot of Route 66 images and we've been along it for a few miles.  Lots of history.

Stamps:  Silent Night and Hit The Road
Card stocks:  Whip Cream and Cranberry Bliss
Inks: Cocoa Powder, Cranberry Bliss, Butter Cream, Black Licorice
Pan Pastels: Mother Nature and Silver

Tonight I'm taking part in an open house at the place where I "rent" a room to teach classes, Earth School Wellness, in Green Valley.  I've been working on my Display Board and prepared some 23 more cards to sell (I hope!).


I think I need to raise the flyer on the far left. Hmmm.  I'll have my repositional tape with me.