Friday, June 29, 2012

Going to the dogs, again!

Yesterday I was pulling out some scrap paper and got a bit motivated. I pulled some stamps that went with the paper and here's what I got:


The pattern paper is from AdornIt and the stamp from The Angel Co.  I also used my new Spellbinders Scalloped Oval dies and some twine from The Twinery.  Whatcha think?


I wound the twine by using the Spirelli technique and inked and sponged the ivory oval.

I would have had this posted earlier today but we got hammered by a nasty thunderstorm last night. Power was out and the wind and rain was amazing!  Did get some damage - a sun shades for the patio was torn.  And we got over a 1/2" of rain in about 1/2 hour!  Gully was running but hubby said it was only 1/2'.  We really need the rain but I'm praying Colorado gets some FAST!! Hope you have a wonderful day!

Wednesday, June 27, 2012

What's on Your Workdesk? Week 160

Are you ready to take your weekly look at my work desk?  It's not too bad today.  I do have a small project in the works which you'll see but it's my shelf area that'll make you gasp!  But all this viewing has been organized by Julia over at the Stamping Ground. Pop over there and check out all the links to other crafters' desks.  Some are really amazing!


I've been playing with masking and sponging after seeing a cool card while blurfing (blog surfing).  And I still have to put away some buttons I bought on clearance at Wally World the other day.  But, are you ready for a REAL mess?


I desperately need to clean this pile. It's disgusting! And you can't even get a handle on how deep this pile is!  I hope to get it cleaned up this week.  Maybe by next Wednesday I'll be able to post a clean floor! LOL!

PS. As of Friday (the 29th) this floor and shelving unit is clean.  Well, not the top of the shelf yet, but I found the floor!!! 

Tuesday, June 26, 2012

Open the Barn door...

I was searching my shelves for something when I seen my LARGE wood mounted barn stamp set.  I haven't used it in a few years so off the shelf it came.  Well, after 2 tries and not getting a good image the rascal got ripped off the wood and mounted on cling cushion.  Problem solved.  Worked great.  Want to see my barn?


I'm still working on the photo box (hubby keeps forgetting to get me the hack saw) so I took this pic on my Scor-Pal mat.  The stamp set is by Limited Edition.  And there's something behind the barn door!


The cow is part of a circle of animals.  You just turn the circle!  All images are colored with Copics.  The chicken just above the door hides the brad.  I put another chicken in the window above the door to hide the animals as they show up upside down!  The window had marks saying to cut out the center and that would have looked horrible if left there.  Or maybe I should have then adhered the chicken over it.  I'll have to try it again!

I'm a bit slow stamping lately.  Between the heat and a cat who wants out starting about 11 pm (I really don't want to let her out, we have coyotes just north of us) I'm not getting much for sleep.  Been having to  take a nap in the afternoons but that's not really helping much either.  Closing the bedroom door doesn't work, she just sits at the door and yowls!  I do make her stay out some during the day but she has long hair and the heat really messes with her, too.  Any suggestions??

Sunday, June 24, 2012

Photo Box and Wolf card

As promised I'm going to show you the photo cube I made.  It is a 2' square cube so it's bigger than you think!


Here are my supplies.  It's made from 1/2" PVC pipe.  I did all the cutting myself with a hacksaw.  And I did it outside in the heat!


Here it is in use.  See the yellowing of the white sheet?  I even removed the sheet from the sides, still yellow.  Hung the lights from the side rails without the sheet on the sides, still yellow.  And for a laugh, you can see the light on the right sitting on my OTT light as it wouldn't stay up!


Here's how I was taking pictures.  Nice and white but what a shadow!


I did try to whiten the background a bit in PhotoShop but it didn't help.  The card colors are pretty close to correct until I took a close up.


The wolf was stamped on ivory or light cream card stock.  This is not good.  I have about $75 in this photo box and I'm not a happy camper.  I'll keep playing until I can figure out what to do.  I may have to purchase a couple natural light lamps but I'll try my Ott and another first.

Friday, June 22, 2012

It IS hot in Arizona

Today at 2:30 pm Mountain Standard Time I took this pic....


It's a good day to stay in and play!  I've assembled my photo box and, while the concept was good, the application isn't so great so far. I love the fact that there are no shadows to fight.  I'm still playing with taking pictures but they all have a yellow background as the floodlights aren't natural light.  Bummer.  Hopefully I'll have something to show you soon.

P.S. at 2:40 this thermometer read 107.2   Can you see me sweating? Ouch!

A Sizzix Bow

When I finished teaching my class Wednesday I was wondering around the AZ Scrapbooking store waiting for my check for teaching and to pay for some rhinestones since I forgot mine (were needed for the class).  I love dies to use in my Wizard (the old purple one) and came across this....


Hmmm....  Interesting!  I seen some earrings made with the smallest of these but I decided to play for a moment with some scrap paper and make a bow as intended.


I really needed another sheet of the paper to get a better bow but you get the idea.


Do you recognize the brad?  It's actually a golf ball brad colored with a Copic marker!  White just wasn't doing anything for me on this flower but yellow!  I will be playing more with this die later.  I did have a little trouble finding the right "sandwich" for this BigZ die but I prevailed!  And I used just pattern paper, not card stock.  If I find another sheet of this particular paper I may add more petals.  But I like how easy it was to make a cool bow!

Wednesday, June 20, 2012

WOYWWeek 159 and Girl's Dress card

Today is Wednesday and many of us are posting a picture of our work desk.  Julie at the Stamping Ground has brought many crafters together to enjoy having a peek of each other's work area.  What a hoot!


You can see my card below on the desk as I figured out flowers, lace, buttons, and whatever to complete it.
This card is probably finished but I've been trying to decide if it needs some text on the front or just leave it for inside.  Your thoughts?? This card is my sample for my July 25th class at the AZ Scrapbooking store in Green Valley, AZ.  I think 3 shaped cards will be enough as there will be a LOT of cutting.


I tried taking the picture in front of a white sheet of paper but the sleeves totally got lost in the background.  Paper is by JilliBean.  And, right now I can't find that pad of paper! LOL!  Guess I need to clean my work desk and computer desk.  Oh, the floor between the two is an absolute disaster right now and REALLY needs attention! Hmmm.. wonder if it's in there.


I layered the white lace for the waist band of some blue so it would stand out more.  And the flower and button really set it off.  I should have used a back ribbon that coordinated better but I couldn't find any in my stash!  Can you believe it!!!  I may have to make another card for one of the granddaughters.  The youngest is quite the girly girl (at this time).

This past weekend my hubby and I went to the local hardware store to purchase supplies to make a light box so my photos won't have so much shadow.  I now have a hack saw and maybe this weekend I'll be cutting the PVC pipe and getting it assembled.  I'll show you the box and give you a link to where I found the directions when I get it done.  So far the cost is about $70.  It BETTER be better than what I've been doing!

Monday, June 18, 2012

I'm (kinda) published!

I submitted a card recently to Graphic 45 (one that I recently posted here) and they put it in their gallery!!
Wahoo!  Just click HERE to see it in their gallery!


More Graphic cards... :-)

I have 2 more Graphic 45 cards to show you.  And again, NO stamping.  Are you still in shock from the previous post about that??  My hubby asked me why no stamping and all I could do was show him the cards and ask him why.  He agreed, they didn't need it.


This collection is just fantastic!  I'm still debating the flower on this.  Maybe the card doesn't need it.  What do you think?


I use my Fiskars Treading Water border punch a lot and these 2 cards both use it.  But on this card I got to thinking about those little holes in the scallops then I spotted my rhinestones...  And here's a close up of what happened...


I like this!!  A great touch of bling!!!  Don't you think so?

Saturday, June 16, 2012

It's Graphic.... 45, that is!

I've been working on some ideas for a July class and Debi at the AZ Scrapbooking store in Green Valley, AZ wanted me to use some of the new paper that she got in.  The Graphic 45 paper called  "A Ladies' Diary" is wowza!!  I did come up with 4 cards that has NO stamping....  Ok, friends, you can get back in your chairs now and pick up your jaws.  You heard me, no stamping!  But when you see these cards you will understand!


Didn't this come out nicely???  Just so elegant!


And how about this one!! For a better look at the papers just click HERE!  This is the store main page and some of the paper is showcased.  I'll post the other 2 cards shortly.

Thursday, June 14, 2012

Happy Flag Day!

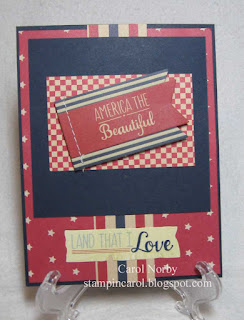
Today our great nation celebrates Flag Day.  I proudly have my flag flying.  I consider myself a patriot as I think this nation is exceptional (I'll not get on my political soap box at this time).  I made a card using Memory Works products.  The cool paper (except the solid blue) is all from the pack called Let Freedom Ring by Pebbles.


No don't faint.  There's NO stamping!  Originally I was going to use a flag stamp but it just wouldn't go together the way I wanted.  I'll save that flag for another card.


Here's a close up of the raised panel.  I love the stitching!!! And the other text is a flat sticker, no foam to raise it up.  This is the card I was working on yesterday when I posted my work desk.

Do you know the history behind Flag Day?  It was officially proclaimed in August, 1949 by an act of Congress.  It celebrates the adoption of the flag of the United States.  There's more on Wikipedia if you're interested in more of the history.


And I just had to share a picture I took of a mother Gambel's quail and babies.  There's about 8 of them and boy, can they run!!!  I'm glad my little camera has a pretty good zoom as I took this from inside my house about 50' away.  We have lots of these cool birds in our yard and are so fun to watch.  They are very spooky and just opening the window blinds can make them scurry!

I want to thank all of you who visited my blog yesterday.  I had a record number of hits! I hope my projects and pictures inspire, encourage, and gladden you.  I do LOVE comments so, if you are so inclined, please let me know if you enjoy my pictures, etc.  Thanks, and God Bless America!

Wednesday, June 13, 2012

WOYW Week 158

Again, you get the opportunity to look at a number of crafters' work desks! Thanks to Julia at the Stamping Ground for bringing us together to get a look at projects on the table and how we organize (or lack thereof, like me) our work spaces.


I just got my order in from Memory Works and got some wonderful paper called Let Freedom Ring by Pebbles.  I'm working on a card following a sketch posted by Operation Write Home a week ago and I'm using a stamp from a set called God Bless America Quilt by The Angel Co.  Red Rubber Designs doesn't carry this set yet but who knows.... And you can see the beach ball card I may try to teach at the LSS next month. I seen the card in the July/August PaperCrafts magazine and had to give it a try.  Yep, a very busy desk. What's your desk looking like???

And last Friday I got a huge order in from Memory Works for a group of gals.  This is my freezer before I start sorting the orders...


It took me a couple hours to get these in their piles as I had to keep going to my catalog to figure out the papers!  Since there is a huge selection I don't have them memorized.  But I'm now working on delivering so the gals can play.  You can see the group as I posted a pic a couple weeks ago about this Tucson crop group.

Tuesday, June 12, 2012

Horsing Around

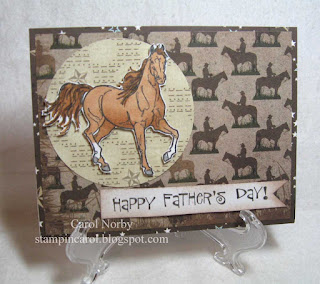
Our grandson-in-law is a horse trainer.  He trains and sells horses in the Powell/Cody, Wy area.  Well, I just had to make him a special "horsey" card for Father's Day.  I don't know who makes the horse stamp but the text is from The Angel Co.

Papers are by AdornIt and Got Moxxie.  (If you click on Got Moxxie you will go the page of the horse and rider paper.)


I colored the horse with my Copic markers and added Crystal Lacquer to the hooves.  This is an Arabian horse.  I had a gorgeous Arabian gelding many years ago but didn't color this one to match mine.


I made the banner wavy by using foam mounting tape between glue dots and I sponged Burnt Umber PH ink on the banner so it wouldn't be so stark white compared to all the browns.  I think Sky will like this card...  My hubby does! LOL!  I had an Arabian gelding for 22 years.  He was a gorgeous bay with face markings.  Very intelligent and much missed.

Sunday, June 10, 2012

Anniversary card

Ok, as promised I'm going to show the card I made using the silver/red medallions from my previous post.


Some very wonderful people from WY will be celebrating their golden anniversary in a week.  Yes, I know this card doesn't use ANY gold!  One, I didn't have any, and two, I like the contrast between the front and back of this pattern card stock.  And, I didn't layer the 2 medallions!


I did add a crystal rhinestone to the center of the medallion as it just begged something!


I adhered the bow (made with my Bow Easy tool) with glue dots and fixed the tails so that they were "wavy".


And the inside.  I found a poem on the web that I liked and printed it. One thing I did after taking the photos was to highlight the words Golden with a copic marker.  I think they'll like this card, what do you think?

Friday, June 8, 2012

Spellbinders Shapeabilities Cut, Fold, & Tuck

I borrowed this die set from AZ Scrapbooking store recently to play with to decide if I want it or not or whether I want to teach a class on it.  Well, it took some finagling to get it to work and the results are rather cool.  I did learn some things playing with it but I'll show you what I came up with (is that a dangling participle?).


I played with 2 different double-sided card stocks that had lots of difference between the sides.  There are 3 different dies and you can layer them, if desired.


Here's the top 3 layered.  Very busy!  I probably won't layer the 3 sizes together unless I use paper with less design. May need to find a double-sided of solid colors instead of so much pattern.


Here's the bottom 2 layered. I used the middle and smallest dies.  Not too bad.  My next post will show a card using the silver/red medallions.  Oh, what I learned...  I had to shim the dies with 2 layers of card stock to get the cuts to go all the way through the card stock in the die.  Plus I had a piece of wax paper between the die and the card stock to be cut.  Made it so much easier to get the card stock out of the die. So, back to playing!!  And, I do like hearing from you.  What's your favorite flower shown above, the singles, the triple, or the double?