Thursday, July 29, 2010

No mojo for a few days.... Sorry.

I've been a bit out of it this past week.  Had insomnia Sat. and Sun. nights and was a total wreck on Monday so, no stamping.  Tuesday wasn't much better.  Or Wed. But yesterday and today I've been working hard!  I'm involved in a card front swap on Paper Wings of new images from the new catalog.  I can't show the cards until the swap is complete but I will give you a sneak peek!!


This image is from the set Sunflowers.  My favorite flower is the Sunflower so I "had" to buy this set!  I used Copic markers to color from Color Caboodle Sets A & F. I'm a novice using them but I really like how my shading turned out. I did have a couple areas on the leaves that I didn't get blended very good, though. I'm not "Copic certified" but maybe someday....  I stamped the image on White Caboodle card stock which really is great when using the Copic markers! Seems to minimize the bleeding through of the markers. I stamped the image with Noir PH ink and it did just fine. I hope to get the Momento Tuxedo Black and give it a try when I order next. It is the ink that's recommended when using Copic markers.  Oh, don't be shocked when you see the whole card. I didn't use the Stardust Clear Gel pen on it! LOL!


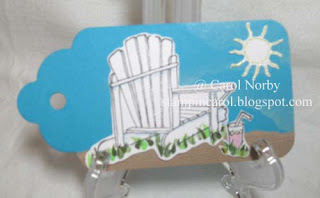
 Michelle, my downline in north Tucson, is having a beach theme tag swap.  I had to do this in a hurry and since Anchor To My Soul is the only "beachy" set I have I had to use it.


I used the Copics again for the grass, chair shading, and pink lemonade.  Can you see the sparkly ice? I used the Stardust Clear Gel pen on it and the sun.  And I made the clouds using a piece of torn paper, a piece of sponge, and my Moonlight White Brilliance pad.  I used my Wizard and a Sizzix scallop tag die to cut the tag from some blue card stock I have in my stash.

I want to welcome my new "followers"!  I appreciate all of you who follow or subscribe to my blog.  I hope my projects give you inspiration. 
Sunday, July 25, 2010

It's Christmas -- in July!!

As promised all week (and maybe longer) here is the Paper Wings Christmas in July Blog Tour!!  You are invited to tour our blogs and get some great ideas for your Christmas projects with plenty of time to maybe make some!  Please take time to visit each angel listed below in the list and leave comments on what you think of their works of  art!

I have 3 projects to show you today.  I've had fun making them and hope they inspire you.


My projects are, from left to right, a Purse Photo Album, a candy box, and a card.  The first 2 were inspired from the blog Christmas Stampin.  I started following it a couple weeks ago and the designers are great!  All images are from the Jingle Jolly stamp set and I used Penelope SWIC, card stock, and ribbon.  I used my Scor-Pal on the box and photo album.  I'd be lost without that great tool!  And, FYI, we now carry the Scor-Buddy  (but right now it's out of stock as it's so popular)! 


I'll start with the little candy box.  Can you see this filled with Ghirardelli chocolates or M & M's as a place marker??  I stamped the snowflake with Pumpkin Spice VersaMagic ink and added a sequin and pearl from the Clear/Pearl Gem Collection. And I used the Stardust Clear Gel pen (naturally) on the ends of the snowflake.


I used a piece of transparency sheet to keep whatever goodies you put in the box to stay in the box.

Here's the card. I used my Wizard and the Labels 3 Nestability to create the center layers.  I stamped the images with Noir PH ink and colored with Prismacolor H2O pencils and my Dove Blender pen.  I colored star and balls with the Stardust Clear Gel pen for bling.


I used pop dots to raise up the tag and staples to attach the ribbon.  And that is Pumpkin Spice VM ink sponged around the edges of the white layer.


Now for the Purse Photo Album. This was a hoot to make.  A bit time consuming but, after you get the hang of it, it does becomes easier.


The top flap uses a half piece of a small circle of  hook & loop tape to keep it closed.  After stamping Santa I used my Prismacolor Pencils to color then punched with my 2" circle punch. The purple is punched from the Mega Jumbo Scallop Circle punch then I used my White Gel pen to add the dots to the scallops.  Can you see the Stardust Clear Gel pen glitter on the fur of the hat and coat??


I covered 2 CD sleeves to make the pockets.  The lovely little gals are 2 of our granddaughters. And Rylie, the one in the mouse suit in the left picture, was just in a dance recital and was still in costume. I stamped 2 images from the stamp set, colored  with PrismaColor pencils, cut out and adhered as shown.


I sure have enjoyed sharing my projects with you and please visit the other angels' sites for more!

Rita W
Shirley
Christine

Kim
Julie
Seleise
Angela
Michelle
Chelsea
Betty
Candi
Angie
Teresa
Diana 

And if you need more inspiration just go to the Paper Wings website and check out the gallery! Do a search for Christmas and see a few years of wonderful inspiration!

Saturday, July 24, 2010

Thanks through a horse...

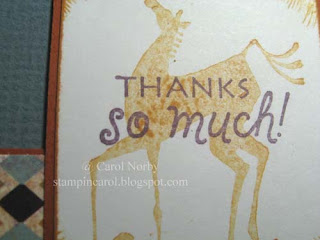
I have a new customer who ordered Hieroglyph Horses among other sets.  I like to make Thank You cards for my customers using a set they purchased (if I happen to have one).  I've used my Hiero Horses set so much it's beginning to show a hint of staining. But I digress...


She also ordered Winchester SWIC so I also used this product plus the matching cardstock (which is one of my favorites, too).  The little Thanks So Much is from the Thinking of You set (which used to be a Hostess set but now is available for general purchase).  I used Cognac and Noir PH inks.


I like to make my bold images different and this one is no different.  After inking I stamped off once on some un-crumpled paper before stamping on my little piece of cardstock.  Can you see the way the horse looks dappled??


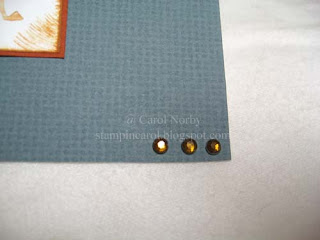
I found some cool little brownish sticky-back rhinestones that just finished off the card with a touch of bling. Kathy liked the card and, so do I!!  What do you think?  This layout was also a sketch challenge on Paper Wings.  Have you checked out the gallery lately?

Don't forget our Christmas in July blog tour starting tomorrow evening! There are 15 of us taking part and I can't wait to see what the other angels have come up with!

Thursday, July 22, 2010

The Ink Spots stamp club

Our stamp club meets the last Friday of each month at the AZ Scrapbooking store in Green Valley, AZ at 6 pm.  I finally finished my punch art name tag but need to laminate it yet. I have a large Xyron and my name tag is kinda small so will wait until I have a few more things to laminate. But my little gal is just too cute!


I used mostly circle punches for most everything. The lips are the bottom of a heart punch, and the lace from a Fiskars border punch.


Here's a close-up of the head. I added some White gel pen and the Stardust Clear gel pen to the hair as I am getting more and more silver. Oh, the body is a tag punch.  What do you think of my sun glasses?? I used a black Stardust glitter gel pen on the lenses and the frames for more bling.  I hope to get pics of the members name tags at the meeting.

I also updated my personal blog. If you are interested just scroll down the left sidebar to the link. I have pics of my Prince Charming and his chariot and more!

Tuesday, July 20, 2010

I'm back!!!

Got a new power cord and a replacement modem.  Only needed the power cord. Will be sending the modem and BAD power cord back.  Yippee!  Can't believe how disconnected I felt!

So, now for a post for today.  Next week on the30th from 10 am to noon at the AZ Scrapbooking store I will be teaching a class on using the Southwest Collage stamp from Outlines Rubber Stamps.


This is the picture that should show up on their website.


Here's the 3 cards close up. The solid card stocks are smooth Bazzill, pretty cool but I do like the textured better. I will be teaching another class in August using another Outlines collage stamp.  I really need to stamp with our images but seems like my time this past week was getting to computers to check email, etc.

This coming Sunday some of us angels from Paper Wings will be having a Christmas in July blog tour. I have 3 projects (10 pictures) to show! I'm so excited! The tour starts at 6 pm Pacific Daylight time so stay in touch!

Friday, July 16, 2010

Gift card holder and marking your place...

We give quite a few gift cards at Christmas as our family is fairly difficult to shop for. And, if you are having a lot of people over for Christmas dinner, you may want to have them sit in a certain place at the table. Well, we made 2 projects at Seminar that address these needs.


This cool hanging gift card holder (can you just imagine it on the tree doubling as an ornament?) starts with the Sidney Circle Album Kit. Add an embellishment along the pocket edge (here I used some sewn paper edging),  add a fold-over tab and an eyelet, string some gold sheer ribbon and you have it!


 I did sponge a bit of Burnt Umber PH ink on the paper edging for a more vintage look.


Now, wouldn't your guests just love to sit where this is at the table?  Fill the mini clear tube with M&Ms or something small for an added treat.


Items used: Nestabilities Labels 9Emma SWIC,  tree from Jingle Jolly, Primsacolor H2O pencils, a Dove blender pen, brown satin ribbon, 1" circle punch, Scor-Pal, a sponge, and Noir & Burnt Umber PH inks.


These tubes are about  4" long and a bit over 3/4" in diameter. You can get 4 tubes for $2.95 (before s/h & tax).

Wednesday, July 14, 2010

A couple cards made at Seminar...

I would like to show you a couple cards we made while at Seminar.  These both use new sets in the catty and one of them is on my wish list.  Take a look...


This card could be used for Christmas but then again, it'd work for a birthday or anniversary! Do you notice that large background? Actually there's a couple sets used to create that.  One is Damask Backgrounder and the other, Vintage Backgrounds. Also used is Noble Notes and Fundamental Frames. The base card is Kraft card stock and some olive green card stock for the frame.  Inks used was Burnt Umber PH and VersaMark.


Here's the closeup. The detail of the Frame is wonderful! After punching a 1/4" hole in the tag I added a piece of sheer brown ribbon to add more embellishment.  I also used Pop Dots on the text piece for more dimension.  Oh, I sponged the Burnt Umber ink on my Kraft pieces to make them more vintage.


Here's a "Bah-da-Bing" card. That's what TAC™ called it! And there definitely is some bling!! We used Angelee SWIC and ribbon, Floral & Stone Impressability, and the Clear & Pearl Gem Collection. Oh, a sanding block was used to bring out the swirls from the texture.


Isn't this gem just lovely?  It really added the bling! This card is so feminine. But, with the gem, it may be difficult to mail and will definitely cost more than the current 44 cents.

I still have more from Seminar to share so stay tuned!

Monday, July 12, 2010

Christmas In July class sample

I'm teaching a cool class on the 22nd using an Outlines Rubber Stamp Co. image called Cut Away Topper.  The class will be at the AZ Scrapbooking store in Green Valley, AZ from 10 - noon and will cost $18 and will include the embossed images, a hand out, and the glass ornament (plus one will receive an additional embossed images of the Ornate Topper and hand out). 


I've had this stamp for a few years and love the elegance of it. I colored the sections using my Souffle 3-D Opaque Puffy ink pens and then the Stardust Clear Gel pen over that.


If you are in the Green Valley/Tucson area and are interested, call the store at 520-393-7755 as space is limited.  As of this posting my class is not on their calendar and my "Southwest Collage" class has been moved to the 30th due to the stamps not arriving in time.  And on the 30th is our monthly meeting of the Ink Spots at 6 pm.

A couple Seminar projects that I finally completed....

I've been trying to finish some Seminar projects and am getting them done!  Wahoo!  I don't usually finish them at Seminar as there are so many of us angels trying to do them that I just take pictures and wait. I do what stamping I need since we use new images that I don't have yet.  I'll start with a cool Christmas wall hanging...


We started with an acrylic page from the Small Banner album. These are found on page 116 if you have the catty or just click on the link (the words "Small Banner"). We used the purple & ice blue sides of sheets from Maggie SWIC.   I also used the cloud scissors and  Silver Stickles to embellish the purple.  I used my Scor-Pal to help fold the ice blue piece into an accordian fold and then I also cut the edges with the cloud scissors and added the Stickles.  The phrase is from Noble Notes stamped on white premium with French Lilac Ph ink and folded and cut to make a little banner.


Here's a close up of the accordian flower and the top edge of the banner. I used white & lavender scrappers floss and white ribbon for hanging and more embellishing.  I think this wall hanging is so cool and it wasn't really that hard to make but it was a bit time consuming to allow the stickles to dry completely before assembling.


How do you like my cool necklace?? I don't have anything to wear that this really goes with but it is just so cool!! It starts with a 2" x 2" Black Patina Memory Frame.  Did you guess that? We stamped the little piece of Emma SWIC paper with the zebra image from the Safari Squares stamp set using VersaMark ink and embossed with black embossing powder.  For additional bling there is the black flower from the Neutral Bitty Blossoms and a gem from the Clear & Pearl Gem Collection. Add the black cord and voila!!


Here you can see the pendant close up.  Very striking if I say so myself.

Are you enjoying seeing what we did at our annual convention?? I've got a few to go! And I'm already looking forward to our next one on June 23 - 25, 2011 in Wichita, KS.  My plan is to fly into Oklahoma City and ride up with a friend.  We are discussing having a little "pre-Seminar" get-together by having a "shoe box" party. 

Saturday, July 10, 2010

Hedgehog and Flowers

We carry a wonderful Hedgehog Hostess C set (earn FREE with a $500 net order). It has 11 stamps and is great for any occasion!!  I was playing with a sketch challenge over on Paper Wings (click link in sidebar) and this set just popped out at me.


Isn't he just TOO cute?? And the wagon of flowers, the wheels.....  I really like this card.  I used Emma SWIC, black, and white card stocks.  Oh, the phrase comes from the Brighten Your Day stamp set (sorry, I couldn't get the link to work).


I colored with the PrismaColor Pencils3/8"  and 1/4" blending stumps, and OMS. Can you see the faint shading I was able to do? And I used the Stardust Clear Gel pen in the center of the flowers for some bling.  How do you like the wheels??  They're just 1/4" black buttons and white scrappers floss. Oh, I used Pop Dots under the flowers for more dimension. 

I do appreciate those of you who leave comments.  Those comments are very important to me.  Thanks so much!