Saturday, March 31, 2012

More magic....

Did you enjoy that magic card in my last post?  Here's the other 2...


There's not much to say today but now I need to get some other projects completed!  Work, work, work.... No, that's play, play, PLAY!  LOL!

It sure has gotten quiet for comments!  Would appreciate your feedback on my projects. But I'm glad I'm moderating the comments... been getting a lot of spam comments recently. I may yet go back to word verification, need to think about it.

Thursday, March 29, 2012

It's Magic!

I spent ALL DAY yesterday getting our tax stuff in order and today it'll be in the mail to our C.P.A. son in CA. I hate sitting and sorting receipts then putting those that are deductible on a spread sheet. Then, after printing out my stamp business info, and I don't know what I was thinking,  I deleted the spread sheet!!!  Oh my gosh!!!  Well, at least I have a hard copy.  This year it looks like we'll be itemizing due to some hefty medical bills on my numb foot (and it's still numb on the outside but just a 1" x 6" area) and Dean's big tool purchases (he has to supply his own tools for work).  So, this morning I finished photographing 3 cards for an upcoming class on April 18th at the AZ Scrapbooking store in Green Valley, AZ.  Still have to get my directions wrote so I'm slowly getting there!  Here's a pic of all 3 cards...


Do you know what's "magic" about these??  I'll show you a close up of one card...


Here it is closed....


And now open!!!  I haven't made these cards in over 10 years!  And with the use of clear stamps, it's a whole lot easier.  But have you noticed... this one is paper pieced!  It does have a tendency to catch on the pieced bird when closing but it was an aha! moment!   I'll show you the other 2 cards in upcoming posts.  Now to get the directions put together.  At least I took a step by step pictures to help me!

Tuesday, March 27, 2012

Watercolor Desert

I'm running a bit behind this month and finally got a card made for my Technique Junkies monthly swap.  I have NO idea who made this stamp but I embossed it on watercolor paper with white embossing powder then colored with my Aqua brush and inks.


The little geckos are from a TAC set and embossed with Verdigris powder.  I had some cool wood grain paper and some fun pressed wood to finish out my card.

Here's a close up but it seems a bit dark. Click on it to enlarge and maybe you can see it better. I used quite a few inks to get the different tones.  There's a bit more to this technique called Distress Ink Watercolor but I did change it around a bit to fit what products I had.  Not too bad.  I may try this again!  What do you think?

Sunday, March 25, 2012

The other 2 pages...

Ok, here's the other 2 pages from that Quick Quotes kit. (Try saying that fast 5 times! LOL!)


This is an interesting page and maybe it's for some photos of you doing something on your bucket list.  You can insert little pics on the 3 cream pieces if desired.


Isn't this bucket cool!  I used the ink pad to swipe on the color and love how it turned out!


This is the final page. The brown "frame" is the left over from all the chipboard pieces! Pretty cool how the company had this figured out!


I think this little chipboard handle and tag are just adorable! I did use some red liner tape on the handle as I didn't run the little brads through the page.  I don't know the cost of the kit and it took me a few hours to make all 4 pages.  I'm not the greatest scrapper and I think this kit is nice if you get in a stump on layouts, etc.  What do you think?

Friday, March 23, 2012

A couple scrapbook pages

As you probably know if you've been reading my blog for any length of time is that I'm an instructor at the AZ Scrapbook store in Green Valley, AZ.  We had our monthly meeting last Thursday and Debi had us teachers take kits from different companies to assemble for display.  I took a scrapbook kit from Quick Quotes Scrapbook Company called "Sky's the Limit".  I just finished them yesterday and here's the first 2 of the 4 pages.


The kit came with instructions and embellishments.  This is the first page.  Cute but a bit busy for my taste. I did have to sand all the pop-outs as the tabs didn't look good.


Here's a close up of the flowers.  I used a needle and thread for the yellow crepe paper flower and got the center a bit off.  One can add a circular photo on the brown chipboard flower and journaling on the 3 little strips.  This page is very dimensional.


Here's page 2. I did have to cut a couple sheets of 12 x 12" papers according to directions.  I didn't adhere the right edge of the blue piece so that you can slide a photo under it on the cream colored piece. The chipboard embellishments are pretty cool.  I used the brown chalk ink included in the kit to color/edge most everything.


The little ribbon thing hanging on the balloon basket is supposed to be a sand bag..  Interesting...
Sunday I'll post the other 2 pages. 

Wednesday, March 21, 2012

What's On Your Workdesk... Wed. 146

I've been feverishly working on some projects and a tutorial for Memory Works to finish fulfilling my month as Guest Designer.  I will post those projects when they've posted to the MW blog.

So, when I took this pic of my workdesk I was kinda between projects so it's not too bad...


It's not good but it's definitely been worse!  So do you have any projects you're working on? How's your desk?  Check Stamping Ground for more workdesks and see how your's compares!

Tuesday, March 20, 2012

Dog-gone busy!

The past few days just seemed to whiz by without me making anything to post!  I did attend the Rubber Stamp & Scrapbook Expo in Tucson, AZ last Saturday but was so disappointed by the limited number (10) of vendors.  My favorite, After Midnight Art Stamps, was there and I did purchase 10 Copic markers.  I had my marker book with me but still managed to duplicate one color.


Along with the markers I purchased a cool Tim Holtz Kraft-Core paper pad, a package of Frame-Its Kit A-2 by Stamp On It, and a Spellbinder M-Bossibilities (2 sided!) Mystic embossing folder.


Here's how the Frame-It works.  I put my Kraft-Core paper inside.  Holding the folder up to a light I could see where it was and carefully taped my Frame-It to the outside of the embossing folder.  It took me a bit to get the right "sandwich" for this to work in my Wizard.


I embossed the phase in the frame.  Quick tip: don't start with one embossing powder then change your mind for another.  The bottom word is in silver and the rest is in brown.


Here's a close up of the embossing. I sanded it to bring out the kraft color. I did notice that the Kraft-Core slightly warped with the embossing so it took more tape to get it on my card base.  You can see some of the warp-age in the full card picture. I will have to play more with these.  I've been so busy with trying to make some projects for Memory Works that need to post Thursday then I can post them here Friday. And between Bible Study (I helped with treats so baked pumpkin muffins and pumpkin cheesecake bars Monday) and other priorities I've not been able to get stuff made.  Maybe soon I'll be able to spend some time at my work table!

And another cool note: Red Rubber Designs is now open for business!!  If you loved The Angel Company's stamps and paper Pam has them here! I see a couple I'd like but it seems I have many of these or sold them when they were retired. Bummer.  And RRD has a blog!  Check it out! I'm waiting to see who is on the Design Team and what they've come up with to inspire us!  I was thinking of trying out for it but have just too much on my plate right now.  Hope you check them out!

Saturday, March 17, 2012

A couple pages of Moab

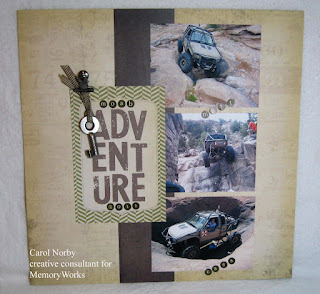
For the past few years our son and his friends have been going to Moab, Utah for a 4 Wheelin' weekend. They went again this past Sept. and I managed to snag some of his pictures from the Powell Valley 4 Wheeling website. And, since I'm a guest designer this month for Memory Works I made a couple pages.


I used paper from Simple Stories called Destinations.  I love this paper!


This paper is from Memory Works' March Express Kit.


Isn't this key just cool!  And it's perfect for this page! I also made a mini album with some of his pics and will be posting that soon. 

Friday, March 16, 2012

Getting Punchy #2

Ok, this will be my last samples of this style (at least for a while).  I've had so much fun playing with my larger punches and then I thought, I should try this will my Spellbinder dies, but I'll save that for some time down the road.


I again used the Bo Bunny stamp set but the text is from a TAC set.


The flower center was just begging for a crystal!


Now wouldn't this card be wonderful for an anniversary or Valentine's Day?  And I REALLY added the bling!


Have you enjoyed these?  Have you tried this style?  Go for it!  Get those large punches out or your dies!


Wednesday, March 14, 2012

Getting Punchy #1

I have so been enjoying making cards using my larger punches to create "windows".  I have made a couple before and posted and I love the look!  I made another 4 recently and am thinking these would make a fun class at the AZ Scrapbooking store next month.


Isn't this a hoot!  The stamp is from a set by Bo Bunny.  Paper is by Fancy Pants Designs.


I added a dot of my Stardust Clear Gel pen to the eye.  I used lots of foam mounting tape and added the "stitching" with a regular ink pen.


Same paper, same set of stamps. This one is my mom's favorite.  She really like the birdy side of the paper.

It was nice dusting off the punches. Oh, I added some bling to this flower with the Stardust pen, also.
So get out your punches! Play a little!!

Monday, March 12, 2012

My Prayers

We have a friend who is now in hospice for pancreatic cancer.  She is a lovely Godly woman and I wanted to send her a card.  AZ Scrapbooking store in Green Valley, AZ got in more cool Peel-Off Stickers, the special double adhesive tape and the Cool Highlight "glitter" and I'm now off and running!!  These are all on Elizabeth Crafts Designs site and I posted a week ago the teapot card I made using these products.


I used 3 different card stocks to match the colors I used with my Copic markers and Copic blender pen.  I almost forgot to "burnish" the glitter before coloring and after getting this card completed I had a very "sparkly" face, hands, clothes, and desk.  The stamp is one I've had forever and I can definitely tell I had recently re-inked my ink pad!  But I like it that the word MY is highlighted as we've been praying for Geri daily.


How cool is this!! I added a crystal to the center of this poppy for more bling (like I needed more!).  I hope to get this card in the mail today or tomorrow.  And, while reading this, please say a prayer for Geri.  Thanks!

Saturday, March 10, 2012

Sunflower and Butterfly

Ok, I know, I know.  I missed posting yesterday.  I try to post every other day but I got busy with some cleaning.  Right before Christmas my brother and his wife came to visit.  So.... I shoveled much into the hutch.  Then mom wanted a couple books she loaned me (I think I returned them right before Christmas but I looked anyway).  Therefore I took everything out the of bottom of the hutch and started going through it.  I filled a garbage bag and organized all my magazines.  Boy do I have a pile of stamping ones! And a rather impressive pile of cooking ones, too!  But later in the day I did finish this card that I started Wednesday.


I used some stamps and paper from The Angel Co. and a Cuttlebug embossing folder with my Wizard.


I colored the flower and butterfly with Copic markers. I like how the flower turned out.


For some reason the butterfly isn't very clear.  I had my camera on the correct setting but, oh well.  I wanted to show you the Stardust Clear Gel pen on this.  Seems I get my students at the LSS to purchase it whenever I have a class.  Love the  subtle bling!  I'm now playing with some more stickers from Elizabeth Crafts.  Hopefully I'll have a card made soon.