Monday, August 31, 2015

Hiking Boots and Birthday Hearts

My mojo came home Saturday and I was trying to take advantage of that.  I was looking around Pinterest at the pins I have (I NEED to use them or what use are they?) and I got busy!  I made a few cards and today I'll show you a couple.  The first one is so EASY peasy that anyone can do it!


I started with some Pineapple Smoothie paper and made a 2 1/4" wide x 4 1/4" Whip Cream banner.  I stamped the sentiment from the Sentimental Prints set at the bottom of the banner with Black Licorice ink.  I used the smallest Heart-Felt die and cut it at an angle. 


I had some heart shaped crystals in my stash and I used one of those in the center of the heart (which was pop dotted). I have so much stash and love using it on my cards!  I love the simplicity of this card.  I think I'll send it to a wonderful lady who just celebrated her 95th birthday.


This card is probably familiar and it should be.  I've made a similar one a while back but I used different elements from the Scenic View stamp set other than the mountains.  And this time I lightly adhered the white square to the Whip Cream layer before stamping the mountains with Fresh Forest ink.  I did 2nd generation stamping, too, for the depth.  Both are layered on Fresh Forest card stock.  I stamped the boots and words with Cocoa Powder ink but I cut the boots out and pop dotted them on the diagonal square.


I also pop dotted the diagonal layer for a bit more depth.  This is another easy card to make and it will be one I'll teach at a party some day.

I put in a rather large order Friday so I'll have another Christmas stamp set, a Halloween set,  a southwest set, an inspirational set, some Silks, card stocks, ink pads and fun dies.  Lots of goodies!  I had to take advantage of the Double Hostess awards for August.


Here is the September (on my, that's TOMORROW!) Kit of the Month cards.  DONUTS!!  If you are interested in getting this kit (and 5 more since you have to sign up for 6 consecutive months) for $24.95 plus shipping and handling just click HERE.  You get an exclusive stamp set that is not available for general purchase for 3 months and all the paper needed for the cards and embellishments.  You supply the inks, glaze, glitter, or other stuff most crafters have.  I should have my kit by Friday.  Hmmm.... I don't think I shared the August ones with you!  I have 3 of the 4 cards complete but am waiting on my order for a Silk that I wanted to use.  Guess you better come back!

And don't forget to check out my FSJ Specials page for what all is  happening!  FSJ is going into mixed media with classes available.  Head on over to that page!
Friday, August 28, 2015

A Smile in a Heart of Flowers

Not sure if I like my post title but it does fit my card for today.  One of the Journey Coaches on FB does a weekly challenge and this week was to use stamped flowers as part of the background.  I found a cool card on Pinterest (link HERE but scroll down a bit) that would work great with what FSJ stamps I have.


I used 2 stamp sets,  Flower Party and Greet & Shout.
Four different inks were used:  Black LicoriceCandy Apple, Pineapple Smoothie, & Beach Ball.
I used the Petals Wall embossing folder and Heart-Felt die set.


I stamped 3 extra flowers and added them outside the heart and added the littlest Pearls to their centers.  I like how this turned out and just love Pinerest!  It is slowly bringing my mojo back from vacation.

Wednesday, August 26, 2015

Desks and Monuments

I have been missing in action from this wonderful weekly blog tour of desks for the last 2 weeks.  I went to Wyoming to see our daughter and her hubby, my sister-by-choice, our son, his girlfriend and new grandson, and our granddaughter, her hubby and new great grandson, a girlfriend.  Was so wonderful seeing everyone and to hold the babies, oh my!  My heart was full.  But today I'm back (actually got back late last Tuesday and way too tired to even think of joining up) and joining in week 325 through Julia, the head and queen desker at the Stamping Ground.  I have no projects to show but do have a couple pics of the fabulous buttes at Monument Valley, UT and AZ.


Got a little bit going on.  Yeah, very little.  I have 1 card from the FSJ Kit of the Month to finish.  I think I'll wait on it until I get an order in and purchase a couple items I need (inks) even though I did finish the other 3 with what I had on hand.  Those got changed up a bit yet turned out pretty cool.  You can see a printed out email far left, the sheet of stamps,  Silver ink and pad and glue dots on the left.  Center to right is my work spot, the kit in a baggie, my All-in-One tool  and scissors.  Top is my Cricut, some cards, spray bottle of water and cleaning rag, and my loaded desk organizer.  Oh and my black ink pad.  I hope to get stamping again tomorrow.  I may be home from vacation but my mojo stayed with the pics below.


I stopped at the Monument Valley visitors center (cost $20 for up to 4 people in the vehicle) and so enjoyed the view!  This butte is called West Mitten Butte and most all are actually in Arizona.


Here are West Mitten,  East Mitten, and Merrick Buttes.  I hope to visit this place again and it had a pretty nice little museum!  I enjoyed reading about the Navajo Code Talkers who helped us win WW2.


And I thought I'd show you the purse I purchased while in Wyoming.  I am a horse lover and had 1 for 22 years that I raised and trained.  I had to put him down in 1996 due to crippling and miss him still.  He got me through some really tough times.  This purse is quite deep and doesn't have not much for pockets so much of my stuff is in clear makeup bags.  Works pretty good!

I hope you click on through to the Stamping Ground and check out all the fun desks and projects.  I'll be heading there when back from some errands with hubby.

Monday, August 24, 2015

Backbacks and Dahlias

I am home and slowly starting to stamp again.  I had a wonderful time with the kids, grandkids, and great grandkids in Wyoming.  In fact, I visited with a friend who owns a reality company about a possible move in a couple years or so.  Yep, I am wanting to be near our kids and the babies.

But for now here's a couple cards I managed to get made after I got home.


I needed to get a card made for one of the monthly swaps I'm in and this card was for the Technique Junkies 1 - 1 swap.  The technique is called Brayered Spotlight.  I think I should have made the spotlight a bit smaller but it turned out good.  I used all FSJ products.
Stamps:  Brush Strokes (circular stamp and the link was incorrect) and Dahlia Burst
Card Stock: Pineapple Smoothie and Whip Cream
Inks: Black Licorice and Pineapple Smoothie
Other: Gold Silk & Black Licorice Twine


I like this technique and may try it again.


This card is one of the 4 cards from the August "Kit of the Month".  I didn't have all the items needed according to the directions so I changed things around.  I used the Brush Strokes stamp set and Grape Fusion ink for the circle die as I don't have the Sweet Pear Re-inker.  And I decided to used my Punch Handle and Chevron Trends cartridge and punch the chevrons from a piece of card stock in the Journey Basic Pastels paper pack.  The kit came with orange chevrons but I wanted more coordination in colors at this time.


I stamped the backpack from the new "Forever Friends" set that comes with the KOTM and stamped it on some  Sweet Pear card stock then used Journey Glaze and Journey Sparkle Dust.  Aren't the Candy Mini Dots just too cute?   The kits come with all the paper and embellishments needed, you supply the inks, Glaze,  and any basic products to finish.   You can get the KOTM delivered right to your house monthly for $24.95 plus shipping and tax!  When you order you are signing up for a 6 month commitment but you are getting an exclusive stamp set each month that is not available to the general public for 3 months after the Kit is delivered.

I hope to get more done soon but I have been busy getting caught up on laundry, grocery shopping, bill paying, and other necessary chores and errands.  Being gone almost 2 weeks and traveling 3000 miles round trip (and alone) takes a lot out a person!  But I did also get to see my niece, whom I haven't seen in 8 years, and took some time at Monument Valley in southeast Utah.  Hope to share a couple of those pics on Wednesday!

Friday, August 21, 2015

Stars and Cowboy Boots

I'm waiting on a fun swap, a kind I've never done before.  We had to make 12 3" x 3" focal pieces, send in 11, make a card with the 12th, then make cards with the other 11 when we get them back.  What a challenge but one I enjoyed!


Here's my 12.  I used a variety of products on these little babies.
Stamps: Wild West from the Adventure collection
Ink: Gold Silk and  Cocoa Powder 
Paper: Whip Cream, Cocoa Powder, Pineapple Smoothie, & Journey Basic Neutral (pattern paper)
Dies:  Star-Dom and Star-Dom Piercing Elements, Wild West dies
Other: Whip Cream Thread, and Journey Glaze
You can save money by ordering the Wild West Bundle.  This includes both the stamp set and coordinating dies.  And the Stars and Piercing Elements also now come as a Bundle if you want both.  When I started with FSJ the Piercing Elements were not available.  I really like these!


Here's my completed card.  I love splattering the Silk inks on my papers. 


Here you can see the Silk splatters a bit closer.  It really adds a bit of pizazz to the card.  I should be getting the other 11 pieces in a week or so and will enjoy finishing out some more cards!

Have you ever done anything like this?

Wednesday, August 19, 2015

Tiptoe Through The Tulips

I think with this card I finally used all the ATS stamps I've recently purchased at convention.  This one was very popular and I can understand why.


There's a lot involved with this card.
Stamps: Tulips ATS
Inks: Cocoa Powder, Citrus Cooler, Kiwi Splash
Paper: Whip Cream, Citrus Cooler, Limeade Splash, and Journey Basics Pastels
Dies: Journey Ovals and Sweet Today
Embossing Folder:  Petals Wall
Embellishments: Pearls


After I die cut the flowers and leaves I sprayed them with water and started working them to get them soft then I blasted them with a heat gun to hold the shapes I wanted.  They are very dimensional and will hold their shape unless flattened to mail.


To color the image I patted the ink pads on an acrylic block and picked up the color with a water brush then colored the image.  I got a nice suede look. I fussy cut the image then used my pop dots to adhere to the center of the inside oval.

I really like this card.  I'm debating about adding another flower since most embellishments are in 3's.  What do you think?  Should I add another flower, and, if so, where?

Monday, August 17, 2015

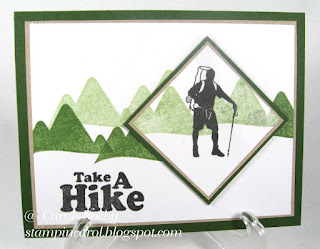
Take A Hike

A fellow coach, Cindy Bristow, made a fabulous card that inspired me so that I almost cased it.


I like making masculine cards which I know many do not.  This card will be great for my brother or nephew as they love to hike the peaks of Colorado.

I only used 1 stamp set, Scenic View from the Adventure collection.  I very carefully cut the words away from the mountains with a craft knife and they both stamp great.  For the mountains I used only 1 ink, Fresh Forest, which the lighter color mountains are the 2nd generation stamping of the image.  The text and hiker image are stamped with Black Licorice.

Paper is Fresh Forest, Oatmeal Cookie, and Whip Cream.


There is no bling on this card.  It just didn't seem needed.  This card would be great for a class.  It was fairly fast and easy.  Thanks, Cindy, for your inspiration!  And I hope you like it, too!


Friday, August 14, 2015

My Champion

I really like so many of the FSJ stamp sets I have and love making cards.  Just before I went on vacation I made quite a few that you have been seeing the past 1 1/2 weeks and will see next week.

I used 2 stamp sets on this card: My Champ (Dude collection) and Chevron Trail (Background collection).
I used 3 different card stocks: Whip Cream, Denim Days, and Blue Lagoon.
I only used 1 ink, Blue Lagoon.
I used the Journey Ovals die set for the trophy layer.


For a bit of bling I found an old hand held oval punch that I've had for many years and punched out 3 from the Denim Days card stock.  A bit of Stardust Clear Gel pen and they're done.  I added some of the pen to the #1 in the trophy to pull the bling together a bit.  I even sponged the Blue Lagoon around the white layer.

I'm not sure I like this card.  I wished the ovals cut in closer increments or I should have made my layers the same distance as the die cut ovals.

Wednesday, August 12, 2015

Ants and Watermelon

Each month FSJ coaches are challenged to use the current Kit of the Month to make a card different than those in the kit.  Well, I almost missed the deadline last week but I got it done!  This card uses the July KOTM set Sweet Slice (not available for purchase until October or November.


I used 4 different card stock colors: Limeade Splash, Watermelon Fusion, Whip Cream, and Lemon Drop.  I used Black Licorice ink and Black Licorice Thread.  The circle is made using the Journey Circle dies with the piercing element.


I added some Journey Glaze on the watermelon seeds for a bit more punch.  Looks good enough to eat, almost!

Monday, August 10, 2015

Dino Power in Orange

I've been challenging myself to use stamps that I haven't used yet.  This boy's birthday card is made using the Dino-Mite! set from the childhood collection.


I forgot to take the picture until I had it packaged to sell but you can see all the details of it just fine.  I used the Journey Basic Brights pattern paper, Whip Cream and Citrus Cooler card stocks.  I stamped with Citrus Cooler ink. 


I used Journey Ovals die for the large oval layer and a Spellbinder scallop oval die for the dinosaur focal point.  I used my aqua brush to pick up some ink from the pad to color the little rascal and the speckles were made with a tool I've had for abut 15 years.  The arrows and tags were made using our fabulous new Punch HandleTag Time and This Way punch cartridges.  The text is stamped with Black Licorice ink.  I hope to get a card made for a little girl soon.  How'd you like this card?


Friday, August 7, 2015

Another Wild West Card

I showed you a fun cowboy card a couple weeks ago and here's the 2nd that I made along with it.  It again uses the embossed vinyl that I found in my stash.


I used the cool Adventure set called Wild West and it's matching dies, Wild West.  If you are interested these 2 can be purchased as a bundle for a great price!  I used a star from the Star-Dom Bundle die set.


Here you can see the embossed vinyl strip clearly.  The base layer of the card is Cocoa Powder card stock and all stamping used Cocoa Powder ink. The cowboy and text on Oatmeal Cookie card stock and the big star and Sheriff star are on Pineapple Smoothie card stock. 

I love that so many of our stamps have coordinating dies.  Sure makes cutting so much easier.  Have you tried our stamps?  You can click on the Holiday Mini Catalog logo at the stop of my side bar to to to my replicated web site and shop,  join my team, order the Kit of the Month,  view some fun projects,  check upcoming events,  download the catalog, and more!

Wednesday, August 5, 2015

Gazebos, Road Runners, and Desks

August???  Already???  And Wednesday??  Time just seems to be flying by!  I think the older I get the faster time goes!  Today is the day of the weekly blog tour of desks put together by head desker Julia at the Stamping Ground.  I sure enjoy looking around at fellow crafter's work areas and seeing any projects they choose to share.  And if you are new to this please click on the WOYWW logo in my side bar or, when on Julia's blog, the appropriate page tab at the top of her blog.


I'm doing some die-cutting to prep some folders for upcoming FSJ parties.  You can just see the edge of the lime green folders on the far left and the orange flowers I'm cutting.  I did some stamping, too, but had to use my Staz-On to put the company logo on the folders as they're plastic.

Last week those who popped by seen the gazebo I was working on.  Here it is, completed.  This baby is about 10" across and 10" high.  The top comes off to place lights or a gift inside.


I added LOTS of glitter and rhinestones.  I should have used Frosted Lace Stickles but used Crystal instead which has a faint pink to it.


Here you can see it better on the snow.  The rhinestones on the top are quite large and I added itty bitty ones to the snowflakes on the side panels.  I also swirled the Stickles on the white base.


Of course I had to take a pic with battery tea lights inside.

And for Angela, the road runner in our tree...


Unfortunately there is a bit of reflection problem from the window blinds but he definitely doesn't look like the cartoon one that Wile E. Coyote chases!  But these little rascals are very fast. I went back a few years and found a much better pic that I took...


So now please head over to the Stamping Ground and enjoy the blog tour of desks!  I will be in Wyoming for the next 2 Wednesdays playing with grandsons, great grandsons, and family.  And I am scheduling my posts for the time I'm gone so if you are a follower there will be cards to view on Mondays, Wednesday, and Fridays! 

Monday, August 3, 2015

Christmas Tree and Gone Fishing

I follow a lot of blogs and enjoy doing challenges but i haven't done one other than FSJ for the last couple of months.  It is time.  I was at 52 {Christmas} Card Throwdown this past weekend and they had a really cute sketch to do.  I'm way behind on Christmas cards so I  decided to get it into gear.


I used all FSJ card stocks: Cool Pool, Fresh Forest, Whip Cream and Winter Fresh Prints
Stamp: Oh Christmas Tree by FSJ
Twine: The Twinery
Ink: Fresh Forest, Gold Silk, Bubble Gum Silk
Accessories: Holiday Elements sequins, rhinestones from my stash, Stardust Clear gel pen (for tree top star)


Here you have a closer look at the top left sequin corner.  I splattered the white stamped piece with the Silks.


 I made a double bow and added a sequin and a colored (with a Copic marker) rhinestone to finish out the card.

I find it relatively easy to make masculine cards and this one was inspired by 2 cards made by fellow FSJ coaches.


I used only 2 stamp sets on this card, Out Fishing and Ink Splat.  First I stamped the hooks at the top using River Stone ink.  I then stamped the Ink Splat on my Whip Cream card stock using Kiwi Slice ink that I stamped off once.  I splattered some Cool Pool Silk over that.  Then I stamped the words as shown with Black Licorice ink.  For the fish I used a piece of scrap card stock and stamped the Ink Splat with Denim Days ink stamped off once, then splattered  with the Cool Pool Silk before stamping the fish with Black Licorice ink. I then fussy cut the fish.  I took some White Thread and adhered to the middle spat on the main piece then pop dotted the fish.  I glazed the fish with Journey Glaze.


This fun fish focal point is layered on coordinating card stocks.  I gave this card to a friend for her to give to her hubby for his birthday.  I liked it so well I made another to put in my For Sale pile.  It was pretty easy to make and I think I'll probably make more.

Don't forget to click on over to 53 {Christmas} Card Throwdown and see  the fabulous inspiration cards and the challenges.