Friday, February 28, 2014

Envelope Punch Board Bows

I had a few minutes the other day and got to playing with my Envelope Punch Boa rd.  I seen some cute little bows on Pinterest and had to give them a try.


This was a great way to use some scraps and here's 4 that I completed in a matter of minutes.  What to know how they were made?


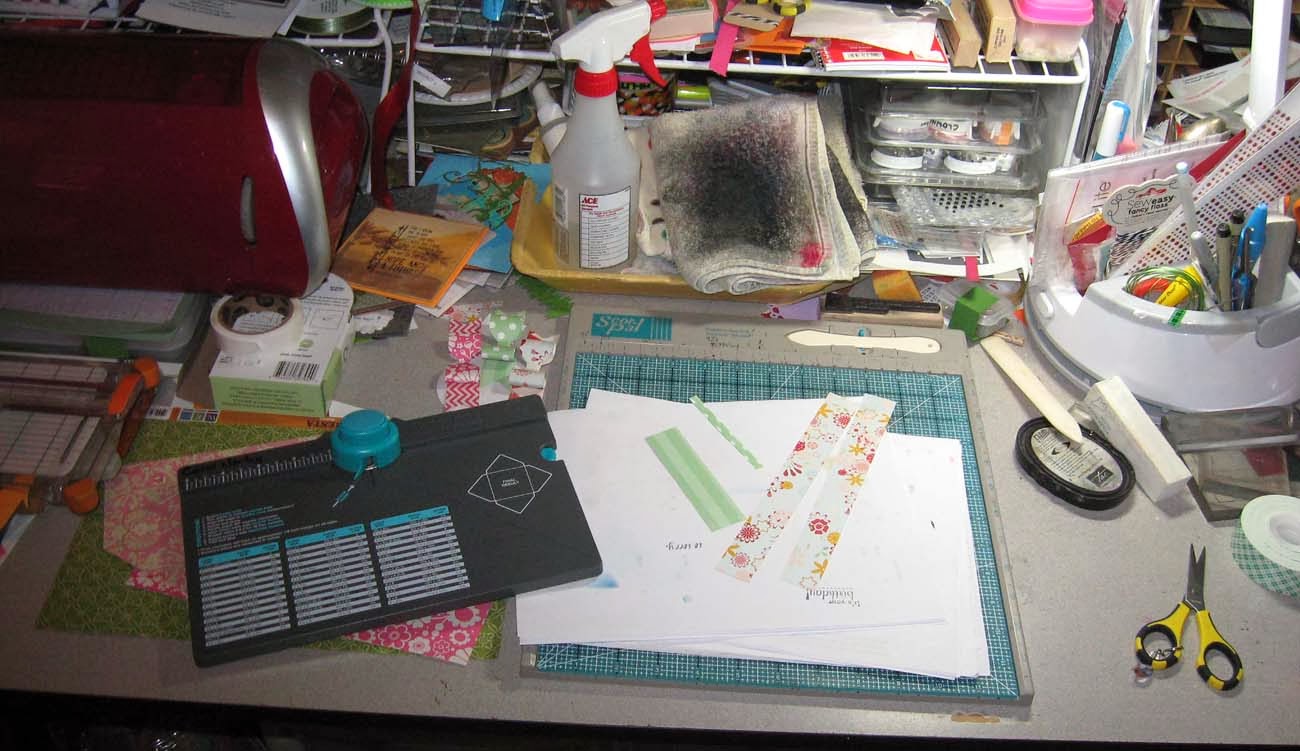
I started with 2 1" wide strips and a 1/4" wide strip.  The shorted one is for the back and the longer for the bow.  The 1/4" strip is for the piece over the middle.  Play with the length of the back piece.  I have both short ones and longer ones and prefer the longer so they show more behind the bow.  These shown are 4" and 5".  The 1/4" strip needs to be about 1" long or so. You can probably alter the lengths and widths to suit your needs.  Just play around and see what works.


I folded the 2 1" strips in half then actually added a pencil mark at the half so I would know where to start punching.  I have a line drawn on my Punch Board as to the center of the punch and you can see it in the photos below.


I punched the middle of both strips at the half on both sides. 


On the longer "bow" piece I punched the ends as shown.


On the back piece I punched the center of each end.  Adhere the ends of the "bow" to the center to form the bow.  Adhere it to the center of the back piece then wrap a piece of the 1/4" strip over it.


Ta da!!  The finished bow!    Though they aren't good for using a cards (unless they're hand delivered) they sure dress up an envelope or package!

Wednesday, February 26, 2014

Another Wednesday, Another Workdesk, Another Card

It's hump day!  The day many crafters from around the world give you a view of their work areas!  I have been joining the fun blog tour for over a year and enjoy looking at their desks and projects.  And it is all put together by Julia at the Stamping Ground.  And today is week 247 so that tells you that this has been going on for over 4 1/2 years.  How amazing!


Hmmm. My desk last night.  Lots happening.  From left to right: Cricut and paper trimmers; Envelope Punch Board & glue dots; bows made with Board just above it; Scor-Pal with mat and scrap paper (where I do my work), bone folder, ink pad, scissors, foam tape and sanding block.   I will be posting the bows soon when I get a few more made.  Good way to use up scraps.   I did get a card made yesterday...


I used stamps by A|Muse Studio and some twine from The Twinery.  A bit of masking and...


a couple of black rhinestones and the card is completed!

So, if you are so inclined please let me know what you think of my desk or card then hop over to the Stamping Ground and visit Julia then on to all the links to other crafters' desks!  Be sure to have your favorite beverage and spend a bit of time blog surfin'!  If you want more info on this fun event just click HERE.  And if you're interested in joining please read THIS post to learn what you need to do.

Monday, February 24, 2014

Another 3 Desert Cards

A couple weeks ago I showed 3 cards made from 1/3 of a sheet of GORGEOUS card stock made by LazerLine.  Since we live in the southwest United States I see scenes like this paper and love the colors.


I used a small chili punch to embellish this card. Stamp is from a set called All Year Greetings by Fiskars.


I decided to cut this panel into sections.  Stamp is from a set called With Sympathy by Red Rubber Designs.


This last card I used an old corner punch that I've have for ages.  The geometric design does seem to have a southwest flair. 
Aren't the colors fabulous!!! I have 1 panel left using browns and yellows and having palm trees.  Hope to get them done in the next couple weeks.

Saturday, February 22, 2014

RRD Inspirational #108 - Getting Extra Inky

Red Rubber Inspirationals has posted their weekly challenge yesterday and today I got a bit of time to play.  I did have to make a 2nd card as I didn't make my first card meet the challenge.  I got so wrapped up in my first card that I totally forgot what I was supposed to do!  I had a good giggle and started over.  Here's the card that meets the challenge of using at least 2 different inks on my card.


I used a stamp set by Red Rubber Designs called Dotty Flowers and 3 different inks.  The paper is called Pop Rockz.


I added some Stardust Clear Gel pen to the blue flower center for a bit of pop.  At the time I added my card to the challenge it is the most simple card.  I guess I like some that are relatively fast and easy.  What's really funny about this card...  I don't particularly like it.  I'm coming up with all kinds of ideas now.   Anyway, now for the boo boo card....


I think this card developed because I just purchased a new embossing folder called Poppy.  The stamp set was purchased from The Angel Co. way back when and it's called Dotted Peony.


I colored with Copic markers then added some bling with the Stardust Clear Gel pen.  So now pop on over to Red Rubber Inspirationals and check out the inspiration projects and the challenges!

Friday, February 21, 2014

Sunshine and Happiness

I needed to make a card for my monthly swap with Technique Junkies 1 on 1 group.  I perused the Feb/March 2014 newsletter and came up with deciding on the Offset Die Cuts Technique.  Actually I've done something quite similar but now it has a name.


All papers are by Simple Stories from a collection called Summer Fresh.  There is NO stamping.


I like the stickers that go with the collection and the bottle of lemonade fit fairly nice in my scalloped circles.  I love the bright cheerful colors  and hope to get a lot of mileage out of this paper pack.

Tuesday, February 18, 2014

Workdesk 246 and a Copper Quail

Are you ready for some blurfing?  You know,  blog surfing?  Well, today is a GREAT day to visit work desks all around the world in a tour organized by Julia at the Stamping Ground!!!  It usually takes me a couple days and I hit about 20 - 25 blogs but I sure enjoy the inspiration of many wonderful projects, organization ideas, and fun posts!  Here's my desk today....


I took this picture yesterday and I do have the finished card on this post.  Hmmm.... what have we here....  Left to right: Cricut Expression and some paper, beads, Scor-Pal with mat and scrap paper (where I actually work), card on the mat, another card just above it needing to be completed, upside down ink pad, cheap scissors, another quail.  The quail image is by Copper Leaf Creations and I took a class from one of their gals, Deb, last Saturday.  I finally finished this 5th card.


I embossed the quail with copper embossing powder and added a scrap of copper metallic paper to frame the bird.  Still needed something.  Then I thought of my beads.  Hmmm...


I used some black twine to thread these 2 turquoise and copper beads then glue dotted the top to the card.  I know, I'm supposed to use an odd number but it was just too much weight and bulk.  Anyway, now that you're at the end of my post hop over to the Stamping Ground and check out oodles of desks!  As the day goes by more gals link up so if you're here quite early come back or bookmark Julia's blog!

Monday, February 17, 2014

Christmas Landscape Challenge

I've had a stamp set by Stampendous called Winter Trees for over a year now.  And the challenge over on the 52 {Christmas} Card Throwdown blog is just perfect to use this set.  The challenge is to make a landscape on the card.  I got that accomplished!  What do you think??


There are 3 layers over the base card on this.  But now that I'm looking at the picture I just noticed that the words are not quite straight.  Must be the snow is melting under the words....  LOL!  That's my story and I'm sticking with it!


I used some pale blue ink on the "hills" then added some Frosted Lace Stickles to make the glistening snow.


I used a scalloped oval Spellbinder die to cut out the window then I used my Cuttlebug Snowflake embossing folder to make the top.  Can you see all the stickles I added to the snowflakes?  You may have to click on the pictures to get them to show up.  Now pop over to 52 {Christmas} Card Throwdown and check out the fabulous inspiration cards and the challenges. 

Ice Resin and Copper Leaf Creations

I had a fun opportunity last Saturday to take a class from Deb of Copper Leaf Creations.  The cards were cute and quite basic and I did change them up some.  I did not finish one with an embossed quail as I had to run to meet some friends from WY for lunch but here's the 4 I did finish.


I added feathers to the pot card (that does sound a bit strange, doesn't it?).  I have a bag of feathers from LONG ago and the popped up pot (say that fast 5 times.....) needed to be holding something.  The card on the left is using a shadow-type stamp, a K-Pad and glossy card stock to make the background and there are glass beads on the cactus within the coyote.  The other 2 cards are embossed or shadow stamping.


Here's the morning class (there was an afternoon one also) with Deb in the blue plaid blouse.  This picture is minus me as someone had to take the picture!

Now as to the Ice Resin.  I follow a cool blog called Craft Test Dummies.  I find the blog very informative and I comment when I have a question or something.  Well, about 3 weeks ago I got an email stating I won a prize.  Hmmm.  What did I enter?  It's been so long I forgot.  Saturday I got a BIG package in the mail.


 Oh my GOSH!!!  Ice Resin!!  A kit by Susan Lenart Kazmer with a pendant/bezel, the resin in a 2-part syringe, chain and ice enamels, 2 magazines, 2 DVDs, some itty bitty needle-nosed pliers, and a package of charms!!!!  I did post some things I made at a class at AZ Scrapbooking a couple months ago and now I get play at home!!!
If you click HERE you can find more about some of these things at their site.  And check out the projects!  I could spend a LOT of time on this site.

Saturday, February 15, 2014

Inspirational #107 - Dreaming of Spring Flowers

Here in the southwest we've been having above average temps with yesterday and maybe even today supposed to hit 90*.  That is way too warm and we are needing rain.  But for those in the east from north to south it's still winter.  What better to bring a little sunshine and a touch of spring than flowers.


Over on Red Rubber Inspirationals the challenge is make something with a flowers.  I purchased a pad of paper from K & Company and a packet of matching dimensional flowers from Joans a few years ago and thought it was just the ticket!  Stamps are from The Angel Company. I used some Spellbinder Cheery Lynn Design dies for layers.


I was hoping my close up pic would show the sparkle in the petals but no such luck.  The picture at least shows the dimension of the flower.  So now pop on over to Red Rubber Inspirationals and have a gander of the inspiration cards (I had a wow moment looking at Paula Kay's) and those submitted for the challenge!

Friday, February 14, 2014

Blue Desert Cards

My local scrapbook store, AZ Scrapbooking, in Green Valley, AZ got in some great new papers and one line is from a company called LaserLine Cuts.  They are fabulous!!  I just had to purchase a couple sheets on these 3 cards are from a line called Desert Borders.  I also used stamps from Fiskars called "All Year Greetings" and some corner dies from Cheery Lynn Designs.


I added the little black rhinestone on this one.


I originally stamped directly on the designer paper but the image was fuzzy so stamped on white and pop dotted the text.


Really wanted to try my corner dies.  Added more rhinestones.
Did you notice that all there cards were actually 1 continues image cut into thirds?  The paper is 12" x 12" and I could not find it on the website. There is also a 12" x 4" yellow and red scene and 12" x 4" cream and brown scene.

Wednesday I taught a class at Green Valley Recreation called Inside Out Cards.  I had 2 "students" and Sandy made a gorgeous Valentine card. 


Here she's showing the inside of the card where the fancy folds and cuts are done.  I just had to take a photo. 

Today we're going to Apache Junction just east of Phoenix to attend the Arizona Opry to celebrate Valentines Day. We are going with my folks church group and should be great fun!  Hope you have a fun celebration of Heart Day!!

Tuesday, February 11, 2014

Another Workdesk Wednesday and an Elk

Sometimes I wonder if Wednesday isn't the "highlight" of my blogging week.  I so enjoy the cool international blog tour that Julia at the Stamping Ground has put together.


Just to give you a heads up what's on my desk there is, from left to right on bottom half of picture:
my Cricut, paper trimmers and some stamps,  Spellbinder die cover, my sunglasses (needing repair), today's card and glue dots, needle-nosed pliers to fix glasses, scissors, ink pad, twine, bone folder, and more scissors.
 Top half of picture: plastic tray full of stuff, stuff, ribbon and tape, spray water bottle and rag for cleaning stamps, stuff, inks, Ott light with more stuff.  Yep, lots of stuff.


Now a card.  I pinned a cool masculine card on Pinterest  but this doesn't have a lot of resemblance to it other than trees (these are from PaperTreyInk) and wildlife (elk from Red Rubber Designs) and a hint of the layout.


I used my Earth Tones Pebbles chalks to add some color to the moose.  The pale blue background doesn't show up much but then, it is quite pale.

So please, after leaving a comment if you will, please pop over to the Stamping Ground and check out all the desks.  Most days there's over 100 of us so if you're early in the day, you might not see all those who are participating.

Monday, February 10, 2014

Caffeine Jitters

Well, when I created these cards I wasn't having caffeine jitters but the colors I used would make one think that.  I just purchased this Coffee Talk set from Stampendous for a proposed class in March and seen these wild colors of paper and I started having fun....


This last card is kinda iffy with me.  Not sure if I like the layout. Almost seems too easy/simple. Any thoughts??  I did use a few Spellbinder dies, a circle punch, and my Corner Chomper along with doing some paper piecing on the 2nd card.

Last Friday we went to the George Strait concert in Phoenix.  Our kids helped purchase the tickets in celebration of my birthday.  Martina McBride opened the concert and the whole show was excellent!


We were not in the "nose bleed" section and where we were was considered "floor" but, as you can see, we were still a long ways from the stage. Two rows behind us started the 2nd level. My poor little Canon camera with 16x zoom just could not get good pictures at that distance.  Most of my pics were of the big screens above the stage.


I'm a big fan of his music and love his mellow voice.  I hope he doesn't quit singing though this is supposed to be his final tour.  I did purchase the tour T-shirt and a cap for Dean.