Saturday, January 30, 2010

Save that Password!

I'm going to take part in a craft fair on Feb. 12th & 13th (but I'll only be there on the 13th) at the First Assembly of God Church on North La Canada in Sahaurita (Green Valley), AZ. I made 16 of these little books to sell. Eight of them have 15 pages that you can list only 1 website ($4 each) & password and the rest have 15 pages of 2 listings ($6 each). The inside pages are all computer generated. I have a few more than these but these are the ones I just made.

I used both the Brights and the Neutral Chipboard Stacks, the Bind-It-All and 3/4" Black Binding wires. I also used both retired and current stamp sets, various punches, Prismacolor Pencils, Stardust Clear Gel pen, various inks, various cardstocks, and whatever else was within reach! I hope they sell but, if not, I may start an Etsy store.... Who knows!

Thursday, January 28, 2010

Purple hearts and dots...

I seen a most elegant card while blog-hoppin' last week and decided to give something similar a try. No colored cardstock! All white! Only the hearts and the ribbon are colored. I used my Dotted Swiss Cuttlebug folder, my Wizard and Nestabilities Labels 1. I love how this turned out!


Only 1 stamp set was used, Sprigs, stamped with Noir PH ink and colored with Prismacolor H20 pencils and the Niji Water brush.


I used the Stardust Clear Gel pen on the little purple hearts but just could not get the shimmer to show in my photo. I also raised the stamped label with Pop Dots.

The stamp set Sprigs has 4 cute sprigs for $12.95.

Wednesday, January 27, 2010

Fun "students"

Today I taught a class on making a middle step card at Green Valley Recreation, AZ. The gals gave it a great effort considering that the card is more of an intermediate project rather than a beginner project. I wanted to take a picture of them with their creations and here it is! From left to right is Sharon, Kendra, Mary Jo, and Barbara.


Sharon and Kendra are new stampers and their creations were great! Mary Jo and Barbara have stamped before and I loved their projects, too! I'm hoping my class size picks up a bit more but the enthusiasm these gals showed is an encouragement to me.

I'll be teaching this same card at the AZ Scrapbooking store February 10th. I'll have kits made to create 3 cards along with all the paper already cut, stamps to use, and the template. At this class the "students" need to bring basic stamping supplies such as black ink, scissors, adhesive, a paper trimmer and scoring tool, and pop dots. If you are interested in taking this class please call the store and reserve your spot.

Tuesday, January 26, 2010

I Ruff You!

How's that for a title! LOL! TAC™ has a cute new stamp set called Little Darlins which is on special at this time. So, using the masking technique I made this Valentine card:


I used Kraft cardstock , my Scor-Pal and Scor-Bug to create the base card. The dog and phrase were stamped, masked, then punched using the Giga Scallop Circle punch. Images are stamped with Burnt Umber PH ink and I did use my color duster to add some of the ink around the edge of the base card. I also used Pop Dots to raise the punched circle.


I colored the heart with a red Prismacolor pencil then colored with my Stardust Clear Gel pen. I think this card would be great for one of our granddaughters as they have a dog, Sandy. This would also make a cool birthday card. What do you think?

Sunday, January 24, 2010

Valentine Blog Tour

A few of us "angels" from Paper Wings (an online community of TAC™ independent demonstrators) are having a blog tour to feature Valentine's Day! Won't you join us? There are some very talented angels involved! I created a couple easel cards that I will be giving out this year. I have been enjoyed making these, they are easy. I just hope the recipients know how to stand them up but I may have to send small pictures with them! Both cards will fit a standard Invitation (A2) envelope. Anyway, on with the projects!
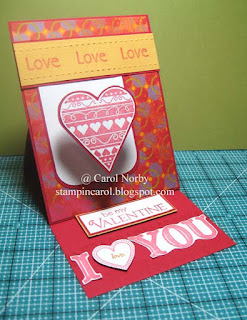

This card uses Cha Cha SWIC, coordinating cardstock, white cardstock, and I Heart You stamp set. I also used the Scor-Pal and Scor-Bug. Images are stamped in L'Amore PH ink. How do you like that heart?


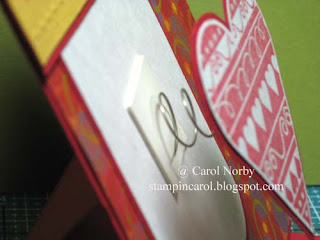
Here's a close-up of the heart. Our local scrapbooking store carries these springs and they are called "Piggy Tales". There are 6 small and 4 large and they have adhesive on them. Just remove the slick backing and stick! How cool!


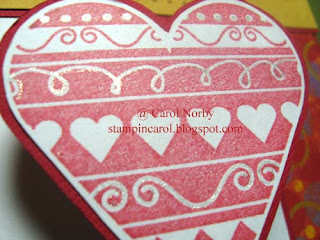
Here's another view of the heart. I used my Stardust Clear Gel pen on the dots and swirls but it's very difficult to see here. The pen added some great bling!


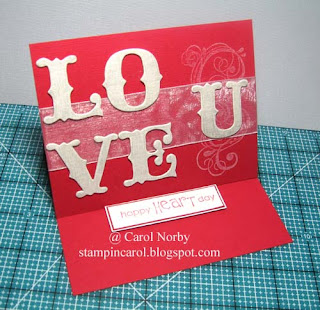
I made this easel card horizontal. The chipboard letters are inked with Brilliance Moonlight White ink then, when dry, I covered with the Stardust Clear Gel pen. The swirl stamp, from Fancy Curls, is also stamped with the white ink. I again used the Cha Cha coordinating cardstock, L'Amore PH ink, and the I Heart You set for the text.


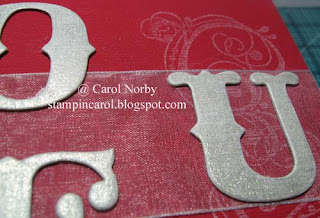
Can you see the shimmer from the Gel pen?

Anyway, please stop by these talented angels and see their projects! (Just click on their names to go to their blogs.)

Jen
Kim
Christine
Chris
Laurie W
Chelsea
Rita
Shirley
Laurie U
Angela
Seleise
Risa
Stacy
Diane
Suzanne
Julie
Rita
Trudy

We do appreciate hearing from you so please leave a comment about what you think of our projects. We put a lot of effort into them for YOUR pleasure!


Valentine Blog Tour starting tonight!

Today's post will go live at 7:01 pm Mountain Standard Time. There are 21 of us "angels" celebrating Valentine's Day with special projects and ideas for your viewing pleasure! Please stop by later and check us out. I have links available to all of us!


Friday, January 22, 2010

Masked or not?

Since The Angel Company isn't having a Feb./winter retreat called Escape we've been having an online one called Escape Out of the Box. The other day TAC posted some projects using the masking technique and since I needed a couple cards for a swap with the Arizona Stampers group that I'm a part of I decided it was a good time to play with this technique. I ended up using a retired set called Floral Vines since it kinda matched my pattern paper from my stockpile.


I stamped my image using Noir PH ink. The image is stamped on white cardstock then punched with the Giga Scallop Circle punch. I used some black/white ribbon and black cardstock to be the base card.


Can you see where I colored with the Stardust Clear Gel pen?? And I also swiped the edges of the punch with the Noir ink pad for a bit of distressing. Now, can you figure out the masking? Most "angels" will know if they're following our Escape.

Wednesday, January 20, 2010

I have a heart of wood...

Did this catch your attention?? Actually I purchased a cute little wooden heart frame at a local "$1" store because it spoke to me. Sounds weird, huh? But I had a thought when I seen this. My sister-by-choice Sandi knows I can see things a bit "different". Right, Sandi?? LOL! Anyway, here's what I did...


I used white gesso and a dry brush to tone down the deep red. I like this look much better. Then I sealed the frame with Decoupage medium. I added the white flower, red button, and 2 strands of white scrapper's floss.


For the framed area I cut a piece of white cardstock to fit then stamped the image from Aged Ornaments in Bordeaux PH ink (after I stamped on scrap paper twice) then stamped the phrase from Inspirational Sayings in Noir PH ink. This little frame would make a great gift for any friend. And you can change out the phrase with a picture quite easily. Do you look at things to alter?

Have you entered my drawing for my blogoversary? Just click HERE to enter the correct post! Please follow the rules and good luck!

Monday, January 18, 2010

Middle Step Card with Robots!

Way back last July I posted a little "sneak" of this card. Well, here's the whole thing! I'm going to be teaching this card design Jan. 27th at Green Valley Recreation, AZ and again in Feb. at the local scrapbooking store in Green Valley, AZ.


I used our Robots stamp set and Miss Moxie SWIC pattern paper. These cute little guys were stamped with Noir PH ink and colored with Prismacolor Pencils. I used my Scor-Pal to help me create the folds.


Here you can see a close up of the phrase. I stamped the phrase on 2 different pieces of scraps of the pattern paper, cut them out, and adhered them over the proper letters. I think it really added to the card.

And the cool embellishments on the side.... Well, I tore apart a broken lamp, took out the "mother board", cut off different pieces of it, and adhered them to the card! Perfect!
I love how this turned out but it is only a sample of what I'll be teaching. At the store we will be making birthday cards using this template. So, what do you think??

Don't forget to enter my drawing for $63 of TAC products! Just click HERE to go to the correct post to leave your comment. Please follow the rules! Thanks!

Saturday, January 16, 2010

A snowy hello!

Here is the final card I made as a sample for the ghosting technique for my recently taught class at GVR (Green Valley Recreation, AZ). I had to use up my "pieces" of the technique and this is just about it.


Again I used Ornamental Snowflakes but added a text stamp from the Tiny Tidbits hostess set. Again I used Prussian Blue and VersaMark inks. And the paper is still Bazzil Blues and glossy cardstock. And I still used my brayer. But this time I added 3 blue brads!


Here is a closeup of the background technique. Actually my last post and this one used the same sample cut into pieces. I still have a small piece left but I'll not be using it for a while. So, what do you think of this "ghosting" technique?

Don't forget to enter Blogoversary Drawing!

Just a reminder that to enter my drawing you must comment on my blog. Facebook comments and emails do NOT count! Click HERE for direct link. Remember to leave your email addy in your comment!

Thursday, January 14, 2010

Snowflakes everywhere!

This is another sample of the ghosting technique I taught yesterday at Green Valley Recreation. This is also the first time I used my Spellbinders Create A Flake 1. How cool is that die! Anyway, here's the card:


I used Bazzil and glossy cardstocks. Stamps are from the Ornamental Snowflakes and Great Greetings. I used VersaMark and Prussian Blue inks. I also used my brayer.


I think it is strange that I used the Prussian Blue ink on the white snowflake and it shows up more grey than blue! And I used my Stardust Clear Gel pen on the top snowflake and in the blue "star" in the very center of the snowflakes. The blue snowflake was created from the snowflake background technique. I really like this card and did give it away yesterday with the rest of my samples.

Tuesday, January 12, 2010

Bug me anytime!

I'm hoping to get back on track of posting a project on even numbered days of the month. So, here is today's project! It's one of the techniques I'll be teaching tomorrow at Green Valley Recreation and is called Faux Cloisonne. I'm also hoping my number of "students" will pick up as my classes progress for the winter.


I used a retired set called Bug Me Anytime and Sprigs to create this card. The sprigs and text are stamped with Noir PH ink. I also used gold embossing powder, VersaMark ink, Prismacolor H2O pencils, Niji water brush, Miss Moxie SWIC and cardstock.


Here is a closeup of the butterfly. Can you guess what the butterfly is embossed on?? And if you are attending this class you may receive this card as a bonus!

Monday, January 11, 2010

Way out west

Actually this is the name of a great county western music group in Tucson (and I have a
CD of theirs) but it also applies to this card. We had a couple more challenges on Paper Wings to use every stamp in a set and to use a set from pages 98 or 99 in our Inspiration Book. So, I combined the two!


I used the Wild West set and the Thinking of You hostess sets for all images. I love how this turned out! I used the small images to create the background then colored with my Prismacolor Pencils. I layered the cream card on the brown piece which you can see below. I used my Wizard (which we will be carrying effective Feb. 1!!) and Nestie 2 (we will be carrying some Nesties, also!!) for the labels. I left the Nestie on the cream then sponged Burnt Umber PH ink around the inside edges (and I stamped all images with Burnt Umber). I found some twine and tied that on for a more rugged look.

Here's the inside. I like this except I messed up stamping the birthday greeting. It's a bit tilted or maybe my head was when I stamped it, who knows.... LOL!


I embellished the star with my Stardust Clear Gel pen for added pizzaz. That star just sparkles! We don't have any grandsons, only granddaughters, so I'll save this card to use someday. Who know, I could give it to an adult for fun! What do you think? Have you made any childrens' cards lately? Do you have this set? Try the challenge and I'd love to see what you did! Post a comment with your link if you have a card using a set from these 2 pages in our Inspiration Book!

Saturday, January 9, 2010

Finally! A project!

I still don't have my Outlook 2007 but it did ship Thursday!! I'll get my emails up and running soon! And I have to assemble my old computer to retrieve some stuff on those 3" floppies and some "sounds" that didn't transfer over. Other than that this is a cool computer and so FAST!!

Now for the card. I finally got a card made using the colors of the color challenge on Paper Wings last week; brown, kraft, turquoise, and ivory. I got this card completed, photoed, and downloaded to my old computer before I changed computers.

I used Watercolor Plants, Running Stitches, and text from With Sympathy, all stamped with Burnt Umber PH ink. I also color dusted the Burnt Umber around the ivory oval to soften the edge. I also used the Treading Water Fiskars border punch, Super Jumbo Scallop Oval punch, and an oval cutter. I like this card much better than the previous one I posted. What do you think?

Thursday, January 7, 2010

Email problems

I had to order Outlook 2007 in order to do outgoing emails. Until I get the CD from Amazon and get it installed I have no access to my contact list, etc. The disc ships on the 11th so hope to have it by the 15th. Currently I have to go directly to my provider and read my emails there so please be patient. I should get my 'puter back today!! We found my photo editing disc!! The tech will install it and a few others I found! So, may be able to post projects soon!! But, of course, I have to do some creating!! Will hopefully get enthused today! Thanks so much for your patience. Also, my subscribers, please be prepared to get a letter from Feedblitz verifying your subscription with me. I hope to finish the "marketing" end of my blog this week.


Computer/Programing Issues


I've purchased a new computer and it's in the shop getting files transferred to it from the old computer. I'm on a borrowed computer and it doesn't work the same way so my post looks a bit different. Anyway, I need to purchase a new photo editing program before I can add photos again so please bear with me. Thanks!!

Wednesday, January 6, 2010

Color and Sketch Challenge

I was playing with a color challenge (turquoise, kraft, brown, and ivory) from Paper Wings and a sketch challenge by Heather Scott and I just don't know what to think. The computer and camera have a tendency to not give the actual colors. The kraft (pale brown) is showing up blueish grey! Beats me! I tried adjusting the colors in Photoshop but it just wouldn't work.

I used the stamp sets Build a Background and Tiny Tidbits, both hostess sets. This top card was my first try. Ok but doesn't thrill me. I used a Cuttlebug folder on the turquoise and carried the design through to the "kraft" using Cloud White VM ink. The stamping was done using Noir PH ink.

Here I added white buttons and Turquoise Scrappers floss. I like it a bit better but guess I just couldn't get this sketch to work for me. What would you do different??

Monday, January 4, 2010

Another Class sample...

Here's another sample for my upcoming GVR class in Green Valley, AZ. It's my version of the Ghosting technique. I have another sample but the background is so subtle that it can barely be made out so it didn't photo well. Don't forget that if you're a member of GVR and you want to take this class to contact the main office or Desert Hills Social center to sign up for it.


I used 2 stamp sets for this card, Hieroglyph Horses and Wild West. The paper is our Amelia SWIC and cardstock along with coordinating hardware. I won't tell more as I don't want to give away my class!


Here's the closeup of the horse and horseshoes. Again, I will be giving away my samples during the class.