

Carol Norby, Affiliate for Spellbinders, Scrapbook .com, The Rabbit Hole Designs, Whimsy Stamps, and Art Impressions!
Friday, October 30, 2009
Upcoming class
Just a reminder for my Green Valley, AZ customers... Don't forget the Cuttlebug Christmas card class on Nov. 4 at the AZ Scrapbooking store from 1 - 3 pm. Cost is $18 and you'll make 3 cards. Please bring a sanding block, a Stardust Clear Gel Pen, and adhesive. All paper will be supplied and I'll have the inks, etc. for you to use. Sign up quickly by calling the store at 520-393-7755!
A semi-creative Christmas card...
I purchased a package of 8 blank cards from Michaels a while back and played a bit yesterday. The cards are glossy so I had to be careful when stamping so that my images wouldn't smear.
 I should have used the darker green (Viridian Leaf PH) on the stars (Christmas Minis set) in the white circles instead of the light green (Chartreuse PH). The tree (Joy of Christmas set) was also stamped on glossy to match the card and the text is from the Thinking of You hostess set. I used a green from DCWV Brights cardstock stack to layer all stamped images.
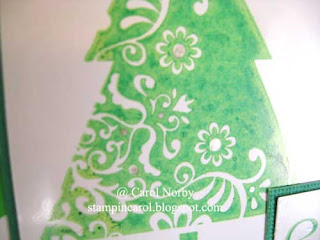
Here is a closeup of the tree. The ink had quite a reaction to the glossy. You can see some of the "dots" where I used my Stardust Clear Gel pen for some bling.

Here is the inside. I used the stars again to give some design to the inside and the text is from the Holiday Wishes set. I'm still trying to decide if I need to add something more to the cover. Any ideas or leave it as is?? Comments appreciated!!
 I should have used the darker green (Viridian Leaf PH) on the stars (Christmas Minis set) in the white circles instead of the light green (Chartreuse PH). The tree (Joy of Christmas set) was also stamped on glossy to match the card and the text is from the Thinking of You hostess set. I used a green from DCWV Brights cardstock stack to layer all stamped images.
Here is a closeup of the tree. The ink had quite a reaction to the glossy. You can see some of the "dots" where I used my Stardust Clear Gel pen for some bling.

Here is the inside. I used the stars again to give some design to the inside and the text is from the Holiday Wishes set. I'm still trying to decide if I need to add something more to the cover. Any ideas or leave it as is?? Comments appreciated!!
Wednesday, October 28, 2009
A flower for you!
I kinda fell down on my posting this week as I've not been creative. Today I finished a card that I started Monday. This sketch came from Heather's Monday Sketch with a change in the ribbon size.
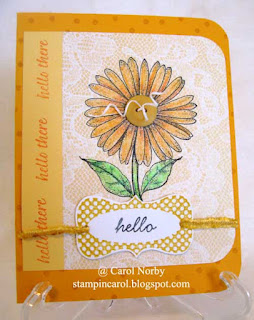 I'm using up paper scraps as I have baskets full! The stamps used are Gerbera Daisy, Joyful Tags, Build-a-Background & Enjoy Nature hostess sets, and a retired set for the Hello on the tag. I used Noir, Orangerie, and Raw Sienna PH inks and colored the daisy with my Prismacolor Pencils.
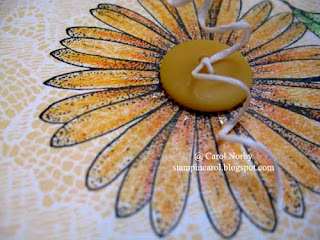
If you look closely at the flower petals you can see where I highlighted with my Stardust Clear Gel pen. I also used it on the veins of the leaves. I also thought the button was perfect for the flower center but just had to add a piece of white scrappers floss for more fun.
So, do you forgive me for being late with my post? I am working on a blog candy drawing for next month. It'll be 24 Christmas cards with matching envys.
 I'm using up paper scraps as I have baskets full! The stamps used are Gerbera Daisy, Joyful Tags, Build-a-Background & Enjoy Nature hostess sets, and a retired set for the Hello on the tag. I used Noir, Orangerie, and Raw Sienna PH inks and colored the daisy with my Prismacolor Pencils.
If you look closely at the flower petals you can see where I highlighted with my Stardust Clear Gel pen. I also used it on the veins of the leaves. I also thought the button was perfect for the flower center but just had to add a piece of white scrappers floss for more fun.
So, do you forgive me for being late with my post? I am working on a blog candy drawing for next month. It'll be 24 Christmas cards with matching envys.
Monday, October 26, 2009
I (Heart) You!
I promised you that I'd post my hubby's anniversary card. Again I made a wiper card but this one is 5 1/2" x 5 1/2".
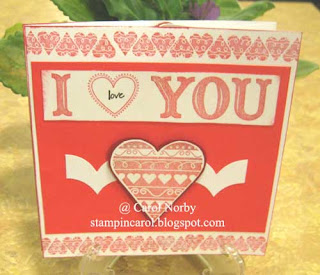 I used the new set, I Heart You, from Inspiration Avenue. It's also wonderful for making Valentine cards. The word, Love, in the middle of the heart is from Tag Tidbits. I used only L'Amore and Noir PH inks. You can't see the bling but the I, You, and large heart are all embellished with the Stardust Clear Gel pen. After making this card I think I need to order a L'Amore refill. It's not as vibrant as it used to be but I've had the ink pad about 4 years. I used red and white cardstocks along with White Cardstock Strips. I tried to make the heart look like it had wings - what do you think?? It's also raised on Pop Dots. And again, I used my Scor-Pal to create the folds/scores.
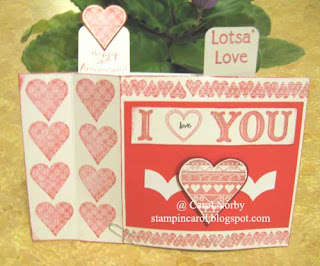 I used my Corner Chomper to round the corners on the wiper arms (and also on the arms of my mom's card in my previous post). And the paper clip at the bottom is only there to help hold open the card. I wrote on the left arm "Happy 28th Anniversary" with a red ink pen. I wished you could see the bling from the Stardust Clear Gel pen. I tried to take a pic of one of the hearts but it just wouldn't take, oh well.... Anyway, I do like this and everyone thought it was real cool when we went out Saturday night to celebrate.
Saturday, October 24, 2009
I'm wiping it up!
How's that for a title?? Anyway, I actually tried a new style of card called a Wiper Card. It's so cool! The reason it's called this is when the card is opened there are 1 or 2 "arms" that pop up!
I used one of the new free download paper patterns from TAC. Since I was running out of black ink it printed is this cool pink! The card is a standard A2 size. The stamped images are from the hostess set Enjoy Nature using L'Amore, Viridian Green and Raw Sienna PH inks. I also used black ribbon, flowers and button from the Audrey Embellishment Jar and Garden Mix Bitty Blossoms, white scrapper's floss, green brad, and a cool circle embellishment that I found. I added some bling on the stamped flowers with my Stardust Clear Gel pen. The black and white label was given to me. I used my Scor-Pal (my favorite tool) to create this and they may have the directions on the site. When I checked a week ago it wasn't posted yet.
Here you see the 2 wiper arms and the left side of the card. The text on the left side arm is from the hostess set Thinking of You. The text on the right arm is from the Great Greetings set and both are stamped with Noir PH ink. All the butterflies have been embellished with the Stardust Clear Gel pen, my favorite bling maker.
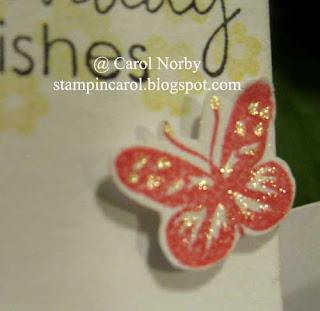
Here is a closeup of one of the butterflies. They are all embellished with the Stardust Clear Gel pen. Did I mention it's my favorite bling maker?? I used Pop Dots to give the butterflies some depth.
Tonight I'll be giving my mom this card as we celebrate her birthday and our anniversary by going to Red Lobster. I will show my hubby's card in my next post so stay tuned! Oh, and Dean got me a Chiminea (not sure of the spelling) which is a small outdoor fireplace. I'll take a picture soon and another one when I get it painted and stamped! It's NAKED right now!

I used one of the new free download paper patterns from TAC. Since I was running out of black ink it printed is this cool pink! The card is a standard A2 size. The stamped images are from the hostess set Enjoy Nature using L'Amore, Viridian Green and Raw Sienna PH inks. I also used black ribbon, flowers and button from the Audrey Embellishment Jar and Garden Mix Bitty Blossoms, white scrapper's floss, green brad, and a cool circle embellishment that I found. I added some bling on the stamped flowers with my Stardust Clear Gel pen. The black and white label was given to me. I used my Scor-Pal (my favorite tool) to create this and they may have the directions on the site. When I checked a week ago it wasn't posted yet.

Here you see the 2 wiper arms and the left side of the card. The text on the left side arm is from the hostess set Thinking of You. The text on the right arm is from the Great Greetings set and both are stamped with Noir PH ink. All the butterflies have been embellished with the Stardust Clear Gel pen, my favorite bling maker.

Here is a closeup of one of the butterflies. They are all embellished with the Stardust Clear Gel pen. Did I mention it's my favorite bling maker?? I used Pop Dots to give the butterflies some depth.
Tonight I'll be giving my mom this card as we celebrate her birthday and our anniversary by going to Red Lobster. I will show my hubby's card in my next post so stay tuned! Oh, and Dean got me a Chiminea (not sure of the spelling) which is a small outdoor fireplace. I'll take a picture soon and another one when I get it painted and stamped! It's NAKED right now!
Thursday, October 22, 2009
What time is it??
I've had such a hectic week and have not had time to stamp! I had a fun class yesterday at the AZ Scrapbooking store and today I'm giving a Make 'N Take for their grand opening. Hopefully tomorrow I can get back to creating.
So, since I have nothing new to show you I decided to post a clock I made about 4 years ago using a VERY retired stamp set. I made clocks for everyone for Christmas that year. I even sold a couple. They were fun to make and I tried to match the design to the person's personality or likes.

I purchased the clocks at Walmart for about $4 each and in a variety of colors. With great care I took off the plastic covering over the face, removed the hands (must remember the order to get them back on correctly so they'll work), and removed the paper face. I traced this face on cardstock, cut it out and decorated. I did have to mark where the "hours" were located in order to stamp in the proper positions. Then just reassemble!
So, what do you think??
And, Saturday we (us and my folks) will be going to Red Lobster in Tucson, AZ to celebrate our 28th anniversary (tomorrow is our actual anniversary) and my mom's 78th birthday (her day is the 28th). Also joining us will be my Aunt Joan (mom's sis) and cousin Bob. Dean was supposed to work again all weekend but he got Saturday off so we can celebrate. He worked every day for the last 2 weeks. Poor guy, he's pooped. But he got my lawn swing put up as my anniversary gift! I love sitting out under our awning on the swing drinking my coffee and watching the hummingbirds come in to feed. When we get the little fence put up I'll take a pic and post it on my personal blog so you can see the changes we've made since we moved here.
Tuesday, October 20, 2009
Peeping Pumpkins
I got this idea from a wonderful crafter, Christina Steeves, and thought these would be great fun to make for family! Click on her name to see what she made that inspired me!
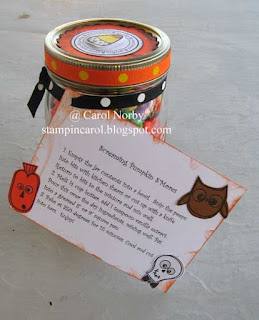
I used Spookalicious and Sweet Goodies stamp sets for all images. They are all stamped using Noir PH ink.
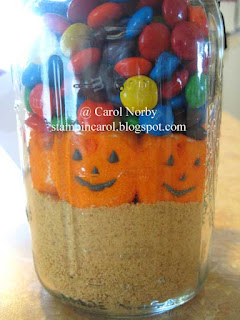

I used white, brown, and orange cardstocks. The recipe card was made using my word processor on my computer.

The eyes of the characters on the recipe card and on the candy corn on the lid are colored with my Stardust Clear Gel Pen. This just has to be one of my favorite bling makers!!
 I colored the corn with Prismacolor Pencils. Ok, but maybe markers would have been better to color the corn. I also used my Mega Circle Punch and Giga Scallop Circle Punch.
And, if you want the recipe, here it is!
1 quart-sized canning jar with lid and ring
1 1/2 cups graham cracker crumbs
1/3 cup brown sugar, packed
1 1/4 c. M&Ms
Package of Peeps candies
Place crumbs into the jar. Use a meat tenderizer to pack crumbs tightly into the bottom of the jar.
Place Peeps candies against the glass on all sides of the jar. Press lightly to create a well i nthe center of the jar.
Add brown sugar to the space in the center of the Peeps, pressing gently to pack.
Gently add the M&Ms to the top of the jar. Seal jar with lid and sealer ring.
Embellish jar.
So, enjoy! And let me know what you think!!

I used Spookalicious and Sweet Goodies stamp sets for all images. They are all stamped using Noir PH ink.


I used white, brown, and orange cardstocks. The recipe card was made using my word processor on my computer.

The eyes of the characters on the recipe card and on the candy corn on the lid are colored with my Stardust Clear Gel Pen. This just has to be one of my favorite bling makers!!
 I colored the corn with Prismacolor Pencils. Ok, but maybe markers would have been better to color the corn. I also used my Mega Circle Punch and Giga Scallop Circle Punch.
 And, if you want the recipe, here it is!
1 quart-sized canning jar with lid and ring
1 1/2 cups graham cracker crumbs
1/3 cup brown sugar, packed
1 1/4 c. M&Ms
Package of Peeps candies
Place crumbs into the jar. Use a meat tenderizer to pack crumbs tightly into the bottom of the jar.
Place Peeps candies against the glass on all sides of the jar. Press lightly to create a well i nthe center of the jar.
Add brown sugar to the space in the center of the Peeps, pressing gently to pack.
Gently add the M&Ms to the top of the jar. Seal jar with lid and sealer ring.
Embellish jar.
So, enjoy! And let me know what you think!!
Sunday, October 18, 2009
It's for the birds.....
We have lots of red cardinals here in southern Arizona but I made this one on the card to coordinate with my paper.
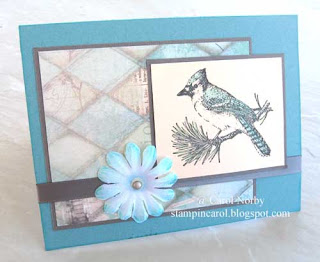 This is a sketch from Mojo Monday and I love how this turned out. I started with a white cardstock base then created the card front. I love the paper, Amberly Grace SWIC and cardstock and really don't need to use the blue cardstock as the whole card. I stamped the bird from the All Things of Nature set using Noir PH ink on the smooth side of the beige cardstock and colored with my Prismacolor H2O pencils and Niji water brush. The ribbon is from the Amberly Grace collection also. My Bitty Blossum was also colored with the H2O pencils and the brad is from Creative Impressions. After I completed the card front I then attached it to the base. I have a little trick I use when attaching small brads to the flowers. I use my 1/32" hole punch on a scrap of paper then I punch that out with my 1/4" punch centering the tiny hole in the center of the 1/4" hole. I then push the brad through this small circle then into the center of the flower. It gives the brad some stability and keeps it in the flower. You can barely make it out since I colored the center of the flower. Now to decorate the inside of the card.....
 This is a sketch from Mojo Monday and I love how this turned out. I started with a white cardstock base then created the card front. I love the paper, Amberly Grace SWIC and cardstock and really don't need to use the blue cardstock as the whole card. I stamped the bird from the All Things of Nature set using Noir PH ink on the smooth side of the beige cardstock and colored with my Prismacolor H2O pencils and Niji water brush. The ribbon is from the Amberly Grace collection also. My Bitty Blossum was also colored with the H2O pencils and the brad is from Creative Impressions. After I completed the card front I then attached it to the base. I have a little trick I use when attaching small brads to the flowers. I use my 1/32" hole punch on a scrap of paper then I punch that out with my 1/4" punch centering the tiny hole in the center of the 1/4" hole. I then push the brad through this small circle then into the center of the flower. It gives the brad some stability and keeps it in the flower. You can barely make it out since I colored the center of the flower. Now to decorate the inside of the card.....
Friday, October 16, 2009
Well, it's not a Christmas CARD!!!
I was asked to do a make & take for the Grand Opening of the AZ Scrapbooking Store in Green Valley, AZ coming up the 22nd - 24th. I chose the 22nd in the afternoon. Since they have the Cricuit Expression I had them cut some items for me and this is what we'll make:
 The text is from TAC's Gift Tags retired set. If you look closely you'll see Red Stickles as the berries and Stardust Clear Gel pen on the veins of the holly. The tag is about 3 1/2" long and 1 3/4" wide. I do have a Quickie Glue pen which works great for gluing the holly to the tag. Maybe I'll learn how to use the Cricuit while I'm there! And, if you're in Green Valley when I'm at the store, stop by and say hello!
 The text is from TAC's Gift Tags retired set. If you look closely you'll see Red Stickles as the berries and Stardust Clear Gel pen on the veins of the holly. The tag is about 3 1/2" long and 1 3/4" wide. I do have a Quickie Glue pen which works great for gluing the holly to the tag. Maybe I'll learn how to use the Cricuit while I'm there! And, if you're in Green Valley when I'm at the store, stop by and say hello!
Thursday, October 15, 2009
Halloween projects...
Do you celebrate Halloween? We don't but I came across some great projects made by Kim Spears, an angel, as a design team member for TAC™! Just check out this website!
Wednesday, October 14, 2009
OMG! I'm still making Christmas Cards!!!
I just got my order yesterday, delivered by Buddy, my wonderful U.P.S. guy, and had to play! I tried a new technique from my Technique Junkies Oct. newsletter and this is what developed.
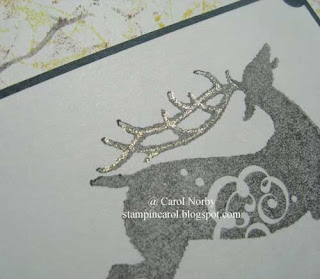
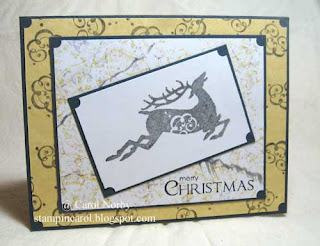 This cool reindeer is one of the sets available in TAC's Stamp Stimulus promotion and is called Reindeer Food. This set is available to purchase for $6.75 with a qualifying $30 order. The background technique is called Faux Marbling but I'm not sure what I think about it. Anyway, I also used the Thinking of You hostess set "Merry Christmas". As to inks, I used Noir, Burnt Umber, and Raw Sienna PH inks, a grey marker, and one of my favorites, Stardust Clear Gel pen. Can you see it on the antlers below?? I also used it on the hooves. I used a bunch of scrap paper, mostly white cardstock, as I have 3 large containers of scraps and am trying to get them used up.
I'm thinking I will do another Blog Candy drawing next month and give away a bunch of Christmas cards. Let me know what you think about that.
Monday, October 12, 2009
Cuttlebug Christmas class
Next month I'll be teaching a class called Cuttlebut Christmas at the Green Valley, AZ Scrapbooking store. It'll be either the 16th or the 26th of the month from 1 - 3 pm.
 The stamps are by Inkadinkado and the paper is Core 'dinations. I did use Palette Hybrid and VersaMagic inks, Bazzil Neutral Mix Bitty Blossoms, Corner Chomper, ribbon, brad, ivory cardstock, white cardstock, sanding block, Cuttlebug embossing folders, Stardust Clear Gel pen, Mega Circle punch, Giga Scallop Circle punch, a color duster, and pop dots. These are really stunning in real life.
 The stamps are by Inkadinkado and the paper is Core 'dinations. I did use Palette Hybrid and VersaMagic inks, Bazzil Neutral Mix Bitty Blossoms, Corner Chomper, ribbon, brad, ivory cardstock, white cardstock, sanding block, Cuttlebug embossing folders, Stardust Clear Gel pen, Mega Circle punch, Giga Scallop Circle punch, a color duster, and pop dots. These are really stunning in real life.
Saturday, October 10, 2009
Got a moment to play.....
A while back I purchased a pack of 8 cards with envelopes from Michaels for $1.00. I've sat and stared at them and just recently I got a bit of an idea for them! I really messed up 2 so I ended up with 6 for the set.
 I stamped the white dots of the cards with this cute little goodie from the Sweet Goodies set using Paris Lights PH ink. I had to heat set them as the cards are glossy and the ink would smear otherwise.
 Here is a close-up of the covers. You can see the stamping in the white dots. The ink matches very well! I then stamped the phrase from Always Remember in Noir PH ink on white cardstock and punched with my Extra Jumbo Circle punch. I also stamped the center with the little emblem which, to me, really added an extra punch (pun intended). I layered this on the Super Jumbo Circle punched matching yellow cardstock. The ribbon is 1" yellow sheer from my stash. I used some foam mounting tape under the yellow circle for dimension.

I used this text stamp from my Inspirational Sayings set and added the little emblem. Just more "pop"!!
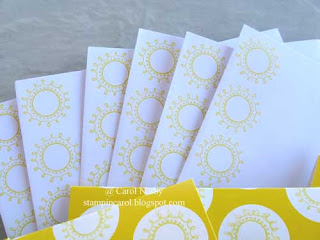
And finally the envies. Same little emblem! Now, what am I going to do with these 6 cards?? Could be a hostess gift for someone who books a party from me here in Green Valley, AZ. Could be a gift for a friend or family member for Christmas or a birthday (my mom's is coming up the end of the month). Maybe even a prize at one of my classes this winter at the Green Valley Recreation department. Any suggestions??
 I stamped the white dots of the cards with this cute little goodie from the Sweet Goodies set using Paris Lights PH ink. I had to heat set them as the cards are glossy and the ink would smear otherwise.
 Here is a close-up of the covers. You can see the stamping in the white dots. The ink matches very well! I then stamped the phrase from Always Remember in Noir PH ink on white cardstock and punched with my Extra Jumbo Circle punch. I also stamped the center with the little emblem which, to me, really added an extra punch (pun intended). I layered this on the Super Jumbo Circle punched matching yellow cardstock. The ribbon is 1" yellow sheer from my stash. I used some foam mounting tape under the yellow circle for dimension.
I used this text stamp from my Inspirational Sayings set and added the little emblem. Just more "pop"!!

And finally the envies. Same little emblem! Now, what am I going to do with these 6 cards?? Could be a hostess gift for someone who books a party from me here in Green Valley, AZ. Could be a gift for a friend or family member for Christmas or a birthday (my mom's is coming up the end of the month). Maybe even a prize at one of my classes this winter at the Green Valley Recreation department. Any suggestions??
Thursday, October 8, 2009
Oh No! It's another Christmas card!!!
Ya know, I just can't stop myself!! I am prepared this year. But, will I get them all sent out?? I try to send cards not only to family and close friends, but to my customers and some on yahoo groups that I've been a part of for many years. Anyway...
 I used Winchester SWIC, cardstock and ribbon, Noir PH ink, Prismacolor Pencils, and the Stardust Clear Gel pen. And I used the new Peace stamp set found in the new Inspiration Avenue magalogue. How easy!!!

The hardest part of this card was cutting out the wing to raise it on a pop dot. But I love the effect!
 I used Winchester SWIC, cardstock and ribbon, Noir PH ink, Prismacolor Pencils, and the Stardust Clear Gel pen. And I used the new Peace stamp set found in the new Inspiration Avenue magalogue. How easy!!!
The hardest part of this card was cutting out the wing to raise it on a pop dot. But I love the effect!
Tuesday, October 6, 2009
Happy Anniversary Mike and Amy!!
Recently our son and his wife celebrated their 20th anniversary (I'm having a hard time believing they've been married this long - we'll be celebrating our 28th in 3 weeks!). It was difficult to figure out what to give them so we decided to give them an Anniversary Party in a Bag. I made a card, purchased Happy Anniversary mints, a Smooch candy bar, 2 flashing heart pins, balloons, and some party favors. They did go out for dinner and hope to go to Vegas to celebrate more when Sue (Amy's mom) gets to feeling better (she's undergoing cancer treatments and is doing better) so that she can take care of the granddaughters. I wished we lived closer to help but we did visit this summer.
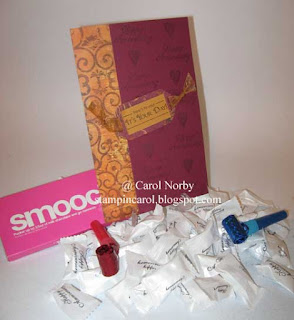 The card is made using Amelia SWIC, cardstock, and ribbon. I also used Label Lingo hostess set, Mini Occasions, and Trendy Greetings. The inks are Noir PH and Versamark.

Here you can see the hearts and phrases on the solid cardstock. It has a bit of a glimmer. I used foam mounting tape to raise the tag. Kinda cool, I think.
 The card is made using Amelia SWIC, cardstock, and ribbon. I also used Label Lingo hostess set, Mini Occasions, and Trendy Greetings. The inks are Noir PH and Versamark.
Here you can see the hearts and phrases on the solid cardstock. It has a bit of a glimmer. I used foam mounting tape to raise the tag. Kinda cool, I think.
Monday, October 5, 2009
Halloween is coming.....
We are so rural that we don't worry about buying candy for Trick or Treaters but we do send out goodies to our kids. This card and treat boxes will be getting mailed to one of the 3 soon but I just had to show them to you!
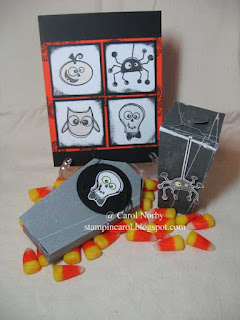
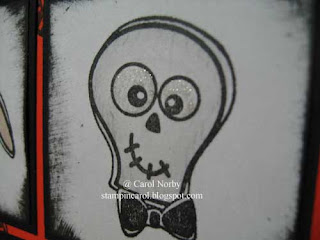
I made the card base with black cardstock then layered orange cardstock stamped with the BOO from the Spookalicious set. I stamped the images on white, faintly colored with Prismacolor H2O pencils and my Niji Water Brush. The eyes, as shown below, are colored with the Stardust Clear Gel pen. I did wipe the edges of the images with my Noir PH ink besides using it to stamp all my images.
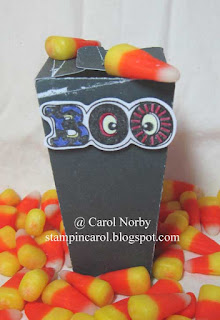 I "googled" for the boxes and used some old Basic Gray cardstock to create them. The coloring on the above BOO was done using my Souffle Gelly Pens. The coffin box does not want to hold together and I think it looks kinda dorky but whoever gets it will still get a kick out of it. I used some black floss to help embellish the skeleton.

So, have you created any cute Halloween projects? Would love to hear about them!!

I made the card base with black cardstock then layered orange cardstock stamped with the BOO from the Spookalicious set. I stamped the images on white, faintly colored with Prismacolor H2O pencils and my Niji Water Brush. The eyes, as shown below, are colored with the Stardust Clear Gel pen. I did wipe the edges of the images with my Noir PH ink besides using it to stamp all my images.

 I "googled" for the boxes and used some old Basic Gray cardstock to create them. The coloring on the above BOO was done using my Souffle Gelly Pens. The coffin box does not want to hold together and I think it looks kinda dorky but whoever gets it will still get a kick out of it. I used some black floss to help embellish the skeleton.
So, have you created any cute Halloween projects? Would love to hear about them!!
Sunday, October 4, 2009
Yep, it's another Christmas card!
I wanted to play with a sketch challenge and make my monthly Christmas card and here it is!
 I like this layout. The original used squares so, I had to be a bit different. The stamps used are Christmas Circles and Thinking of You hostess set. I also used my Extra Jumbo Punch for the snowflake circle and my Magic Matter to create the blue circles. The pattern and colored paper is Kaleidoscope Boyz and the card base and snowflake circles I used white cardstock.
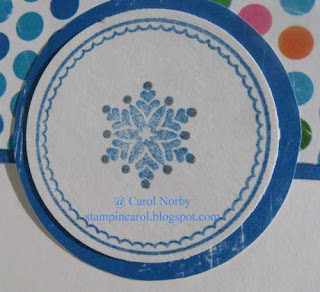
Here is a closeup of one of the snowflakes. All images were stamped using Starry Night PH ink and I dotted the tips of each snowflake with my Stardust Clear Gel pen. It really sparkles but I couldn't get the light right to really show it.
Did you do or create anything for World Card Making Day?? I spent time with family so did not get the opportunity to create anything. And I have a class Wednesday (maybe, if I get some more signed up for playing with the Crop-a-Dile) that I need to prepare for. (Hmmm... is this bad grammar?)
Don't forget that tomorrow is that last day to comment on THIS post to get your name in the drawing for the 15 cards! Don't forget to include your email addy with your comment! I will be randomly drawing a name early Tuesday morning.
 I like this layout. The original used squares so, I had to be a bit different. The stamps used are Christmas Circles and Thinking of You hostess set. I also used my Extra Jumbo Punch for the snowflake circle and my Magic Matter to create the blue circles. The pattern and colored paper is Kaleidoscope Boyz and the card base and snowflake circles I used white cardstock.
Here is a closeup of one of the snowflakes. All images were stamped using Starry Night PH ink and I dotted the tips of each snowflake with my Stardust Clear Gel pen. It really sparkles but I couldn't get the light right to really show it.
Did you do or create anything for World Card Making Day?? I spent time with family so did not get the opportunity to create anything. And I have a class Wednesday (maybe, if I get some more signed up for playing with the Crop-a-Dile) that I need to prepare for. (Hmmm... is this bad grammar?)
Don't forget that tomorrow is that last day to comment on THIS post to get your name in the drawing for the 15 cards! Don't forget to include your email addy with your comment! I will be randomly drawing a name early Tuesday morning.
Subscribe to:
Posts (Atom)