Friday, December 31, 2010

Kick Up Your Heels!

This is New Year's Eve! 2010 is finally over! We've seen a lot happen this year and I pray God will bless the United States this coming year. I hope our elected officials will get their act together, end corruption, and work to make this country great again. I pray for revival in this country. What are you looking forward to?

The owner of the local scrapbooking store in Green Valley, AZ gave us instructors a piece of something that looks like wood lattice.  My mind immediately thought western and cowboy boots. Then I seen a card sketch on one of the many blogs I follow and this is the result:


I'm still playing with the gold brad/eyelet stickers and my crimper. I used card stock from my stash and black cardstock strips that we used to carry.


I colored the boot with Copic Markers: E79, E29, E57, E55, YR24, and the Blender.  Isn't this "lattice" cool?? I still have a fairly large piece so will have to do some more thinking what to do with it.

Wednesday, December 29, 2010

Let It Snow....

We used to live in northwest Wyoming and was used to lots of snow.  We used to snowmobile and ski...  Great fun! I didn't like the wind when it snowed as it would cut right through your clothing and make you miserable.  Hated driving in blizzards, had some close calls when I couldn't see the road..  But I love snowmen and one of the instructors at the AZ Scrapbooking store taught a class a couple months ago making a 3-D snowman, Santa, and more.  She was my inspiration for this card.


The background paper is from Paperbilities. I used my Super Jumbo and Extra Jumbo circle punches to make the snowman.  I cut a piece of black card stock for the hat and used a slot punch to make the brim.  The text is from the Jingle Jolly set stamped in Night Sky VersaMagic ink.


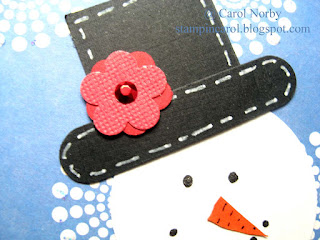
I made the stitches on the hat with my white gel pen and punched the 2 flower pieces from DCWV card stock. (I think I should have sanded the edges of the top layer to make it pop more.) The metallic center of the flower was attached with my I * Rock tool. The eyes and mouth were hand dotted with a black glitter gel pen.  Can you see the Icicle Stickles on the snowflake behind the snowman's head??  I dotted ALL the snowflakes on the outside circles and the centers.


Here you can see the snowman's body.  I punched 5 circles, folded them in half, and adhered them together. I also added the Stickles around the torn edge of the "snow" ground and added lines to look like more snow.  The arms were cut by hand from brown card stock. I was going to use a snowflake punch but I didn't have any large enough so had to make do with cutting with scissors.

Monday, December 27, 2010

Final Christmas shirt....

Now that the gifts are opened I will show you the final shirt I made.  This one is for our son, Matt, in WY.   He's president of the Powell Valley 4 Wheelers club and created the logo on their website.   Susanne and I made a "copy" of the logo, drew it on freezer paper, cut out the elements that I wanted, ironed them onto the shirt and took off bleaching!!


How wild is this??  And now for the close-up...


It's got HEAD LIGHTS!!  I added 2 large crystals with my I * Rock tool.  My hubby loves this shirt! Now, I don't know if Matt will wear it but it sure was fun to make it so personal. He got a real kick from the shirt. He said he didn't notice the headlights until someone said something.  His girlfriend loved her black Tshirt with all the crystals and Marci already has worn hers as she opened it when she got it last Tuesday. How funny!

I hope you had a great Christmas and enjoyed celebrating the anniversary of Jesus' birth! We got a great pic of our 2 youngest granddaughters, gift cards, jewelry, and more! But we praise God that Mom is home and doing well although she is still pretty week. Today she visits with her primary care doctor and the surgeon for follow up. We're praying that the surgeon got all the cancer and she won't need chemo.

Saturday, December 25, 2010

Merry Christmas!!


Luke 2: 1 - 20, The New Living Translation

At that time the Roman emperor, Augustus, decreed that a census should be taken throughout the Roman Empire. (This was the first census taken when Quirinius was governor of Syria.) All returned to their own ancestral towns to register for this census. And because Joseph was a descendant of King David, he had to go to Bethlehem in Judea, David's ancient home.  He traveled there from the village of Nazareth in Galilee.  He took with him Mary, his fiancee, who was now obviously pregnant.

And while they were there, the time came for her baby to be born. She gave birth to her first child, a son.  She wrapped Him snugly in strips of cloth and laid Him in a manger, because there was no lodging available for them.

That night there were shepherds staying in the fields nearby, guarding their flocks of sheep.  Suddenly, an angel of the Lord appeared among them, and the radiance of the Lord's glory surrounded them.  They were terrified, but the angel reassured them.  "Don't be afraid!" he said.  "I bring you good news that will bring great joy to all people.  The Savior -- yes, the Messiah, the Lord -- has been born today in Bethlehem, the city of David.  And you will recognize Him by this sign: You will find a baby wrapped snugly in strips of cloth, lying in a manger."

Suddenly, the angel was joined by a vast host of others -- the armies of heaven -- praising God and saying,

"Glory to God in highest heaven,
and peace on earth to those with whom God is pleased."

When the angels had returned to heaven, the shepherds said to each other, "Let's go to Bethlehem!  Let's see this thing that has happened, which the Lord has told us about."

They hurried to the village and found Mary and Joseph. And there was the baby, lying in the manger.  After seeing Him, the shepherds told everyone what had happened and what the angel had said to them about this child.  All who heard the shepherds' story were astonished, but Mary kept all these things in her heart and thought about them often.  The shepherds went back to their flocks, glorifying and praising God for all they had heard and see.  It was just as the angel had told them.

 May you be richly blessed this CHRISTmas season!

Friday, December 24, 2010

Final Christmas card of the year....

I'm still mailing out cards but this is my final one I'm making this year.  I was digging through some of my crafting drawers and found the gold eyelet stickers TAC used to sell plus I was blog surfing (can't remember where I seen the inspiration for this card) and ding, ding!!  Or maybe a light came on...   Anyway, this card is the result of the card I seen.


I used a light brown card base, a dark brown layer, and Spellbinders Labels 5 with my Wizard.  The pattern paper is from Paperbilities (I thought I had it taped down well enough when going through the Wizard but it still cut crooked). All stamps are from the Hung On A Tree set. The text and edges are inked with Burnt Umber PH ink.


I stamped the poinsettia on White Caboodle card stock and used Momento Tuxedo Black ink. The flower is colored with Copic markers: R35, R89, G14, G19, and the Blender. I added a dot of Black glitter pen to each berry for a bit more added bling.


Here's the gold sticker eyelets.  I also have a pack of silver.  I really need to go through my drawers more often and play with the goodies I rediscover!

Tomorrow is CHRISTmas day.  Remember Him and His birthday as you enjoy time with family and friends.  Jesus was God's gift to the world.

Wednesday, December 22, 2010

You Are The Best!

I sure missed posting recently but mom got out of the hospital last night after having major surgery last Thursday.  I did have some posts prescheduled but not enough! Hopefully today's post will make up for that.

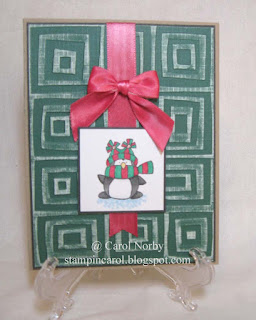
I was in a blog hop sponsored by Paper Wings last Sunday and I'm still playing with that little penguin.  He's just so adorable!  And I did a much more complicated card after viewing one made for a challenge by 365 Cards from a couple weeks ago.  This card has white dry wall adhesive mesh, ribbon colored by a Copic marker, and crystals by Tulip (the blue on the punched snowflake) and Imaginisce (which to me has much more shine) on his hat.


The paper is by Paperbilities - I have a huge stack of pattern paper!!!  The Cuddly Penguin (a free Gift With Purchase with a qualifying $30 order - and right now you can get 3 instead of one!)  is colored with Copic markers: B91, B45, T5, N4, and YR21. The phrase is from the Bless Your Heart Hostess Level A set and stamped on white card stock using Prussian Blue PH ink.  I used my Corner Chomper at the 1/4" round for the text paper.  Am I making any sense......


Look at that shine of the crystals! Love my I*Rock tool! I punched a 3" white circle, a Giga Jumbo Scallop Circle of blue, and a Mega Circle of Caboodle white card stock.


I've had this snowflake punch forever and layered the snowflake on a 1 1/2" punched circle. As you can see this "crystal" is more metallic then crystal.  I used foam mounting tape to raise up the snowflake for added dimension.

I finally got our tree decorated on Monday and put up a spiral Christmas tree outside. Never used the spiral tree yet 2 dozen lights were no good.  Hopefully I can find some to replace in this cute 6' tree.  I have it next to the steps to the front door.  I tried hanging a large star on the front window but my suction cup was no good.  Maybe I can get Dean to get the tall ladder and install a hook a couple inches above the window to hang this. I don't have many decorations out as it just doesn't seem like Christmas to me this year.  All our kids will be together in WY so we're hoping they'll take lots of pictures for us.  I hope you have a wonderful Christmas and remember that Jesus IS the reason for the season!!

Sunday, December 19, 2010

It's a Blog Hop!

The Angel Company™ has great little freebie stamps when one has a qualifying order of $30 or more and we're using those as the focal point of this hop! This hop is sponsored by Paper Wings, a favorite place of mine to see great works of art and inspiration using TAC stamps.

I chose the little Cuddly Penguin GWP found on page 6 of the Fall Supplement. He is just so cute!


I used DCWV white core cardstock, a Cuttlebug embossing folder, and my Wizard to make the "squares". I sanded the embossed card stock to make the embossing pop. I colored the white satin ribbon and penguin with Copic markers (G19, T7, T5, N1, R37, B41, YR21, and Blender). I layered the penguin and green on black card stock and assembled all on a kraft card base.


I have a Bow Easy tool which REALLY helps making great bows. You can't see it but I used the Stardust Clear Gel pen to the eyes to give them a glimmer.

Please check out these angels' blogs for more inspiration:
Shirley
Chelsea
Tina

Laurie U
Angela
Seleise
Betty 
Christine

We all appreciate any comments you feel like leaving.  I even give you an option to "rate" my project if you're uncomfortable leaving a message.  Thanks for stopping by and have fun "blurfing"!!

Saturday, December 18, 2010

The end of the shirts...

Ok, this is the end of my shirts....   At least for a while.  I have bought some to alter to sell. Maybe I can earn enough money to get to convention this summer in Wichita...


The design was centered on the shirt but the way the color came out it makes it seem a bit off.  But look at this bling!


I hope the recipient will like this!


Ok, that's almost it. I have one shirt left but am not going to post it as the person will know who it's for.  I did have some trouble with the bleach seeping under the stencils, the glue was giving up and just didn't adhere very good.  But it is a unique look....


Thursday, December 16, 2010

Some more Christmas shirts...

Here's a couple more shirts that I've done.  I even had to make one for me..  Of course!


The elk didn't lighten up much but take a look at the close up...


Man, those eyes just glow!!!  Almost freaky.


My horse looks almost hieroglyphic!  Again, we got the "deer in the headlights" look but I love it!

I am prescheduling these posts as today my mom is having major surgery for colon cancer. I hate to not leave you something to look at and do have a couple more shirts and some cards to post.  Are you ready for Christmas?? 


Tuesday, December 14, 2010

Getting Christmas gifts done...

I have been working like crazy getting my Christmas shirts completed and mailed. The kids don't check my blog so I feel safe posting some of them here.


I have an I-Rock gem tool and it is just SO cool!  I've added rhinestones to every shirt, even the guys.


You can see them on these 2 shirts. They're great as eyes on the coyote, a bit of bling to a moon, flowers on the cactus...  But wait and see what else I've done.

I'm not just a papercrafter!


Sunday, December 12, 2010

Love them pearls...

At our Ink Spots meeting in October Susanne had us playing with Pearl Ex.  We watered down the pallette then painted stamps before applying them to paper.  I don't know who made this leaf image but it sure is pretty.  The text is from the Bless Your Heart hostess A set and the paper is all from my scrap stash.


The design is from a sketch challenge on Paper Wings. 


How do you like that shimmer?? In real life it almost pops off the card!  I colored the ribbon, both sheer and satin, with a Copic marker and the text is stamped in Noir PH ink.

I got this card done earlier this week as today I'm in Phoenix (this post was pre-scheduled). I have to pick up hubby and Gordon (co-worker) at 9 pm at the airport.  They were north of Calgary, Canada for special classes for work. I doubt we'll get home before 1 a.m.   

Friday, December 10, 2010

It was to be an Angel Company Blog Hop... Oops.

I'm ready for the hop but where'd it go??  Maybe the  move to the new warehouse or the weather is a factor.  Anyway.....

I keep forgetting about my brayer so when TAC™ planned this hop I just had to get into the drawer and pull out that little baby!  I didn't get fancy with my tool but I kinda like the effect I got. I used the tree from the new set, Hung On A Tree, and embossed it in clear embossing powder on white glossy paper. The snowflakes are from the Ornamental Snowflake set.  I used 2 different blue inks and 2 different brown inks to get the background colors. In real life the blue gets darker at the top and the brown gets darker at the bottom. Photos just don't do this card justice.  The glossy card stock is a bugger to photo.....


I have a cool corner punch of pine trees that I wanted to use on the DCWV cardstock.


I did streaks across the brown bottom with my Stardust Clear Gel pen but the glossy paper just wouldn't let me get a good photo of them.


I added bits of color with Copic markers to the tree for a bit more contrast. I stamped the phrase on a piece of white cardstock and used my Corner Chomper on it and the green layer.  I'll tell you more about the  snowflake background on the text piece in another post so you'll have to stay tuned for that.  I also used a Copic marker to color the white sheer ribbon to coordinate with the green card stock.

So enjoy a cup of coffee and hop around our blogs! Please leave comments or rate our projects (if that's an option).

The blog hop started on 12/16/10.


Wednesday, December 8, 2010

It's cornered....

I love to read and will grab almost any piece of paper handy to mark my place.  I have previously posted a corner bookmark of the same design but it was rather large for the paperbacks that I read so I changed the dimensions a bit and came up with this....


I used a few scraps of card stock that was in my bucket and colored the sheer ribbon with a Copic marker.  I used the Giga Scallop Square punch on the black piece and the Double Loopy border punch by MS on the base piece.  The image is from the Swirled Spring Life hostess set.  The Scor-Pal works great to get the folds nice and neat.


I used Copic Markers to outline the flower and stem and added a bit of bling with the Stardust Clear Gel pen.

I haven't been able to make much this week as I have a horrible head cold.  I spent 2 days in bed (Sunday & Monday), Tuesday getting new tires on the car (blew a sidewall from dry rot from the summer heat) and finishing this bookmark.  Today I'll be in Tuscon with my folks as my mom goes through blood work for her upcoming surgery.  Hopefully I'll get something done quickly to post on Friday.


Monday, December 6, 2010

Peace ATCs

Friday night is our Ink Spots meeting at 6 pm at AZ Scrapbooking store in Green Valley, AZ.  Unfortunately, I can't go,  My hubby is flying home from week-long classes in Olds, Alberta, Canada in GPS farming!  So, Friday night I have to pick up him and a co-worker at the Phoenix airport. I'll be giving my projects and notebook to Susanne to take care of my end of the meeting (secretary/treasurer). But, I did complete my ATCs  with the Holiday theme. So, without further ado...


I think these took me the longest time to complete as there's a lot of details involved. I sprayed the green base with Pewter Shimmerz to give the sky a bit of a glow. I probably should have used a navy base but after I got these cut my design changed.  Does that ever happen to you?


The word (from the Peace set) is stamped with Brilliance Moonlight White then embossed with a white sparkle embossing powder (sparkle doesn't show but it's pretty cool IRL!) from my stash.  The tree is created using the Nested Pine Trees shapeability by Spellbinders and my Wizard then swiped with Jardin Moss PH ink.  The tree uses paper from the Miss Moxie SWIC pack. I have a little container of star brads that works perfectly for the tree topper.


I have a cool tree border punch by ?? (maybe EK Success??)  that I used on the bottom layer of white cardstock.  The tree is adhered using foam mounting tape then the top torn white layer.  I also used Icicle Stickles to add a touch of snow on the 2 layers (top one is torn for a more ragged look)  then stamped Merry Christmas from the Thinking of You set in Jardin Moss PH ink.

We have yet to start decorating for Christmas.  Maybe this weekend when my hubby is home.  Are you getting ready to celebrate CHIRSTmas??  Remember, Jesus is the Reason for the Season!