Friday, August 31, 2018

Merry Everything Christmas Card

Here is another card I taught at my Christmas in August class last week.  I really like this stamp set, Merry Everything.  I love the design of the reindeer and trees. It does not have coordinating dies so you must detail cut the images.


Since there was a lot to this card, it was the last one I taught.  Usually the gals will take a picture and finish it at home.


Look at all the detail!

Stamps: Merry Everything
Card stocks: Whip Cream, Cranberry Bliss, and Cozy Winter Prints
Inks: Black Licorice, Hazelnut Blend, and Beach Breeze
Dies: Circle Around
Embellishments: Silver Sparkle Tape and Special Celebrations Sequins
Adhesives: Foam Squares, Glue Dots, and Easy Glide Runner
Tools: Details Pro Shears, Sponge, and Paper Trimmer

I plan on using this stamp set a whole lot more!  Have you started making your Christmas cards yet?

StampinCarol

Wednesday, August 29, 2018

Gnomes for the Holidays

This is one of the cards I taught last week at my Christmas in August class (I wait until August to use NEW stamps from our NEW catalogs!).  I absolutely LOVE this stamp set, Gnome for the Holidays bundle!!


These little guys are just adorable!!!


They're great for coloring and I used our Color Burst Pencils.  I also outlined them using #44.

Stamps: Gnome for the Holidays Bundle
Card Stocks: Whip Cream and Fresh Forest
Inks: Black Licorice, Fresh Forest, and Cranberry Bliss
Silk: Black Licorice
Embellishments: Holiday Elements Sequins
Adhesives: Foam Squares, Easy Glide Runner, and Glue Dots
Tools: Platinum 6 die cut machine and Paper Trimmer

This cool stamp bundle is available through the end of the year as it's in our Holiday Trends Mini catalog.  But you'll want to use it for your Christmas cards and more so don't delay!

StampinCarol

Monday, August 27, 2018

Eyeballs and Bats

Since this month many of our Mixed Media Products are on sale I made a card using our Designer Series Stencil to make a Halloween card.


I stenciled it on a piece of Whip Cream using our Denim Days PanPastel (part of our Mother Nature collection) and a large sponge from our Journey Sofft Tools.


There were no stamps inked for this card.The Boo! is made from gluing together 4 die cuts.

Card Stocks: Whip Cream, Denim Days, and Black Licorice
Silk: Black Licorice
Dies: Snapshot Frames
Embellishments: Licorice Sparkle Dust (no longer available but I got it as part of my Starter Kit when I joined over 3 years ago), Wiggle Eyes
Adhesives: Easy Glide Runner, Foam Squares, Journey Craft Glue, and Journey Glaze
Tools: Platinum 6 and Bloom Tool

I have a customer who LOVES Halloween and this card will possibly be used as a Thank you card when she orders next.  Do you celebrate Halloween?

StampinCarol

Friday, August 24, 2018

Tuesday Morning Sketch - Gather

I haven't had time to take part in any sketch challenges for the last month but this one, oh yeah!  I had an idea immediately and will probably use this card as one of those I'll teach in my October class (Thanksgiving/Autumn).

Here's Tuesday Morning Sketches #467:


I pretty much followed the sketch but got my strip going from side to side more in the middle of the card.


I think the print paper may be a bit too busy but I think it turned out good. I used colored pencils to try and color the leaves and stem.  Kinda worked.


Products used:
Stamps: Gather Together ATS and Martha's Pumpkins Bundle
Card Stocks: Cocoa Powder, Whip Cream, and Fall-O-Ween Prints
Inks: Tangerine Fusion and Cocoa Powder
Silks: Dark Roast and Citrus Cooler
Embellishments: Fashion Gold
Colored Pencils: Color Burst
Adhesives: Easy Glide Runner and Foam Squares
Tools: Platinum 6 die cut machine

I did win a cool prize a while back from TMS and do appreciate the goodies.  Seems life just got wild for a bit and will be again soon as we head out to visit family in Sept. We haven't seen our son and his family for 2 years.

Please head over to Tuesday Morning Sketches and check out all the great inspiration projects and those taking on the challenge!

StampinCarol

Wednesday, August 22, 2018

A Desk Full of Christmas

Yes, I am working on a Christmas project.  I need to make a bunch of banners and I thought it was a good time to start die cutting the banner and pennant pieces.  And today is the weekly What's On Your Workdesk Wednesday put together by our lovely head desker, Julia at the Stamping Ground.  I'm sure I'll be shocking some who regularly take part or follow.  Many involved in this weekly blog tour are getting ready for the annual WOYWW Crop (which sounds like a blast!). But enough of my chatter, here's my desk from yesterday afternoon:


So, what's here.  At the front of my desk from left to right, my banner dies, a pad of retired Christmas paper and 2 die cut pieces, a pack of red card stock, and my Platinum 6 with the plates sitting on the card stock. And on the back of my desk all kinds of supplies, ink pads, and oodles of what not. Oh, and the box of waxed paper was used to hold some special washi tape for my card kits for my Christmas in August class this coming Friday.  I just didn't get it back to the kitchen pantry.

Did your jaw drop as you see my working on some Christmas projects?  Have you started on yours? Some of our kids requested banners so if I don't start soon I won't get them mailed so they can use them in time.

I won't be showing my desk again until Sept. 19 as we're going to be seeing some of our kids, grandkids, and hopefully great grandkids. I do have posts scheduled for while we're gone.

So.... I hope you enjoyed my desk and please head over to the Stamping Ground and check out the other desks.  I still have to prep for a FB Live video (10:30 am my time in AZ) but I'll be clicking on a bunch of desks in my spare moments!

StampinCarol

Monday, August 20, 2018

I Am Blessed

I purchased a cool new stencil this past June at Convention and finally got took a bit of time to play with it.  It's called Buffalo Check and I love it!!


I used a large Dauber Dowel and Pad and our gorgeous new Chambray Shirt ink.  Isn't it just da bomb!! I off set all the blue with some of our Peaches & Cream colors.


Stamps: Humble & Kind
Card Stocks: Chambray Shirt, Peaches & Cream, Whip Cream, and Vellum
Inks: Chambray Shirt and Black Licorice
Coloring: Color Burst Pencils
Dies: Journey Circles and Circle Around
Thread: Peaches & Cream
Embellishments: Meadow Pearls
Tools: Platinum machine, Dauber Dowel Large, and a Large Pad
Adhesives: Easy Glide Runner, Foam Squares Med.

After I finished my card and took pictures I wasn't sure about using the Peaches & Cream products.  What do you think?

StampinCarol

Friday, August 17, 2018

Bloomin Flowers and Garden Fence

Did you watch my FB Live video Wednesday?  If yes or no, I'm sharing it here as I can give you links to the products I used in case you want to go shopping from your easy chair.


I played with a variety of products that I love and hope you like this card, too! It will be great for birthday or just to cheer up someone!


Rather than color the Cottage Bouquet stamps with our great Color Burst or Color Splash pencils I decided to use our Inksplat stamp and inks from our new Good Life collection!

Card Stocks: River Stone, Tin Pail, Fresh Sage, Whip Cream, and Good Life Prints
Inks: Rustic Rose, Fresh Sage, Peaches & Cream, Haystack, Tin Pail, and Black Licorice
Embossing folder: Barn Wall
Dies: Circle Around and Garden Fence
Silks: Gold, Peaches & Cream, and Cosmic Grape
Embellishments: All The Things (Bloom Benefit free with $75 or more order)
Adhesives: Easy Glide Runner and  Foam Squares
Tools: Platinum 6 die cutting machine, Details Pro Shears

I recently got my Platinum 6 and so love the lighter weight and fold up portability! This will be great to take to classes and crops (must use less then 6" wide dies)! I have to say it has quickly become my favorite as it also fits easily on my desk!

StampinCarol

Wednesday, August 15, 2018

Desk and Cityscape

It's Wednesday again.  I almost forgot last night to take my picture and get this post put together!  I have been busy getting card samples made for my September class as I need them to show on the 24th at my Christmas in August class.  And since we'll be on vacation the first 2 weeks of Sept., yeah I need to get things done.  And today since you're here you get to see my desk from last night and get the opportunity to view many others all due to our head desker Julia at the Stamping Ground!


I have a project I'm working on in the middle of my desk.  I purchased some paper boxes from Hobby Lobby to use to help prop my cards for pictures and I'm needing to cover them. I'm using retired paper from Fun Stampers Journey and have just started cutting the sizes I need.  Far right is my new Platinum 6 die cut machine.  I'm so excited to get it as it's portable, it folds up!  Perfect for my classes and crops! Top off center left are a bunch of rosettes I made for gift toppers and/or ornaments.

Here's another project I made a while back at our monthly Casas Paper Crafters get together.  I've had our Hero City Die Set for a long time and haven't used it yet.


The card is rather simple but I like the effect of the bright paper showing through the building windows. And the Sparkle Silk is supposed to represent stars.


And my bat and moon are all sparkly for more pop.


I really don't need any more Halloween cards for family as I have a few left over from last year.  I am working on cards for my September class as I want to show them at my August class.  At this time I have a treat box and card made.

So now please head over to the Stamping Ground and check out the other crafters willing to share their desks.  You will probably get to see a bunch of cool projects, too!

StampinCarol

Monday, August 13, 2018

BOO!

While I was at our monthly Casas Paper Crafters get together the first Saturday of the month I played with some of the dies and stuff I took.  I had my large Platinum machine along with various papers and a few stamp sets.  I did forget the ONE stamp set I really wanted to work with but I did get some fun things made.  This cute tag is one of the items I made but at this time I don't know what I'll do with it.


No stamps were inked in the making of this tag.  LOL!

Dies: Bread Tag, Border Essentials set, and Snapshot Frames
Card stocks: Tangerine Fusion, Lemon Drop, Black Licorice, and Deep Lilac
Silks: Black Licorice and Sparkle
Twine: Black Licorice
Sequins: Special Celebrations
Adhesives: Easy Glide Runner and Foam Squares Med. (some cut in half to use)
Tools: Platinum machine and Details Pro Shears


I colored the BOO! with our Sparkle Silk which really made it pop!

I'm thinking that this would be great to give to our middle granddaughter with some goodies as she is enrolled in California State University at Northridge (north L.A.) and she may need some CARE packages. Just will need to get ahold of her mom to find out what she likes.

StampinCarol

Friday, August 10, 2018

Red Sails in the Sunset

Well, red sails anyway.  I challenged my team to make a card following a sample and using a new set from our new BIG catalog.  My card is a take off of one on page 118 using the set The Bright Side.


I did change things up a little.


Stamps: The Bright Side
Card Stocks: Denim Days, Lemon Drop, Rich Coral, Oatmeal Cookie, and Corrugated Stock
Dies: Journey Rectangles and Border Essentials
Inks: Rich Coral and Black Licorice
Embellishments: Fashion Gold dots and Candy Apple Twine
Adhesives: Easy Glide Runner, Glue Dots, Craft Glue, and Foam Squares Med.
Tools: Platinum machine

Our catalogs have OODLES of inspiration to help you design your cards. I think our big catalog have over 500 fun ideas...  Challenge yourself to CASE one or, like me, use it's general layout and colors.

StampinCarol

Wednesday, August 8, 2018

Looking Forward to Fall and My Desk

Seems like I just blinked and Wednesday is here again!  How fast time appears to be going by and I think the older I get the fast time goes!  Do you have this "problem"?  Anyway today it our weekly What's On Your Workdesk Wednesday and I have my desk view ready for you.  I took it yesterday afternoon while I was busy working on a project.  And my weekly desk view and many others are all brought together by our lovely head desker, Julia, at the Stamping Ground.


I was working on a card idea for my September Halloween class.  Yes, I have to start getting ready as we're going to visit our kids the first 2 weeks of Sept. and I have to be ready before we go!  So, let's see... front left to right... paper trimmer then my pack of Black paper with stamps and dies on it. Next my little MISTI sitting in my work area. Then a small piece of paper with BOO and a little ghostie stamped on it next to my ATG adhesive roller.  Middle from left to right my SNC, my red box with acrylic blocks, some wiggle eyes (not used after all), my card as I work on what layers where, a black ink pad, tools, a card that just doesn't work and my OTT light.  Back left to right, baskets of stuff on a shelf, more shelves and baskets with stamp stuff, then my ink pad rack.  I did manage to finish my card and get the directions wrote up but not ready to share it yet.  But if you look at the top center you see some rosettes and such and the top one is what I made just before I started on my card and now I will show it to you.


I think it turned out very nice and will probably hang it somewhere when we get to the right season.  Right now we're in the triple digits F and I'm staying in as much as possible. We do have breakfast outside on the patio but then it's nice and warm (not cool). Love watching the quail, wrens, hummingbirds, doves, and rabbits out in the yard.


Here's a closer look at the center of my rosette. I stamped the leaves with a clear pigment ink then colored with PanPastels. The gold really makes the leaves shimmer.

Well, I'm done. I do have to prepare today for my morning FB Live video so have to come up with a card to make.  I actually do Lives Wednesday and Fridays. I will have to take 2 weeks off while we're gone unless I do some scenery shots while we're traveling.

Please now head over to the Stamping Ground and check out the links to the other desks!

StampinCarol

Monday, August 6, 2018

It's a Wonderful Time

I hope to get my newsletter out today to my class ladies and customers and this is one of the cards I'll be teaching on Aug. 24.  I used the beautiful "Most Wonderful" stamp set that I got when I registered for the July 14 FSJ LIVE event.


This is a pretty large stamp as you can see so it can be a bugger to come up with a bunch of different designs using it.


And I love our new "Branch & Cone" die set along with elements from our "Snapshot Frames" die set. The Snapshot Frames set has great dies for an assortment of holidays!

Card Stocks: Whip Cream, Hazelnut Blend, Oatmeal Cookie, Kiwi Slice, Fresh Forest, Cranberry Bliss, and Through The Year Prints
Ink: Black Licorice
Silk: Sparkle
Embellishment: Berry & Holly Dots (retired)
Adhesives: Foam Squares, Journey Craft Glue, Glue Dots, and Easy Glide Runner
Tools: Platinum machine and Details Pro Shears

My class is schedule for Friday, the 24th at 10 am. at the Sahuarita First Assembly Church in Sahuarita, AZ.

StampinCarol

Friday, August 3, 2018

Silent Night Christmas Ornament

This past Wednesday I made a FaceBook Live video showing how I made the ornament I'm going to show here.  It was funny that even though I was mostly prepared so much happened before hand that I was discombobulated by the time I started it!  And I really should wear some makeup!  But anyway, I didn't finish my ornament until AFTER the video so here it is, completed.


I started with our DIY Hoops and painted one of the largest ones with our Whip Cream paint (on sale this month!!!).  After it was dry I laid it on a piece of Whip Cream card stock and traced it as we don't have any circle dies this particular size then cut out the shape with my Details Pro Shears.  I then embossed the circle with our Tiny Dots embossing folder (a freebie with a $75+ order) on my Platinum machine (I have the Platinum 6 machine on order and it's supposed to arrive the end of the month).  I glued the embossed circle to the back of the DIY hoop.


I die cut the elements from our Holy Nativity Die Set with Whip Cream and Brushed Gold card stocks and adhered them as shown using our Foam Squares, both medium and small and even then I had to cut them in half to use.

The sentiment is from our Silent Night stamp set and I used Black Licorice ink.  It's adhered to the hoop using Glue Dots.  Last but not least I cut a length of Journey Gold Thread to hang the ornament.

I love how this looks and will be showing it (and previously posted ornaments) at a Make It Party today.  The party is like a home party with a hostess and a push for sales.  The gals will be making 2 cards.  I've shared one, it is the Washi Cross card but I haven't shared the other card yet.

StampinCarol


Wednesday, August 1, 2018

Desks and Gnomes

Hmmm..... Desks and Gnomes.  What do they have in common?  Absolutely nothing but I have both to show you today!  This is Wednesday, the day I show you my desk in whatever shape it was in yesterday afternoon at whatever point in time I grab my camera. And I link up with Julia at the Stamping Ground along with quite a few other crafters who are willing to share their desks. But I do have a project to show you, too.

But first, my desk....


I'm in the process of starting on some card kits for a home party scheduled Friday morning. Right now I have 4 confirmed (includes the hostess) and 2 maybes.  I'll be prepping for 8.  I'll know more tonight when we have dinner with the hostess and her hubby (good friends!).
So, on my desk from left to right in front: a pile of paper, a plastic box with embellishments for one of the card, my work space, a collection of PanPastels that we'll be using,  and my Platinum with scraps and some goodies under the platform and my ATG adhesive roller on top.
Middle is my ScanNCut, a little red bag with some cards and envelopes as the hostess gift, stamps and directions for the cards, my OTT light, and a green basket of odds & ends.
Back is shelving of misc., a shelf of more misc, then my ink pads.

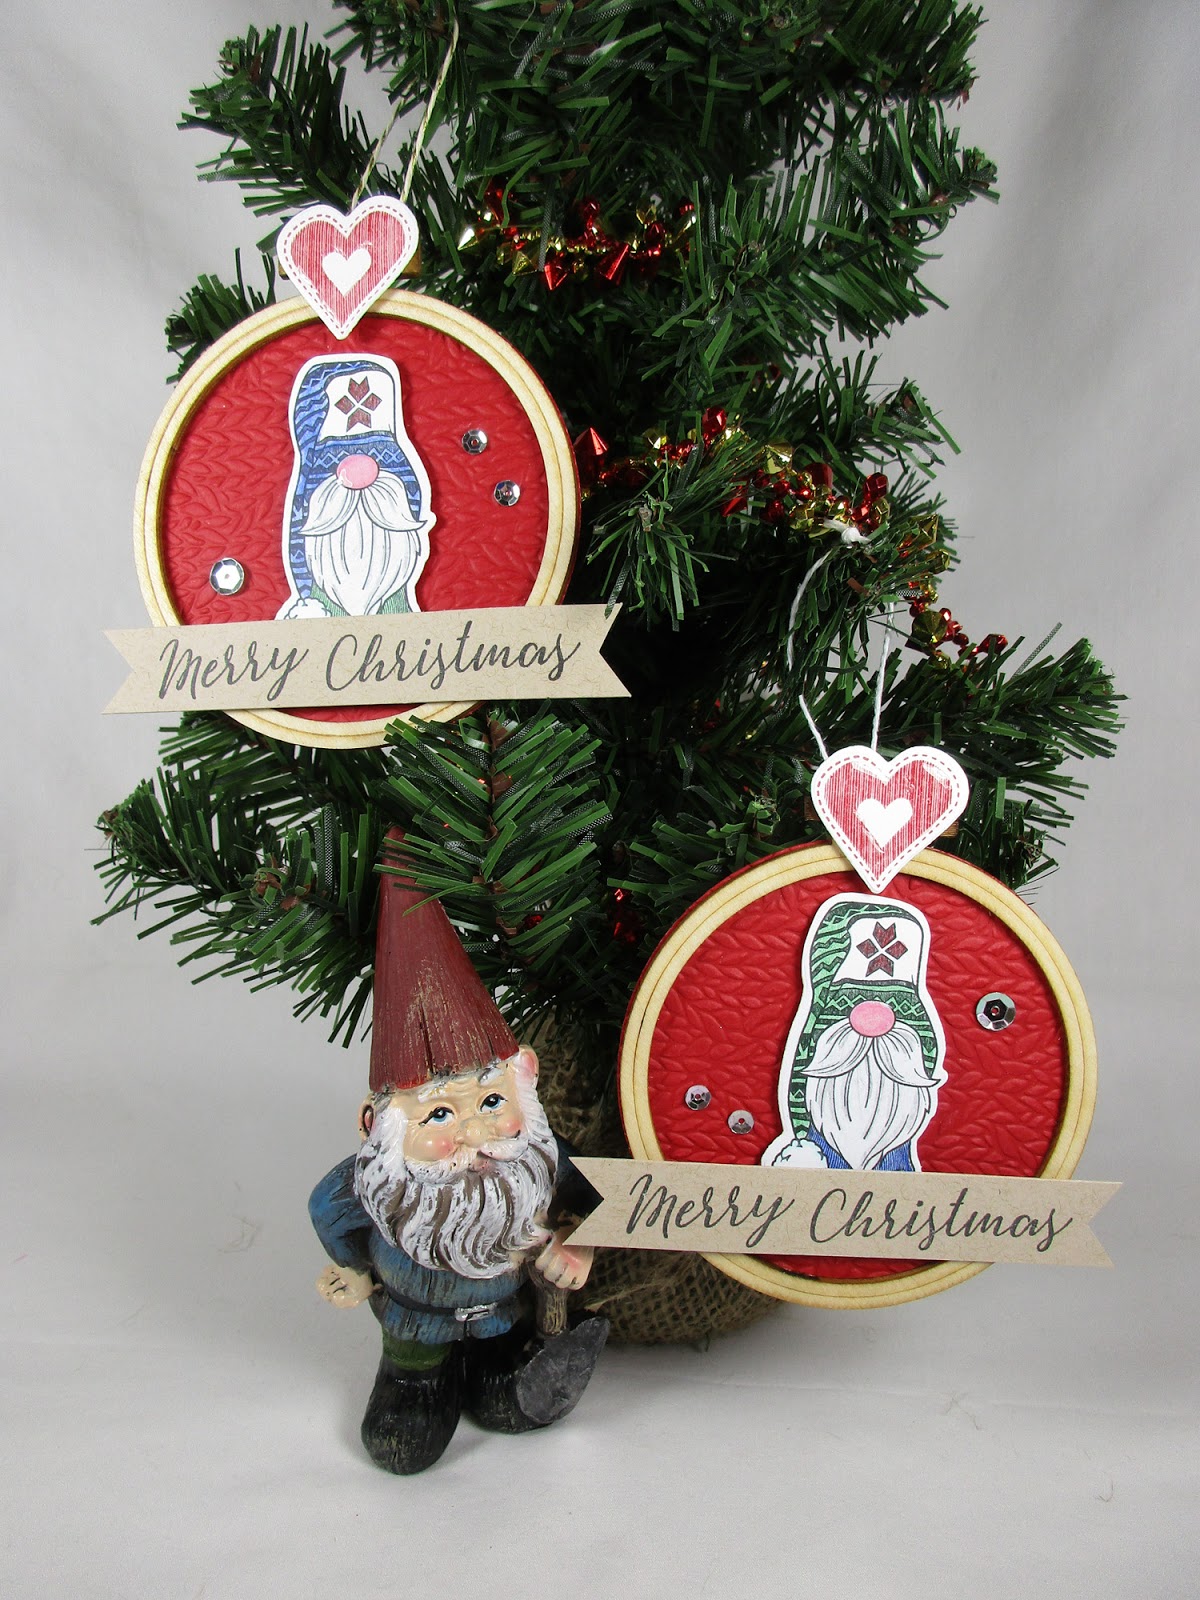
And for my project....  Today our new Holiday Mini catalog goes live and I made some fun ornaments using a stamp set from it.  When I seen the "Gnomes for the Holidays" stamp set with coordinating dies I just fell in love!!  I seen a similar project  on a video and had to make these.  I think they're  adorable!


These little embroidery hoops are about 3 1/4" across and about 1/8" thick.


These would be fun as package toppers, too!  I'll be making more of these!

Ok, I'm done.  I hope you enjoyed my post.  Please head over to the Stamping Ground and check out all the links!  And who knows what fun projects are being shared!

StampinCarol